Contact Us 1-800-596-4880

Configuring SSO When No Identity Provider Is Configured in Anypoint Platform

This use case includes instructions for setting up an identity provider for your portal when no other identity provider is configured in Anypoint Platform. Since no identity provider is configured, the default identity provider automatically maps the identity provider for the portal to the identity provider in Anypoint Platform, providing every Salesforce user an identity in Anypoint Platform. See Out-of-the-Box Configurations for more information about the default identity provider.

Before You Begin

  • In the identity provider of your choice, the users or identities must exist for the users with access to the application.

  • Review the information in the Before You Begin section to understand the roles, permissions, and other information that API Experience Hub requires to configure custom user attributes and claims for the identity provider.

Step 1: Enable SSO for Your Portal

To enable SSO, an identity provider is required for Anypoint Platform to create identities in Anypoint Platform for Salesforce users.

In this step, you create an application in the identity provider for the API Experience Hub portal, enable the ability to send group information in the application configuration, configure groups, and configure the default identity provider. Performing these steps require you to move back and forth between applications and the identity provider application to copy or add information.

Create and Configure an Application Using One of the Following Example Methods:

  • Create and Configure an Application Using Okta OpenID Connect

  • Create and Configure an Application Using Okta SAML

Create and Configure an Application Using Okta OpenID Connect

Details

Create a new application for the API Experience Hub portal in the identity provider using OpenID Connect.

  1. In Okta, create an OpenID Connect Web application. For more information, see Create OIDC app integrations.

  2. From the General Settings section, complete the following fields:

    Field Value

    App integration name

    Enter a name for the app.

    Grant type

    Select Authorization Code.

    Assignments

    Select Limit access to selected groups.

    Selected group(s)

    Enter the name of the group who must have access to the application.

  3. Verify that your identity provider sends the expected claims listed in the Before You Begin section.

  4. Configure the claims that the application sends.

    For example, for OpenID Connect for Okta, configure the groups claim using the following steps:

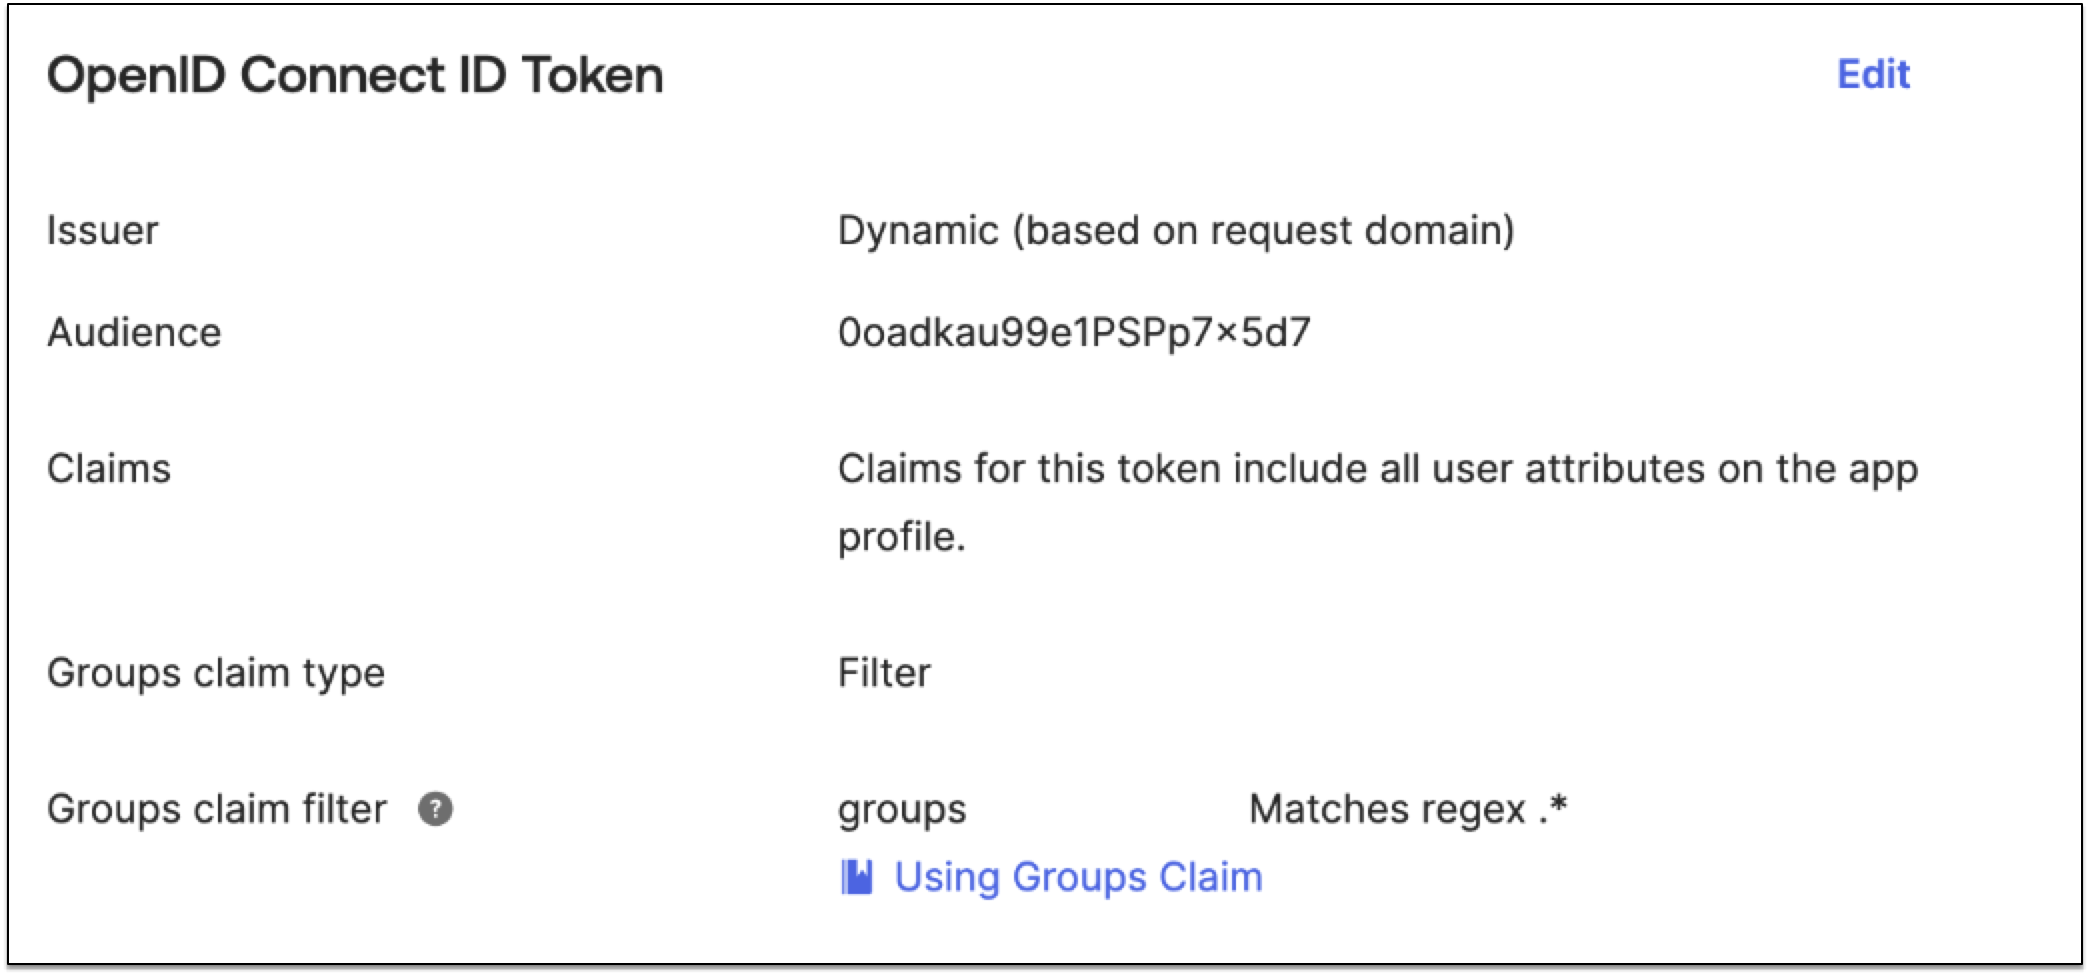
    1. From the Sign On tab, click Edit from the OpenID Connect ID Token section.

    2. From Groups claim type, select Filter.

    3. From Groups claim filter, enter groups.

    4. Select Matches regex for the expression then enter .* for wildcard.

      Groups Claim Filter example
  5. Configure an authentication provider for Salesforce using OpenID Connect.

    You set up the auth provider or SSO settings in Salesforce with the identity provider application information.

    1. From the OpenID Connect application, get these configuration values:

      • Client ID

      • Client Secret

      • Authorize Endpoint URL

      • Token Endpoint URL

      • User Info Endpoint URL

    2. In Salesforce, go to Setup.

    3. In the Quick Find box, enter Auth, and then select Auth. Providers.

    4. Click New.

    5. For Provider Type, select OpenID Connect.

    6. Complete the following fields:

      Field Value

      Provider Type

      OpenID Connect

      Name

      Enter a name for the provider.

      Consumer Key

      Enter the client ID from the identity provider.

      Consumer Secret

      Enter the client secret from the identity provider.

      Authorize Endpoint URL

      Token Endpoint URL

      User Info Endpoint URL

      Default Scopes

      profile openid email groups

      Registration handler

      AEHPortalRegistrationHandler

      Execute Registration As

      Select an administrator user.
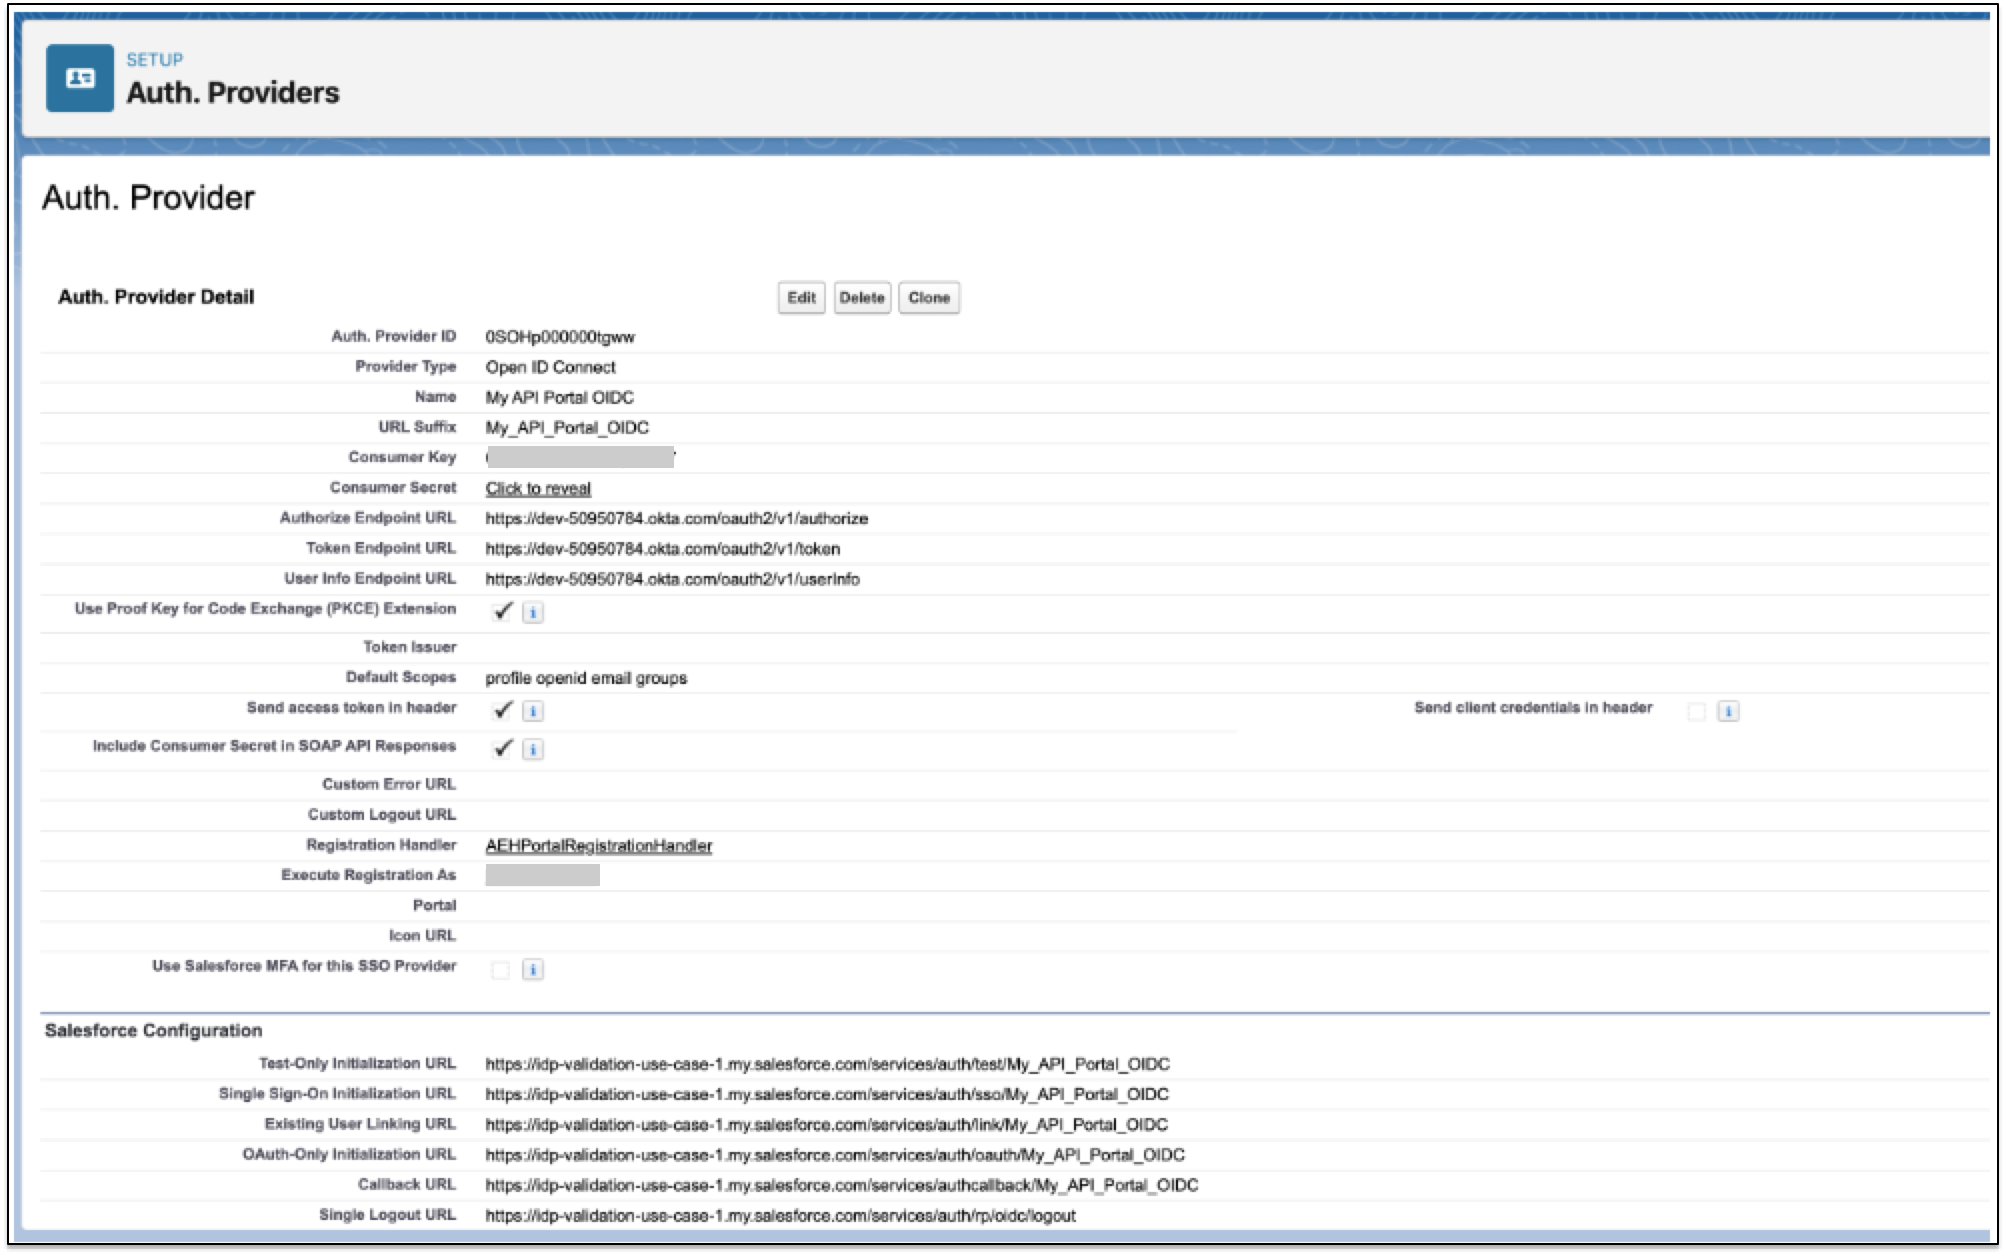
      Salesforce Auth. Provider example
    7. Click Save.

  6. Configure the redirect URIs for the portal.

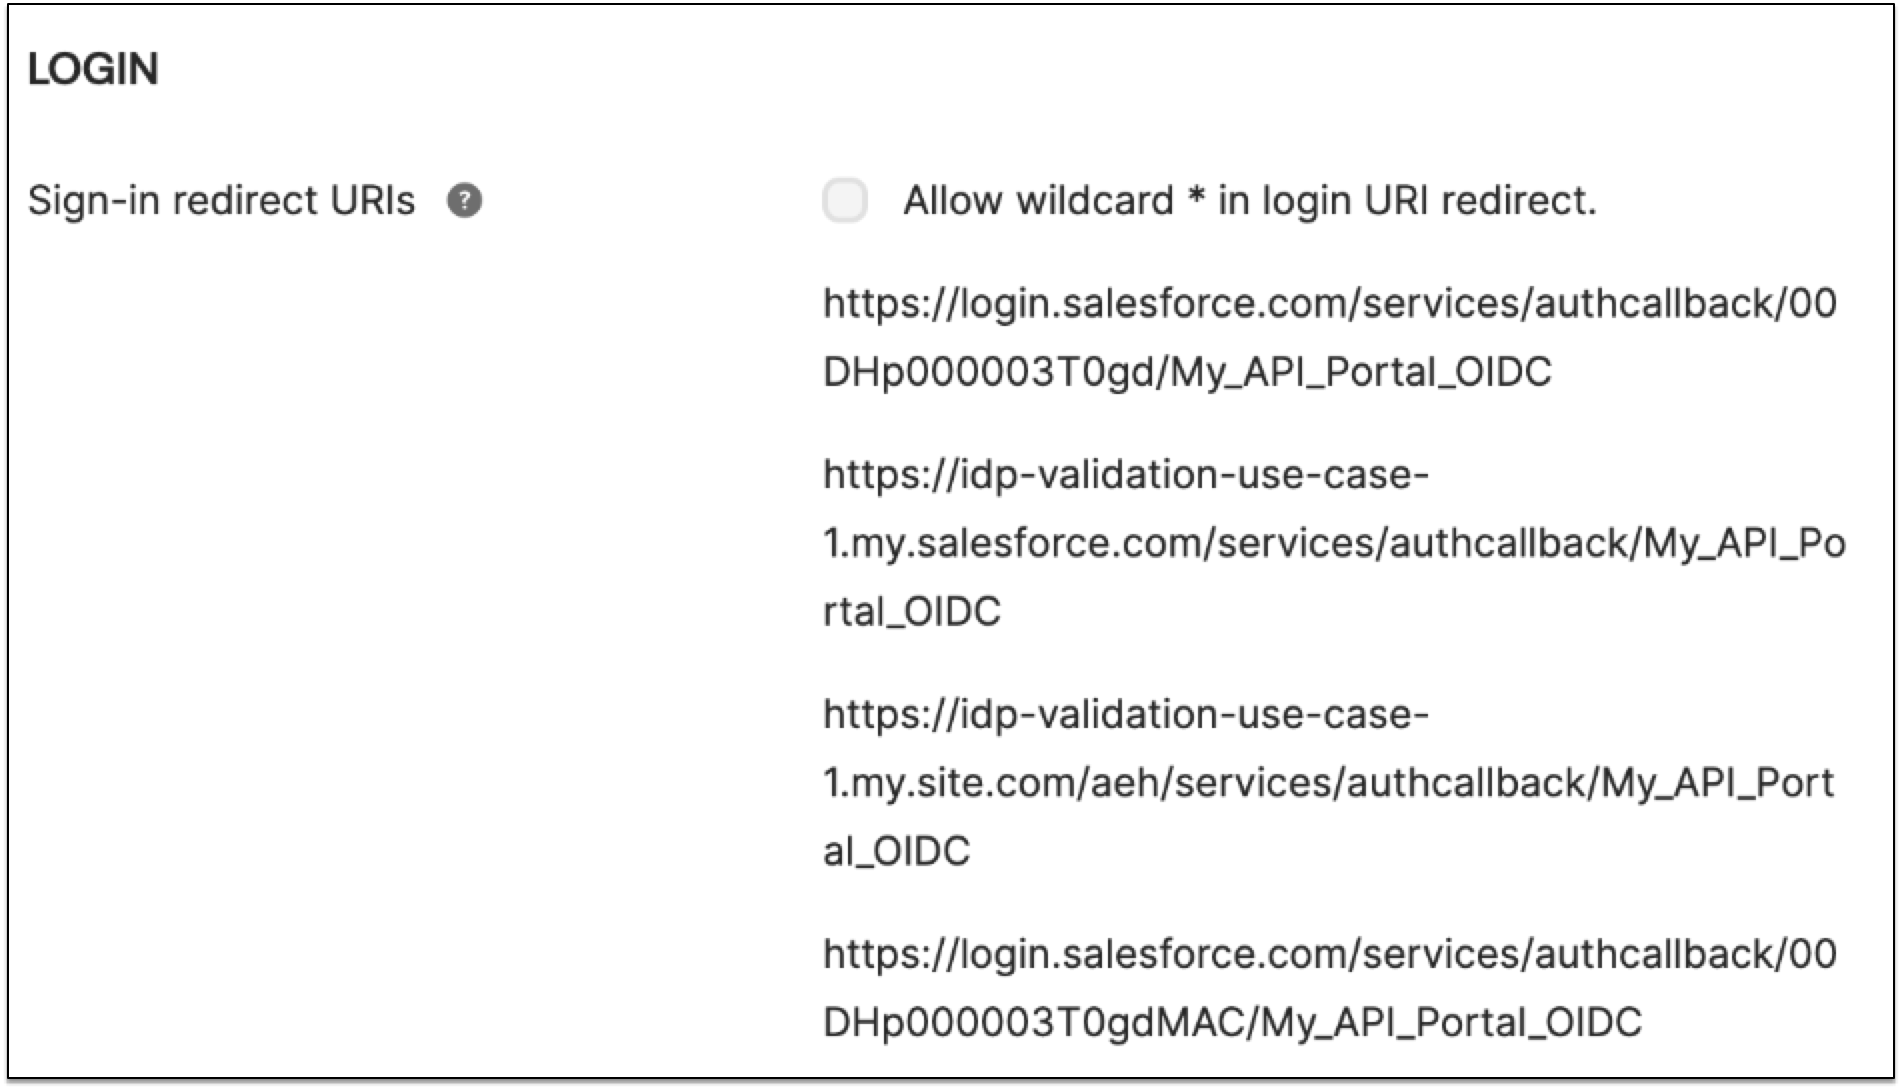
    To configure the redirects, use your 15 digit organization ID and 18 digits org ID and add a URL for each organization ID.

    1. In the Okta application, select the General tab. Add the following URLs for Sign-in redirect URIs:

Create and Configure an Application Using Okta SAML

Details

Create a new application for the API Experience Hub portal in the identity provider using SAML. For more information, see Create SAML app integrations in the Okta documentation.

  1. From Okta, create an SAML application.

  2. In General Settings, enter a name for your SAML application.

  3. Select Do not display application icon to users.

  4. Click Next.

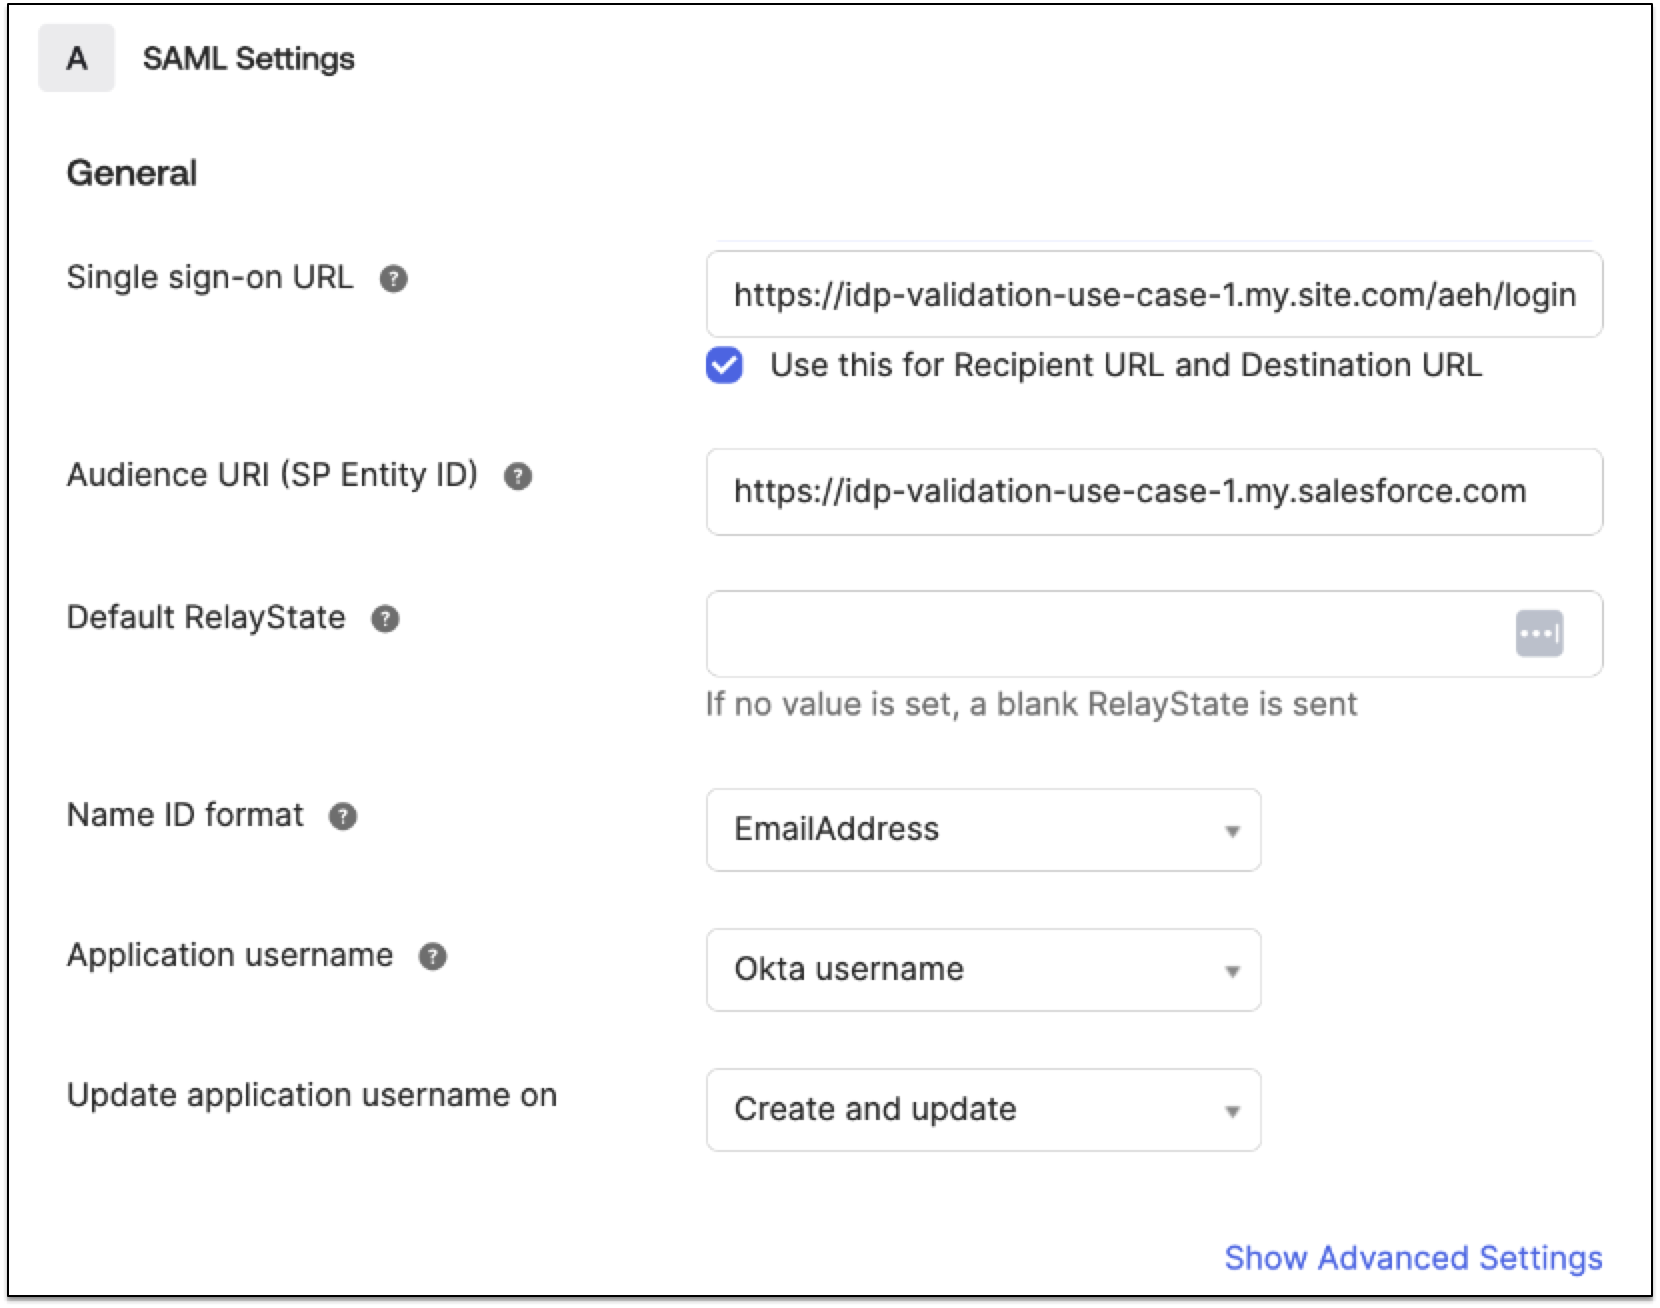
  5. In SAML Settings, complete the following fields:

    Field Value

    Single Sign-On URL

    Enter the URL for the portal login.

    Use this for Recipient URL and Destination URL

    Select this option.

    Audience URI (SP Entity ID)

    Enter https with the Salesforce domain or example, https://{salesforcedomain}.com.

    Name ID format

    EmailAddress

    Application username

    Okta username

    Update application username on

    Create and update

    SAML Settings example
  6. Review the Before You Begin section for information about what API Experience Hub expects for claims to properly map users in the identity provider.

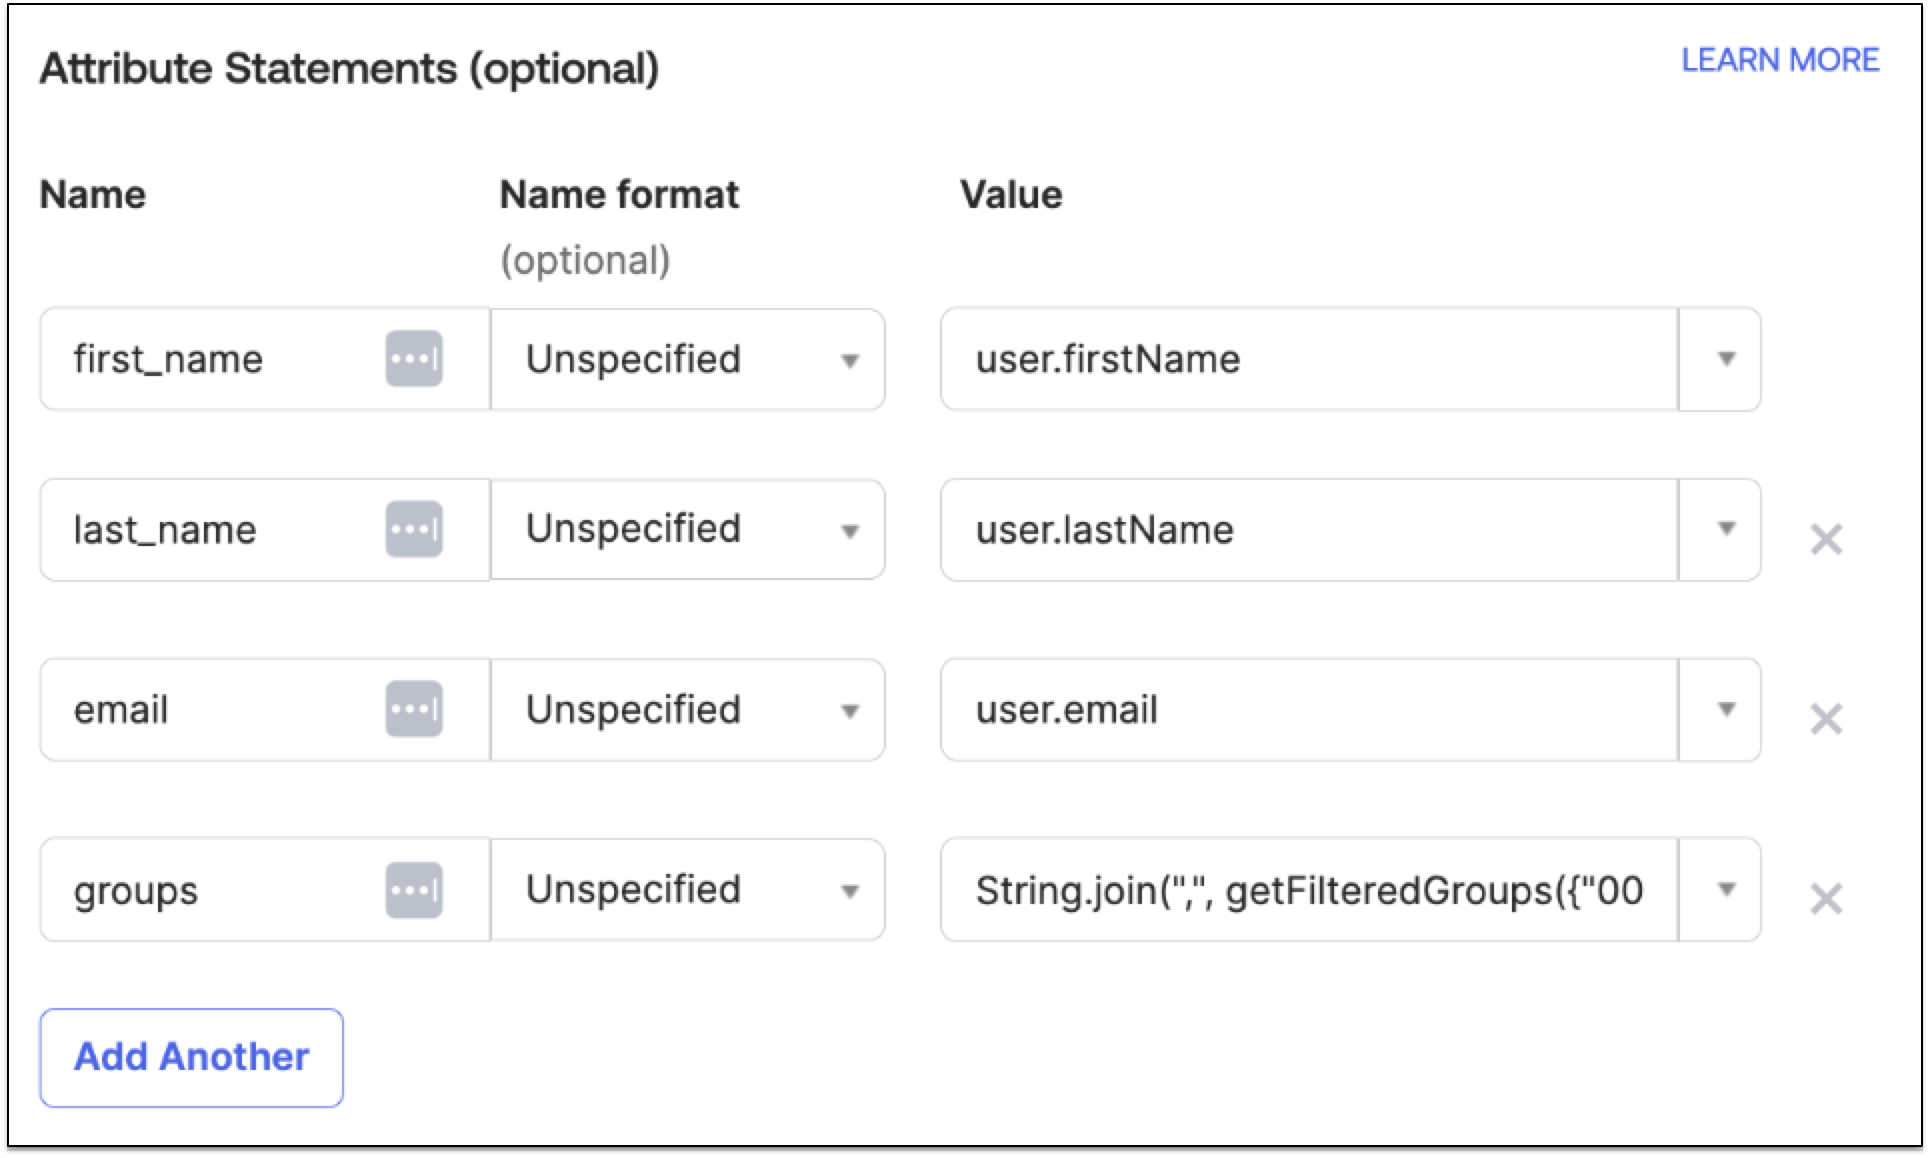
  7. In the Attribute Statements (optional) section, configure the SAML integration by adding the following custom attributes. For supported formats, see Custom User Attributes:

    Name Name format Value

    first_name

    Unspecified

    user.firstName

    last_name

    Unspecified

    user.lastName

    email

    Unspecified

    user.email

    groups

    Unspecified

    (",", getFilteredGroups({"00gdkat3p5RCvkQQC5d7", "00gdjgk337kYDxtE35d7"}, "group.name", 40))

    SAML Attribute Statements example

    The example IDs, 00gdkat3p5RCvkQQC5d7 and 00gdjgk337kYDxtE35d7 correspond to the groups that you want to send. Ensure that you send all Anypoint Platform groups when you’re configuring Okta in Anypoint Platform. Otherwise, the user can lose access.

  8. Click Next.

  9. Select I’m an Okta customer adding an internal app.

  10. Click Finish.

  11. Select the Assignments tab and select Groups.

  12. Click Assign and select Assign to groups.

  13. From the list, click Assign from the row of the specific group and click Done.

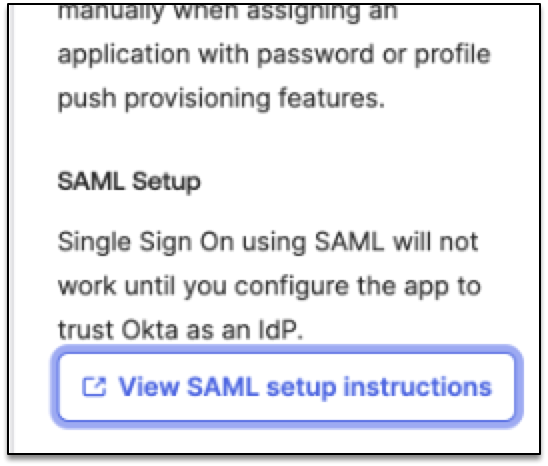
  14. Select the Sign On tab, click View SAML setup instructions to see instructions about how to configure SAML for your application.

    View SAML setup instructions button
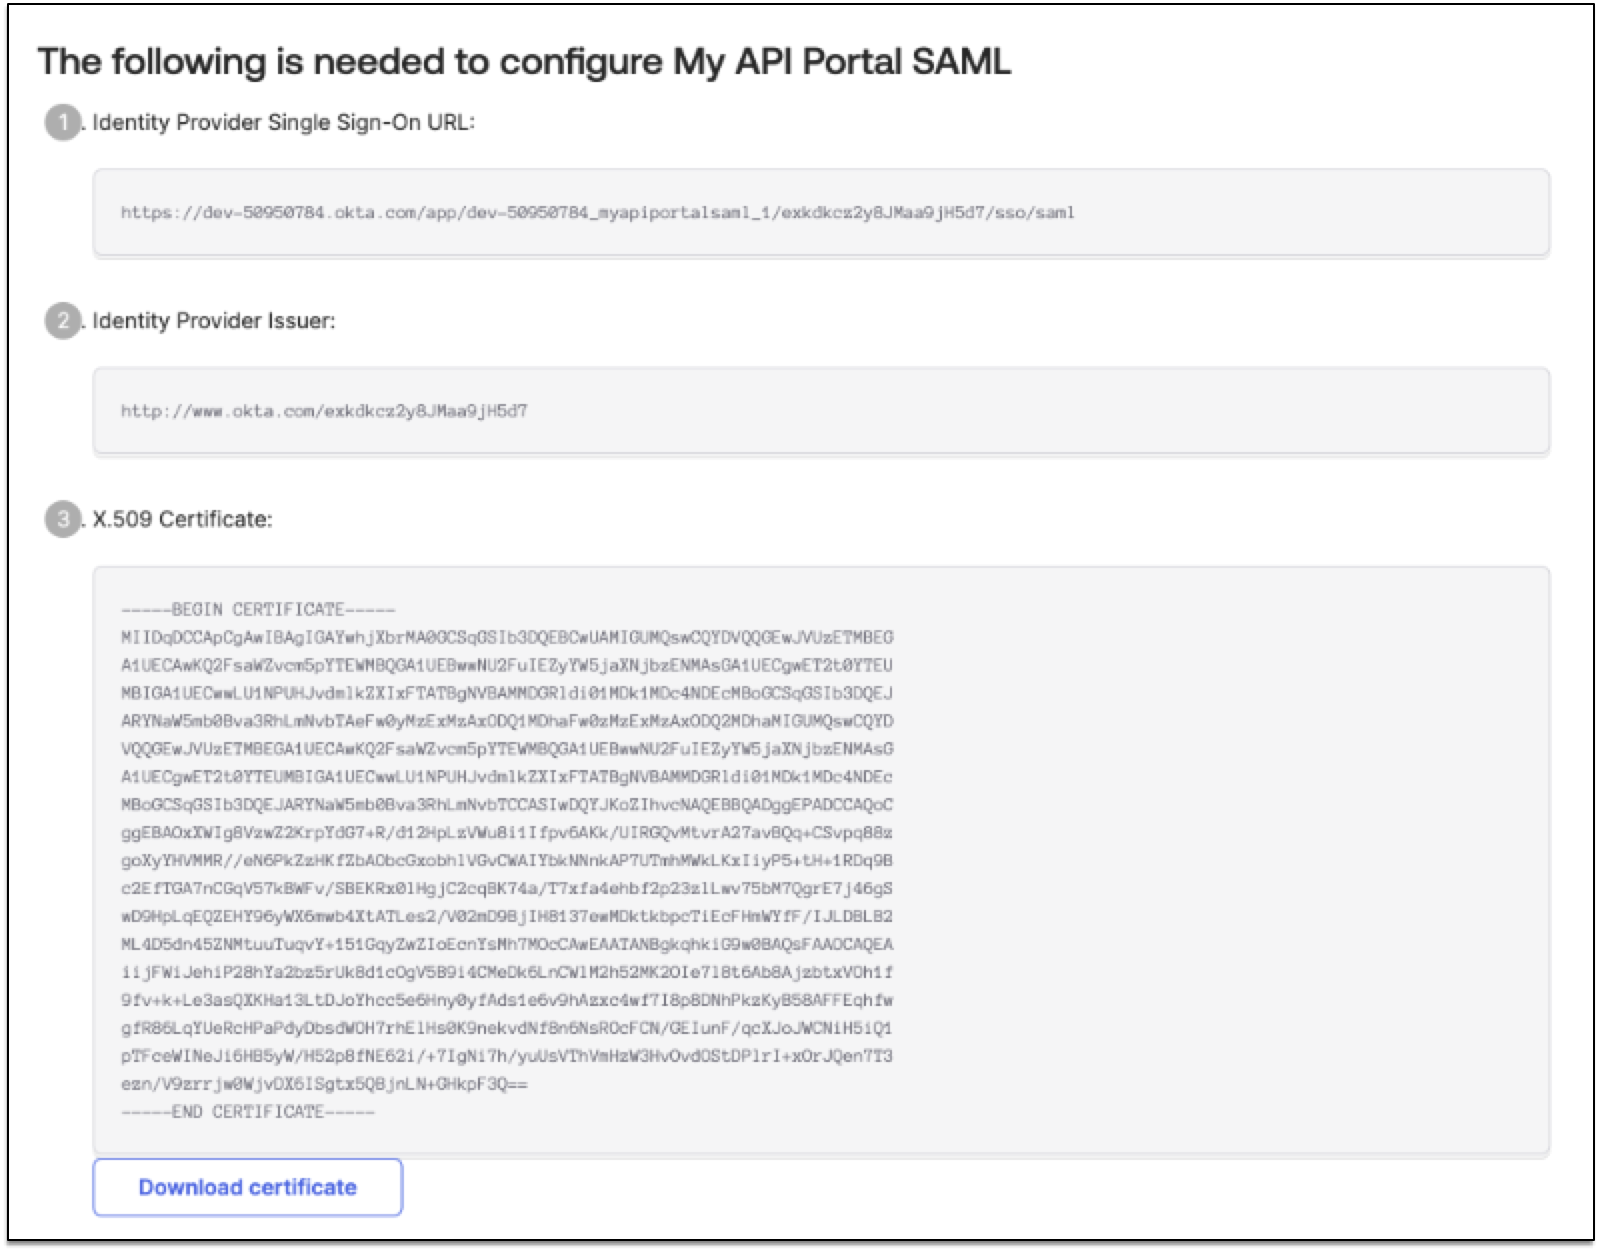
  15. Get the following information from the instructions page to configure the Single Sign-on Settings tab in Salesforce:

    • Identity Provider Single Sign-On URL

    • Identity Provider Issuer

    • X.509 Certificate (download the certificate)

      SAML instructions to set up page
  16. Go to Salesforce > Setup > and search for Single Sign-On Settings.

  17. From the Single Sign-On Settings tab, Federated Single Sign-On Using SAML section, select SAML Enabled and click Save.

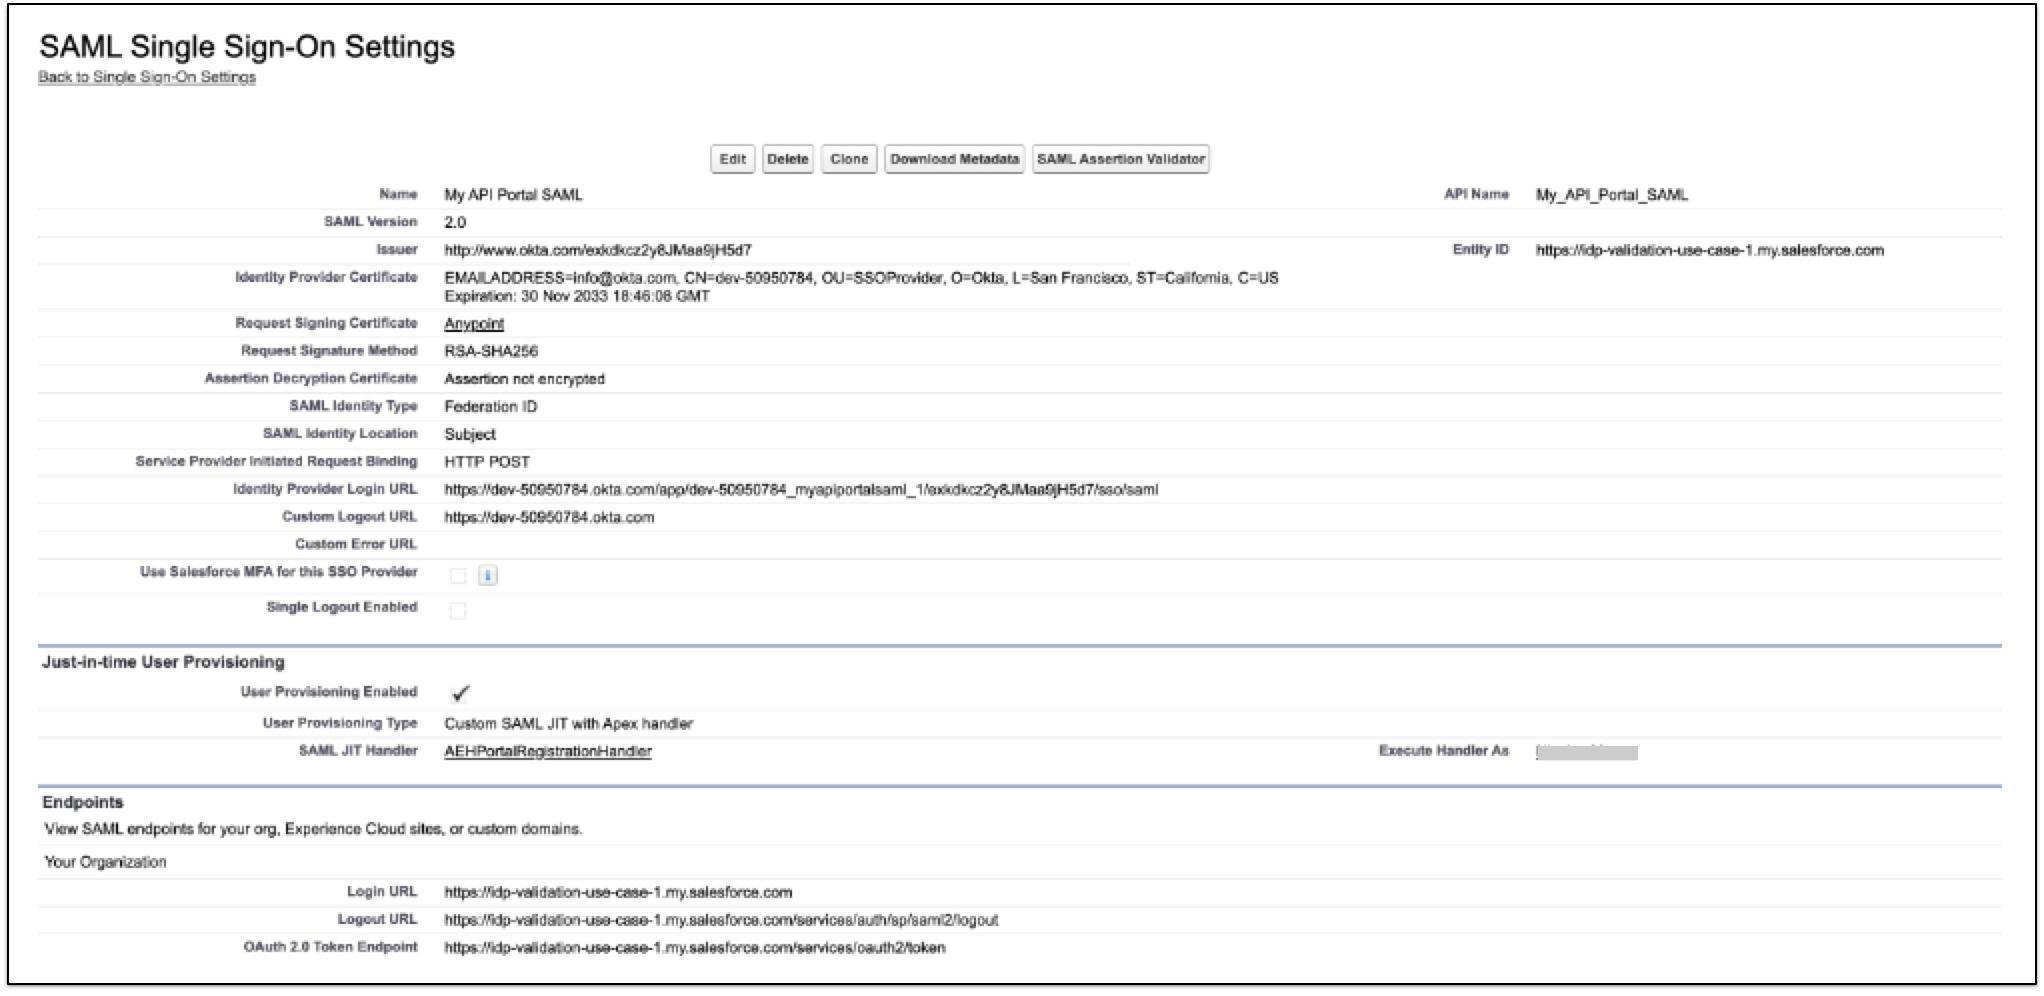
  18. From the Single Sign-On Settings tab, click Edit and complete the following fields:

    Field Value

    Issuer

    Match the Identity Provider Issuer from the View SAML setup instructions.

    Entity ID

    Match the Audience Restriction you set in the application.

    Identity Provider Certificate

    Upload the certificate previously downloaded from the View SAML setup instructions.

    SAML Identity Type

    Assertion contains the Federation ID from the user object.

    SAML Identity Location

    Identity is in the NameIdentified element of the Subject statement.

    Identity Provider Login URL

    Match the Identity Provider Single Sign-On URL from the View SAML setup instructions.

    Custom Logout URL

    Okta URL

    User Provisioning

    Enabled

    User Provisioning Type

    Custom SAML JIT with Apex Handler

    SAML JIT Handler

    AEHPortalRegistrationHandler

    Executed Handler As

    Select a system administrator.

    SAML Single Sign-On Settings example

Step 2: Add Salesforce Identity Providers

After the identity provider is configured for Salesforce, add and enable the identity provider from the API Experience Hub UI. When the identity provider is enabled, users can log in to the portal using this identity provider.

  1. Go to API Experience Hub > User management.

  2. From the User management page, select the Login settings tab.

  3. From the Single sign-on (SSO) section, scroll down to step 2 Add Salesforce identity providers.

  4. Click Select identity provider and select an option from the drop-down menu.

  5. Click + Add identity provider.

  6. Move the slider to Enabled.

Step 3: Add Group Mappings

When setting up SSO for the portal, your users must have an identity in both Salesforce and Anypoint Platform. SSO users are mapped to teams using their group names. You must map your users to teams using Access Management. API Experience Hub provides an out-of-the-box team called AEH Portal - ${salesforceOrganizationId}_${salesforceCommunityId} that is added automatically as a team in Access Management.

Add group mappings by adding the user to the corresponding profile in API Experience Hub:

  1. Go to Access Management > Teams.

  2. Select AEH Portal Guests > AEH Portal Members.

  3. Select External IdP Groups.

  4. From the Group Name field, enter AEH Members.

  5. From the Provider Name field, select the name of the corresponding Salesforce identity provider.

  6. From the Type field, select Member and click Add.

    Access Management group mapping
  7. Click Save Changes.

    The SSO users associated with the group you designated are assigned to the team.

Step 4: Test the SSO Configuration

Verify that the SSO for the portal is configured properly.

  1. In a browser, open an incognito window.

  2. Go to your API Experience Hub portal.

  3. Select the SSO option that you configured.

  4. Log in with a user that belongs to the group you configured in the identity provider for your portal.

  5. Check the visibility of APIs for the user in the portal.

  6. Go to Access Management > Users.

  7. Search using the username to confirm that the user is mapped to the expected identity provider.

  8. Go to the team with the configured group mappings.

    From the Members tab, ensure that you can see your user there.