Adding an MCP Bridge Instance
Omni Gateway MCP Bridge enables you to create MCP servers from your APIs. With the MCP Bridge, you can expose your APIs as MCP tools so agents can discover and call them.
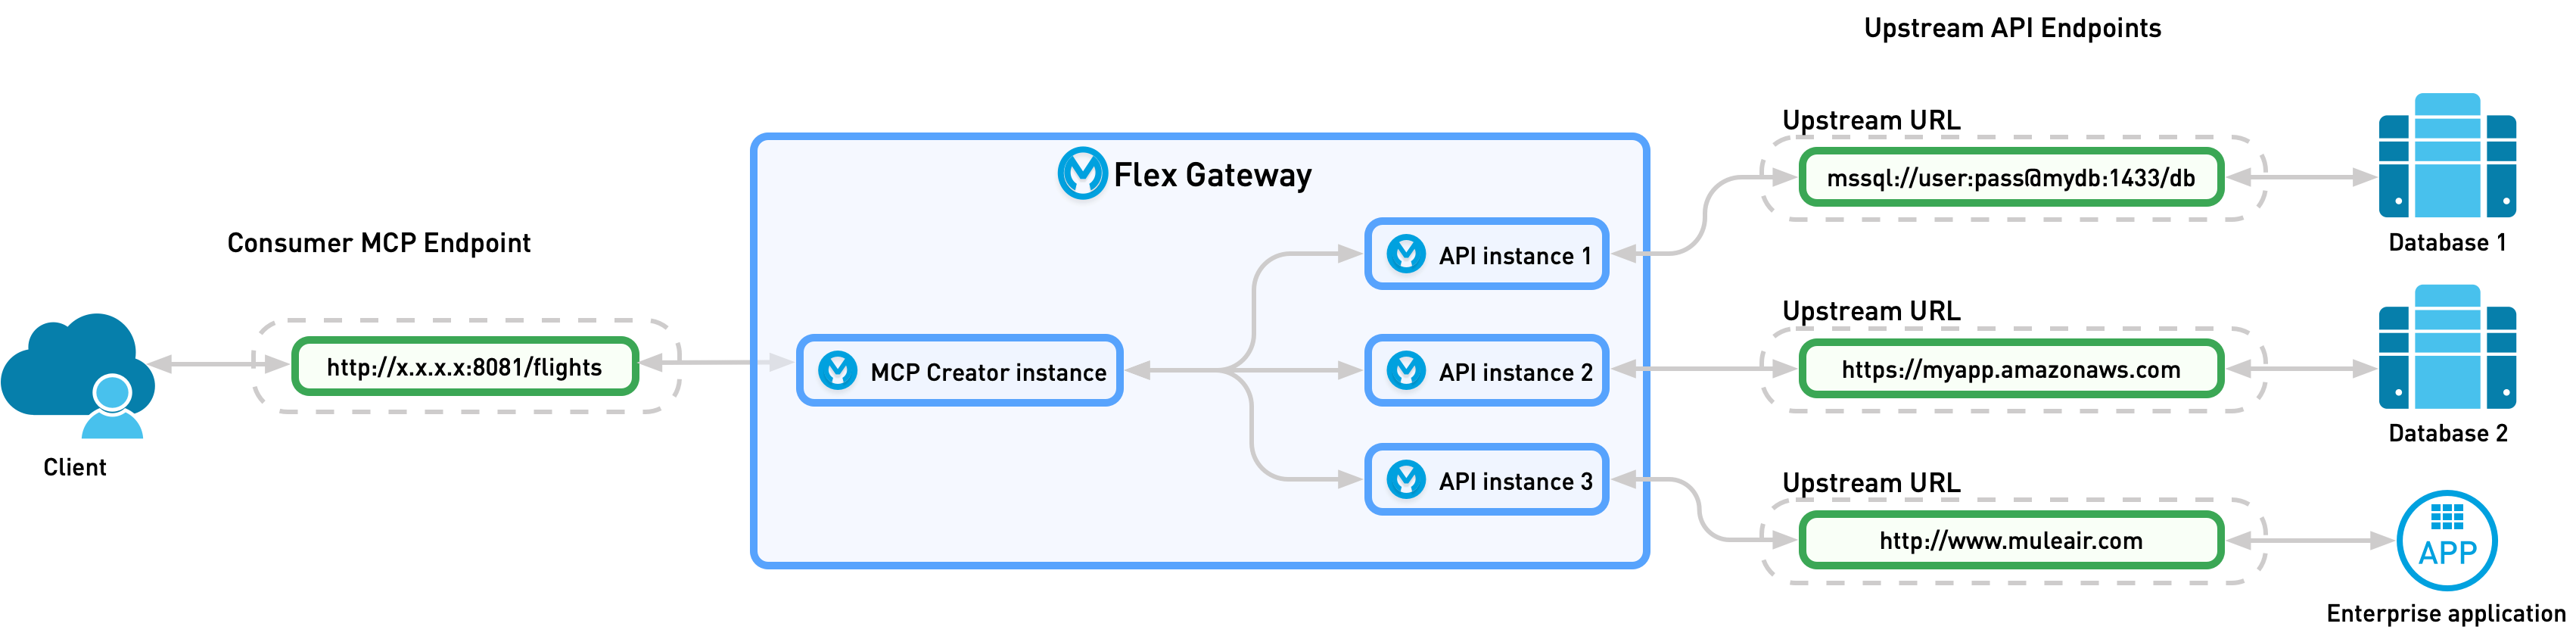
Define your MCP bridge by selecting APIs and mapping them to MCP tools. When an agent requests the list of available tools (tools/list), the gateway responds with an MCP descriptor that defines each tool’s name, description, and input schema. When an agent calls a tool (tools/call), the MCP Bridge maps the tool name and arguments to an HTTP request based on your configuration.
This diagram shows the relationship of the upstream and downstream configurations to your upstream service and agent client:
| MCP Bridge doesn’t support API instances with multiple upstream services. |
| MCP Bridge instances are immutable. After an MCP Bridge is deployed, you cannot add, remove, or modify its tools. To change the tool configuration, create a new MCP Bridge instance. See Update an MCP Bridge. |
Add a New Agent or Tool Instance
To add and a new MCP Bridge for Omni Gateway:
-
Ensure that all APIs you want to add to your MCP Serve exist in Exchange.
-
To begin creating your MCP Server instance, you can start from these locations:
-
From API Instances:
-
Click on an existing API instance you want to add to an MCP Server.
-
Click Actions > Add to new MCP Server instance.
-
-
From Agent and Tool Instances:
-
Click Add > MCP Bridge.
-
-
-
From Select a gateway, choose an Omni Gateway for deploying the MCP server instance.
-
Click Next.
-
Select the APIs you want to add to your MCP Server.
-
Define the MCP server’s asset name.
-
Click Next.
-
Configure the downstream configuration settings:
Managed Omni Gateway
Field Name Description Required Notes Base path
Specifies the URL prefix for all instance paths, relative to the host root. It must start with a leading slash
/.Yes
Client provider
Specifies a client provider for the instance.
No
Anypoint Platform acts as the client provider by default. To configure an external client provider, see Client Providers.
Instance label
Specifies a label for the instance.
No
If you have multiple managed instances of the same asset, add a label to differentiate each instance from the others.
Advanced Options
Consumer endpoint
Specifies a proxy application’s address for consumers to use for sending requests.
No
Self-Managed Omni Gateway (Connected Mode)
Field Name Description Required Notes Protocol
Specifies whether to use HTTP or HTTPS.
Yes
If you select HTTPS, specify a TLS context for inbound traffic.
Inbound TLS
TLS Context used for the inbound HTTPS traffic.
No
Configure a TLS Context for Omni Gateway before adding a TLS Context to your server.
Port
Specifies the number to use if the displayed port is incorrect.
No
Instances can share the same port across the same target if the Base path is different for both instances.
Base path
Specifies the URL prefix for all server paths, relative to the host root. It must start with a leading slash
/.Yes
Instance label
Specifies a label for the instance.
No
If you have multiple managed instances of the same asset, add a label to differentiate each instance from the others.
Advanced Options
Consumer endpoint
Specifies a proxy application’s address for consumers to use for sending requests.
No
-
Click Next.
-
Configure the upstream services for your API instances:
Field Name
Description
Required
Notes
Route Label
Label to better identify multiple API instances.
Yes
By default, the label is the API name.
Upstream URL
URL to access for the upstream service. This must end with a
/.Yes
For example, use the URL of your asset in Exchange.
Outbound TLS
TLS Context used for the outbound traffic to the upstream service
No
Configure a TLS Context for Omni Gateway before adding a TLS Context to your server.
To switch among API instances, select the name of the API.
-
Click Next.
-
Define your API Tools:
-
Select an API to map to a tool.
-
Select an HTTP request Method and Resource.
-
Define an AI tool name.
-
Write a tool Description.
-
Review the suggested Input schema and update it if needed.
-
-
Optionally, click HTTP mapping edit the autopopulated HTTP mapping:
-
Map incoming tool params to:
-
Query Parameters
-
URI Parameters
-
HTTP Headers
-
Payload Body
-
-
Define DataWeave expressions to extract the tool parameters from the incoming request.
-
-
Click Next.
-
Review your selections and edit them if necessary.
-
If you are ready to deploy, click Save & Deploy. Otherwise, select Save to deploy the instance later.
Update an MCP Bridge
MCP Bridge instances are immutable by design. After deployment, you cannot modify the tool list or tool configuration of an existing MCP Bridge instance. This design ensures runtime stability and consistency in LLM-driven workflows, where agents rely on a fixed, predictable set of tools.
Allowing dynamic updates could cause synchronization issues: an agent might operate on a cached tool list while the underlying bridge definition has already changed, leading to unpredictable behavior. This is comparable to modifying an API contract (such as a RAML or WSDL definition) during an active transaction.
To update your MCP Bridge, create a new instance with the desired tool configuration:
-
Follow the steps in Add a New Agent or Tool Instance to create a new MCP Bridge with the updated set of tools.
-
Update any agents or clients to point to the new MCP Bridge instance.
-
Delete the previous MCP Bridge instance when it is no longer in use.