Configuring PGP Cryptography
Mule runtime engine (Mule) can encrypt entire messages or just parts of them using Pretty Good Privacy (PGP). PGP secures messages by combining data compression and encryption. The compression helps reduce the message size, which can speed up transmission within your Mule app. PGP encryption is more resource-intensive than JCE or XML encryption due to its increased complexity.
There are two main PGP scenarios:
-
Encryption
Encrypt an outgoing message in your Mule app using another party’s public key. -
Decryption
Decrypt an incoming message in your Mule app using your own private key.
Use the Cryptography Module PGP operations to configure these scenarios.
| If you’re upgrading to Cryptography Module 2.1, configure the required Java dependencies so your project compiles. For details, refer to Upgrading and Migrating Cryptography Module 2.x. |
| This guide covers the main PGP operations and common use cases. For a complete list of all available parameters and their default values, refer to Cryptography Module Reference 2.1. |
Before You Begin
You are familiar with PGP encryption, concepts of public and private keys, and asymmetric cryptography.
FIPS Compliance Considerations
|
PGP Encrypt operations are not supported in FIPS environments, including MuleSoft Government Cloud. The OpenPGP standard (RFC 4880) mandates the use of RSAES-PKCS1-v1_5 for encrypting the session key, which is blocked in FIPS approved mode. This limitation exists regardless of the symmetric encryption algorithm chosen. Supported PGP operations in FIPS:
For complete FIPS migration details, refer to cryptography-module-upgrade.adoc#scope-and-limitations-fips. |
Configure PGP Operations in Anypoint Studio
Follow these steps:
-
In Anypoint Studio, drag a Cryptography Module PGP operation to the canvas flow.
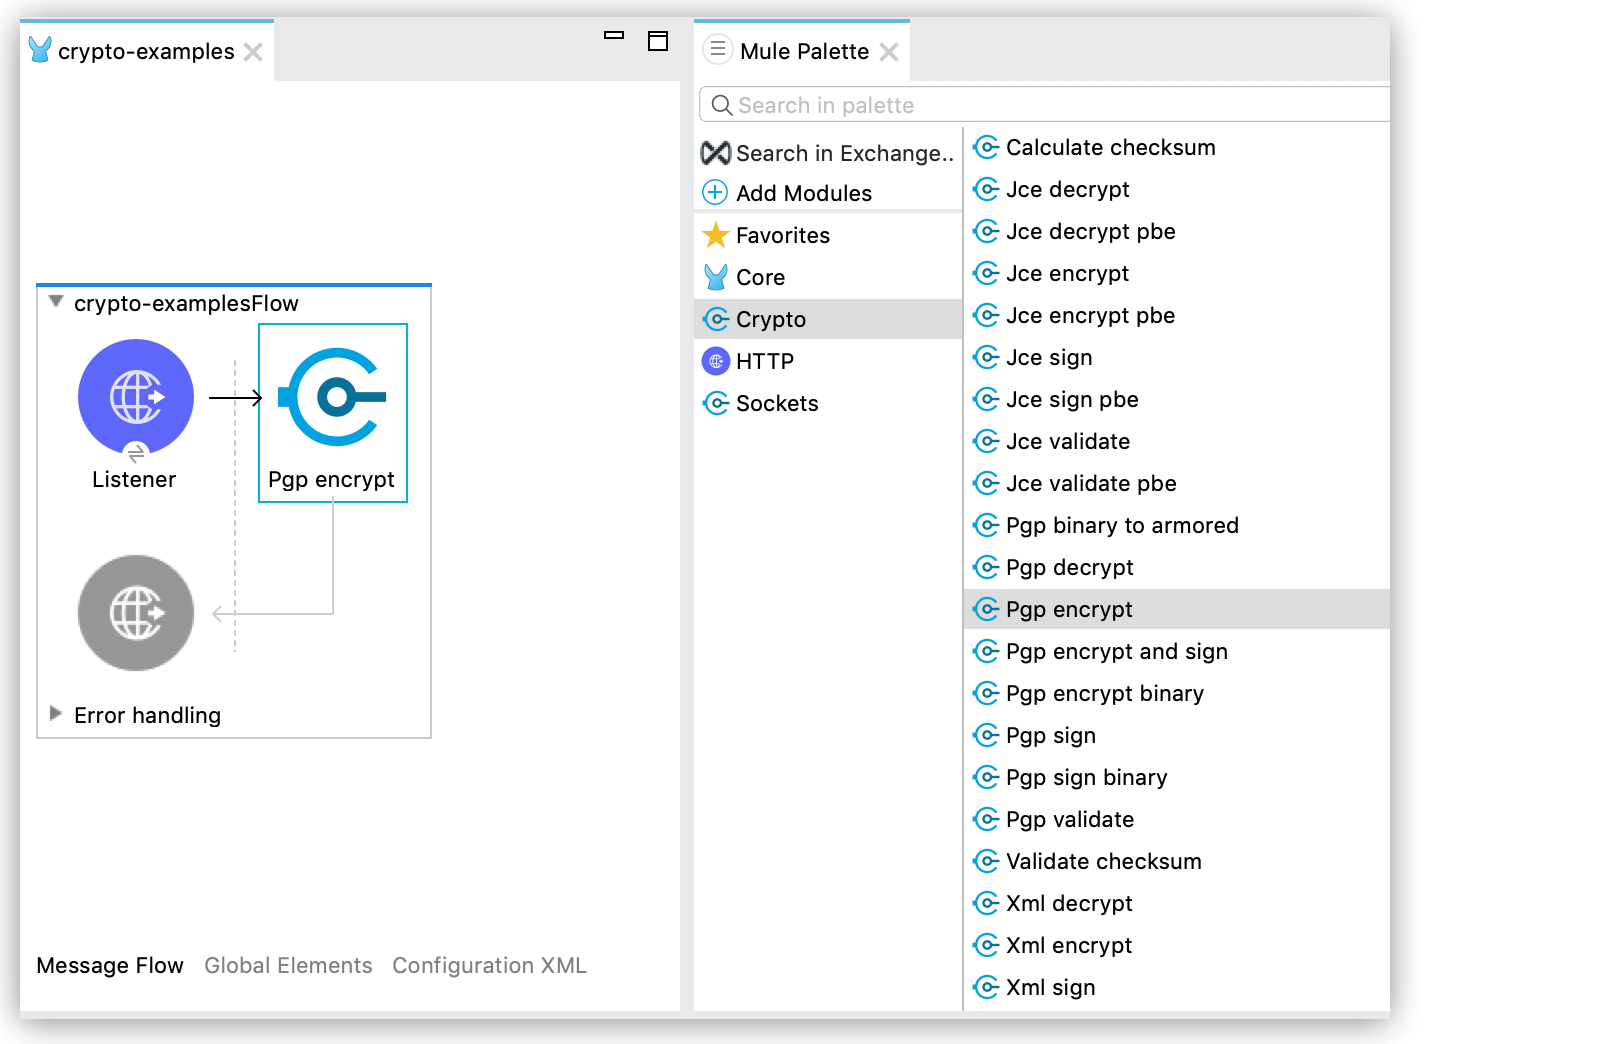
-
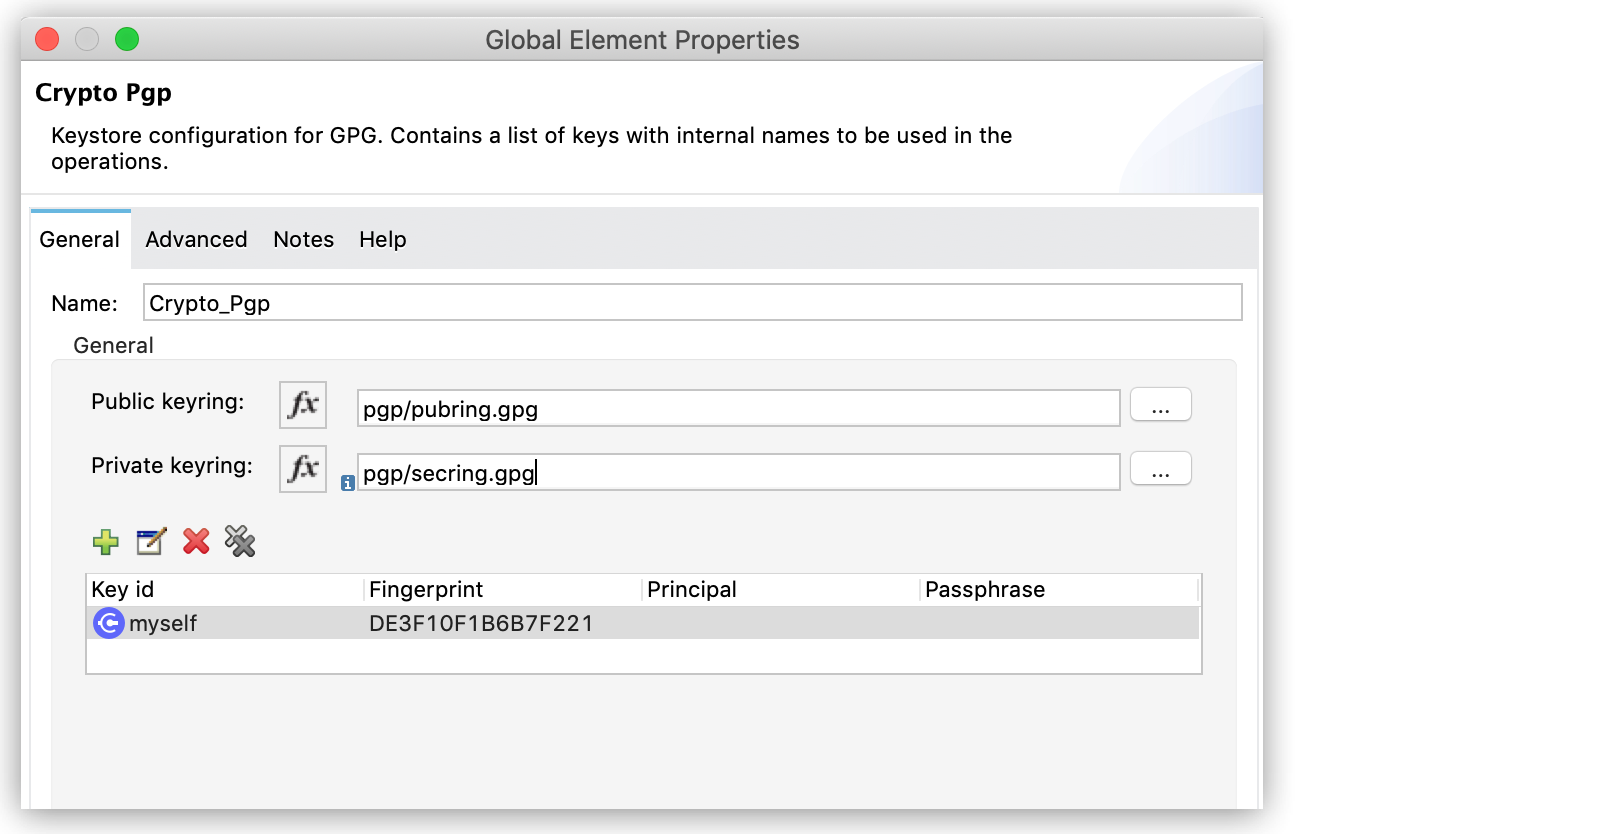
In the operation configuration window, select an existing Module configuration, or create a new one by configuring the Public keyring and Private keyring files.
You can also add asymmetric key information to be used in the sign operations:
-
Configure Key selection by using a Key id value previously defined in the module configuration, or define a new one for this operation:
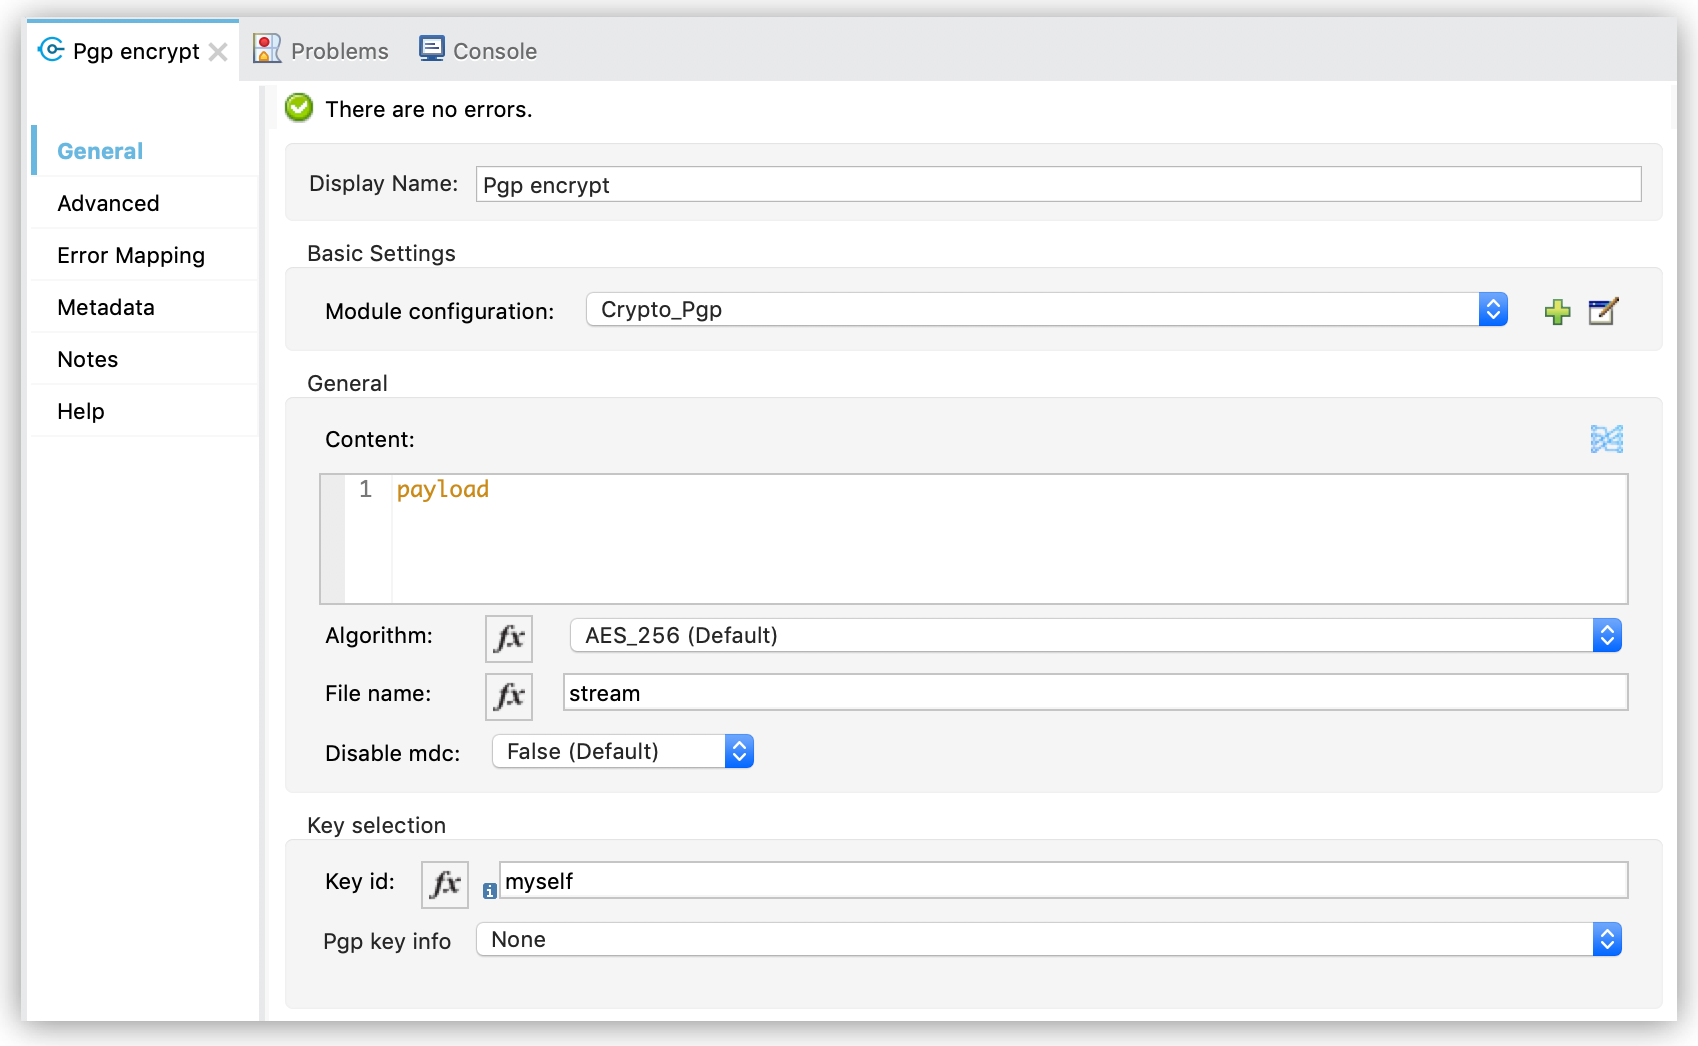
-
Select the algorithm to use during the operation.
Work with Subkeys
According to the RFC-4880 standard, a PGP key can contain multiple subkeys. When you’re working with these subkeys, use the fingerprint attribute within the <crypto:pgp-asymmetric-key-info> XML element to specify which subkey you want to use.
For instance, if you have separate subkeys for signing and encryption, and they use different algorithms, for example, DSA for signing and ElGamal for encryption, reference the correct subkey’s fingerprint for each operation. Therefore, use the ElGamal fingerprint to encrypt your messages and the DSA fingerprint to sign them.
Encrypt Messages with Public Keys
When encrypting messages with PGP, you (the sender) must encrypt the content using the receiver’s public key. Therefore, to encrypt messages in your Mule app using someone else’s public key, add their public key to your keyring. When you configure a new PGP operation in your Mule app, provide your keyring file. The encryption module then uses this file to retrieve the necessary public key for encryption.
Follow these steps:
-
Use a tool like GPG Suite to import the other party’s public key.
-
With the same tool, export the public key, making sure to select binary as the output format. This creates a keyring file with a
.gpgextension. -
Place the
.gpgkeyring file in a location where your Mule app can access it during runtime.
<crypto:pgp-config name="encrypt-conf" publicKeyring="pgp/pubring.gpg">
    <crypto:pgp-key-infos>
        <crypto:pgp-asymmetric-key-info keyId="myself" fingerprint="DE3F10F1B6B7F221"/>
    </crypto:pgp-key-infos>
</crypto:pgp-config>-
Use the Pgp encrypt operation to returns an ASCII-armored encrypted payload, which is suitable for sending over plain-text channels:
<crypto:pgp-encrypt config-ref="encrypt-conf" keyId="myself"/>Use the
disableMDCparameter to disable modification detection code if needed for compatibility with legacy systems. For all available parameters, refer to cryptography-module-reference.adoc#PgpEncrypt. -
Use the Pgp encrypt binary operation to return a binary output instead:
<crypto:pgp-encrypt-binary config-ref="pgp-conf" keyId="recipient"/>Producing a binary output is faster than using ASCII-armored. However, the output is not standard and might not be ideal to send to other systems for decryption.
The disableMDCparameter is also available for this operation. For all available parameters, refer to cryptography-module-reference.adoc#PgpEncryptBinary. -
Use the Pgp binary to armored operation to send a payload with binary output to another system, and transform it to ASCII-armored:
<crypto:pgp-binary-to-armored/>This operation has a single input parameter, the message payload to transform.
Encrypt and Sign
Besides just encrypting, you can also encrypt and sign a message in one atomic operation. This returns a message in ASCII-armored format, similar to a purely encrypted one, but with an added signature inside the encrypted content. This signature acts as an integrity check, verifying the original message hasn’t been tampered with.
To encrypt and sign, the private key of the signer (typically the sender) must be present in the private keyring. This process always produces an ASCII-armored output.
Using the Pgp encrypt and sign operation:
<crypto:pgp-encrypt-and-sign config-ref="encrypt-conf">
    <crypto:encryption-key-selection keyId="recipient-key-id" />
    <crypto:sign-key-selection keyId="signer-key-id" />
</crypto:pgp-encrypt-and-sign>
Decrypt
For PGP decryption, the message receiver must use their private key to decrypt content that was encrypted with a public key. This means the receiver needs to share their public key with anyone who will be sending them encrypted messages.
<crypto:pgp-config name="decrypt-conf" privateKeyring="pgp/secring.gpg">
    <crypto:pgp-key-infos>
        <crypto:pgp-asymmetric-key-info keyId="myself" fingerprint="DE3F10F1B6B7F221" passphrase="mule1234"/>
    </crypto:pgp-key-infos>
</crypto:pgp-config>
In the previous example, notice that you must provide at least three parameters to be able to use the private key ring in the decrypt operation:
-
Key ID (
keyId): the internal ID that allows you to reference this key from an operation. -
Key Fingerprint (
fingerprint): The last 16 characters of your key fingerprint, which can be obtained from your external GPG tool, such as GPG Keychain. -
Passphrase (
passphrase): The passphrase of the private key.
Using the Pgp decrypt operation
<crypto:pgp-decrypt config-ref="decrypt-conf"/>
Use the validateIfSignatureFound parameter to automatically validate embedded signatures during decryption. For all available parameters, refer to cryptography-module-reference.adoc#PgpDecrypt.
|
Sign
Sign a message using a configured private key.
<crypto:pgp-config name="sign-conf" privateKeyring="pgp/secring.gpg">
    <crypto:pgp-key-infos>
        <crypto:pgp-asymmetric-key-info keyId="myself" fingerprint="DE3F10F1B6B7F221" passphrase="mule1234"/>
    </crypto:pgp-key-infos>
</crypto:pgp-config>
Using the Pgp sign operation:
<crypto:pgp-sign config-ref="sign-conf" keyId="myself"/>Validate a Signature
Validate the signature of a message using the signer’s public key.
<crypto:pgp-config name="validate-conf" publicKeyring="pgp/pubring.gpg">
    <crypto:pgp-key-infos>
        <crypto:pgp-asymmetric-key-info keyId="signer" fingerprint="DE3F10F1B6B7F221"/>
    </crypto:pgp-key-infos>
</crypto:pgp-config>
Using the Pgp validate operation:
<crypto:pgp-validate config-ref="validate-conf" value="#[payload]" expected="#[vars.expected]"/>