カスタムポリシーの作成
カスタムポリシーを作成するには、ユーザーが組織のシステム管理者ロールに割り当てられている必要があります。
設定ファイルの作成
この手順では、カスタムポリシーの設定ファイルを作成する方法について説明します。この手順の最後で、完全なファイルをダウンロードできます。
-
新しいテキストファイルを開き、policy 要素、before 要素、pointcut 要素を作成します。
-
分析のためにポリシーを追跡するための policy 要素、ID 要素、policyName 要素を作成します。
<policy xmlns="http://www.mulesoft.org/schema/mule/policy" id="{{policyId}}" policyName="Regex Filter" -
API に対するすべての要求で、実際の API サービスがコールされる前に実行する
before セクションを追加します。返された結果の処理は必要ないため、after セクションは必要ありません。 -
before セクションに、Expression という要素を参照する filter 要素を含めます。この filter 要素には、参照する要素と一致する name プロパティがあります。
expression パラメーターは、絞り込み条件と絞り込み対象要素を指定します。これらのパラメーターは YAML ファイルで定義され、XML 設定ファイル内では
{{curly brackets}} で囲まれます。{{regexFilter}} は絞り込み条件として使用されます。{{queryParamm}} は、目的のクエリパラメーターを参照する式を作成するために使用されます。 -
受信要求を絞り込むために、メッセージ検索条件を含めます。これは、標準 Mule 要素です。この要素は、実際に絞り込みロジックを定義するのではなく、検索条件の動作を指定する Expression 要素を参照します。
-
before セクションの filter 要素の開始タグに policyViolation 要素を参照する onUnaccepted プロパティを追加します。
...
<!-- This executes right after the inbound endpoint of the application -->
<before>
  <mule:message-filter xmlns:mule="http://www.mulesoft.org/schema/mule/core" onUnaccepted="policyViolation">
    <mule:filter ref="Expression"/>
  </mule:message-filter>
</before>
検索条件によって指定された条件が一致しない場合、このプロパティは参照先要素をコールして実行します。
-
.xml 拡張子を使用してファイルを保存します。
定義ファイルの作成
この手順では、ポリシー定義ファイルを含む YAML ファイルを作成します。次に、API へのコールを絞り込むために、ポリシー定義にはクエリパラメーターとクエリパラメーターを絞り込むための正規表現が含まれます。一致しない要求は却下されます。ポリシーを適用すると、プロパティが UI の要素にマップされます。この手順の最後で、完全なファイルをダウンロードできます。
-
Anypoint Platform で、新しいテキストファイルを開き、ポリシーの必須プロパティを定義します。
-
Mule 3.8.1 以降を実行する場合は、
resourceLevelSupported: true プロパティを追加します。このプロパティは、リソースレベルポリシーをサポートします。id: query-param-filter name: Query Param Filter description: Filters query parameters category: Security type: custom standalone: true requiresConnectivity: false resourceLevelSupported: true providedCharacteristics: [] requiredCharacteristics: [] -
1 つの設定要素と、regexFilter と queryParam の値を持つ 2 つの propertyName 項目を追加します。
-
パラメーターを絞り込むための正規表現を定義するプロパティと、評価する必要があるクエリパラメーターに名前を付けて定義するプロパティを追加します。
id: query-param-filter name: Query Param Filter description: Filters query parameters category: Security type: custom standalone: true requiresConnectivity: false resourceLevelSupported: true providedCharacteristics: [] requiredCharacteristics: [] configuration: - propertyName: regexFilter name: Regex Filter description: A regular expression to filter a query parameter. Rejects unmatched requests. type: string defaultValue: optional: true sensitive: false allowMultiple: false - propertyName: queryParam name: Query Parameter description: Name of a query parameter to filter by a regular expression. type: string defaultValue: optional: false sensitive: false allowMultiple: false -
.yaml 拡張子を使用してファイルを保存します。たとえば、mypolicy.yaml としてファイルを保存します。
before および after 例外ブロックの定義
設定ファイルのメイン要素内に 2 つの基本的な構造を追加できます。<before></before> タグと <after></after> です。どちらも省略可能ですが、ポリシーで何らかのアクションを実行するには、少なくともいずれか一方が含まれている必要があります。
次のバージョンは、カスタムポリシー例外をサポートしています。
Mule ゲートウェイ/Mule Runtime
-
v3.8.4 >= バージョン < v4.0.0
-
v2.2.1 >= バージョン < v3.8.0
-
v2.1.2 >= バージョン < v2.2.0
次のフローに示すように、before タグ間のコンテンツは、API への受信要求があるたびに、要求がインバウンドエンドポイントに到達するとすぐに、API がフロー内の残りのメッセージプロセッサーを実行する前に実行されます。同様に、after タグ間のコンテンツは、API への要求があるたびに、API のアウトバウンドエンドポイントに達する直前に、フロー内のメッセージプロセッサーをすべて実行し終わった後に実行されます。
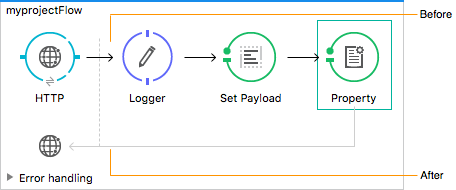
<before></before> タグと <after></after> タグに加えて、追加フローとして <mule:processor-chain></mule:processor-chain> タグを追加して、別の手順を実行することもできます。これらのフローは単独では実行されず、ポリシーの before または after セクションで参照される必要があります。ポリシーを記述するときには、Mule アプリケーションを記述するときとは異なり、要素名に mule: サフィックスを追加する必要があります。
<policy>
    <before>
        <!-- Elements automatically executed at the start -->
    </before>
    <after>
        <!-- Elements automatically executed at the end -->
    </after>

    <mule:processor-chain name="chain1">
        <!-- This flow may be called to be executed by the others -->
    </mule:processor-chain>

    <mule:processor-chain name="chain2">
        <!-- This flow may be called to be executed by the others -->
    </mule:processor-chain>
</policy>
DataWeave コンポーネントは、Mule Runtime 3.8.5 以降でカスタムポリシー内での使用がサポートされています。
例外ブロックを拡張する before および after タグ
カスタムポリシー定義内で before および after ブロックを定義すると、フローの Catch Exception Strategy (キャッチ例外戦略) を変更することなく拡張できます。
次の図は、デフォルトパス Before > Flow > After とエラーパス Before Exception > Exception Strategy > After Exception を示しています。
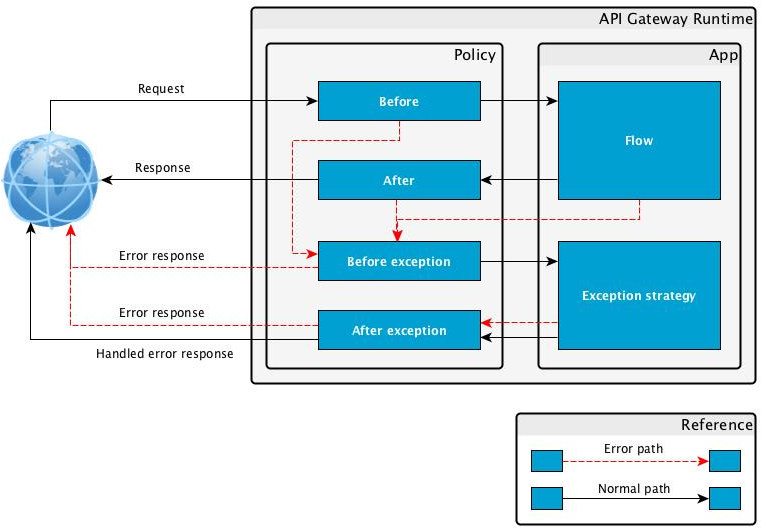
デフォルトパスのいずれかの部分で例外が発生すると、そのパスの実行は停止され、エラーパスの実行がトリガーされます。before-exception または after-exception で例外が発生すると、エラーパスの実行が停止されます。例外戦略内でエラーが発生すると、after-exception が実行されます。
次のカスタムポリシー例は、before および after 例外ブロックの実装方法を示しています。
<?xml version="1.0" encoding="UTF-8"?>
<policy id="1"
       policyName="first"
       xmlns="http://www.mulesoft.org/schema/mule/policy"
       xmlns:api-platform-gw="http://www.mulesoft.org/schema/mule/api-platform-gw"
       xmlns:mule="http://www.mulesoft.org/schema/mule/core"
       xmlns:xsi="http://www.w3.org/2001/XMLSchema-instance"
       xsi:schemaLocation="http://www.mulesoft.org/schema/mule/policy http://www.mulesoft.org/schema/mule/policy/current/mule-policy.xsd
             http://www.mulesoft.org/schema/mule/api-platform-gw http://www.mulesoft.org/schema/mule/api-platform-gw/current/mule-api-platform-gw.xsd
             http://www.mulesoft.org/schema/mule/core http://www.mulesoft.org/schema/mule/core/current/mule.xsd">

   <before>
      <mule:logger level="INFO" message="The before block" />
   </before>

   <after>
       <mule:logger level="INFO" message="The after block" />
   </after>

   <before-exception>
       <mule:logger level="INFO" message="The before exception block" />
   </before-exception>

   <after-exception>
       <mule:logger level="INFO" message="The after exception block" />
   </after-exception>

   <pointcut>
      <api-platform-gw:api-pointcut apiName="{{ apiName }}" apiVersion="{{ apiVersionName }}"/>
   </pointcut>
</policy>
API Manager へのカスタムポリシーの追加
-
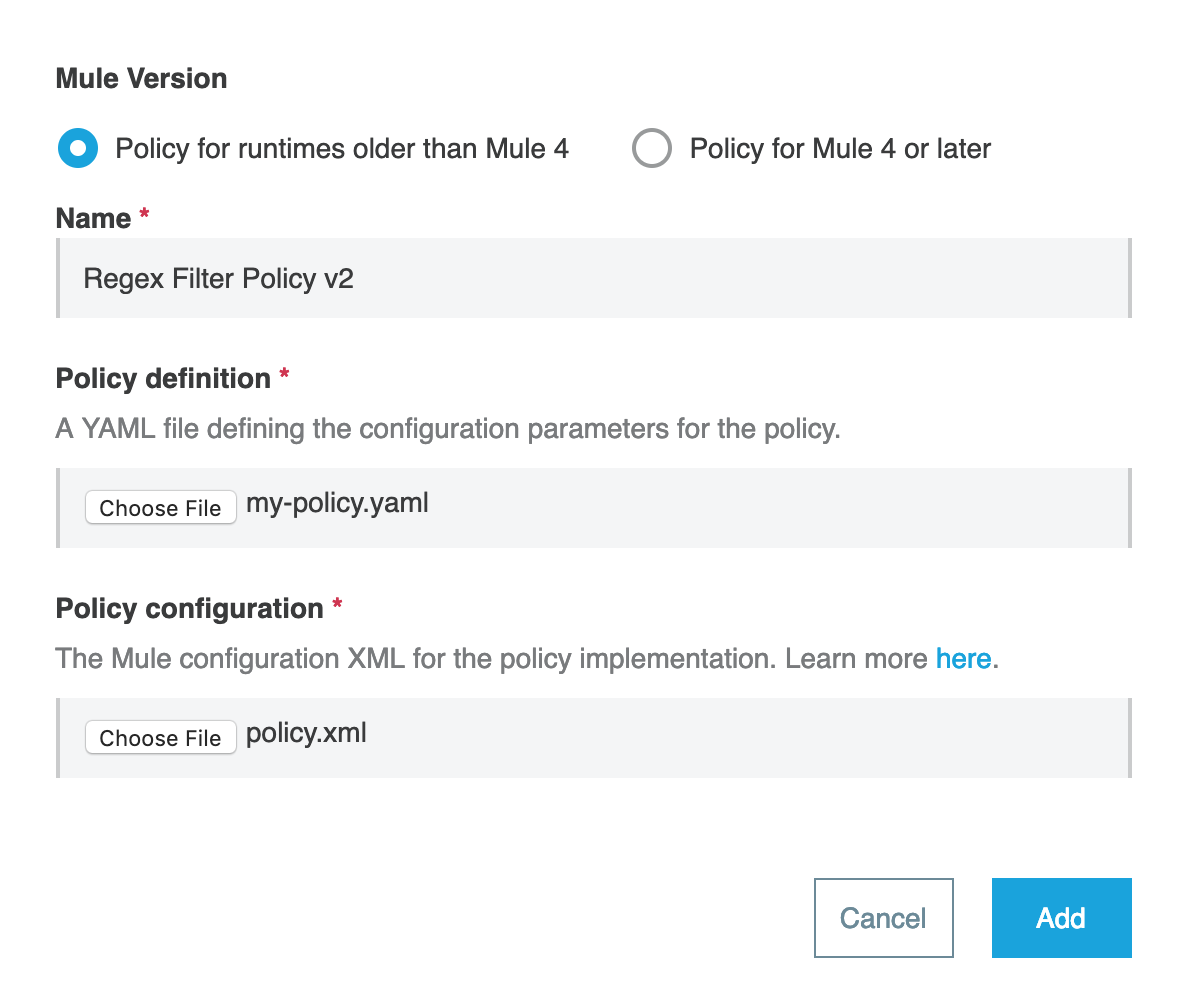
API Manager で、[Custom Policies (カスタムポリシー)] に移動し、[Add Custom Policy (カスタムポリシーを追加)] をクリックします。
-
[Policy for Runtimes older than Mule 4 (Mule 4 より古いランタイム用のポリシー)] を選択します。
-
[Name (名前)] 項目で、新しいポリシーバージョンの名前を入力します。
-
カスタムポリシーの新しいバージョンの YAML ファイルと XML ファイルをアップロードします。
-
[Add (追加)] をクリックします。