
Install or Update the Runtime Manager Agent


|
Where possible, we changed noninclusive terms to align with our company value of Equality. We maintained certain terms to avoid any effect on customer implementations. |
The Anypoint Runtime Manager agent registers Mule runtime engine (Mule) with Runtime Manager. After Mule is registered, you can manage it using Runtime Manager within the specific environment and Anypoint Platform business group in which Mule was registered. You cannot register Mule with multiple Runtime Manager business groups or environments.
Use the amc_setup command to install and configure the agent, using different parameters depending on the type of console to which you are connecting the agent:
When you run amc_setup, the agent creates the $MULE_HOME/conf/mule-agent.yml with the configuration options you specified.
After initial installation, you can:
-
Rerun
amc_setupto change the agent configuration or to update the agent version. -
Modify
mule-agent.ymlto change the agent configuration.Some configuration options, such as extending JMX monitoring to other external services, are not possible using
amc_setup. You must manually add them tomule-agent.yml. See Update Agent Configuration in mule-agent.yml.
$MULE_HOME is environment variable that specifies the location where you installed Mule.
These instructions use paths for Mac or Linux. If you are using Windows, replace the $MULE_HOME path with %MULE_HOME%.
|
Requirements and Restrictions
-
Do not register a single Mule runtime engine with more than one Runtime Manager business group or environment.
-
Do not register Mule with Runtime Manager more than once.
-
Do not register a Mule runtime engine with both an older Mule Management Console (MMC) and Runtime Manager.
If Mule is currently managed in MMC, first unregister it with MMC before running
amc_setup.MuleSoft support provides migration scripts to migrate from MMC to Runtime Manager.
| Runtime Manager agent can’t run in a separate JVM. |
Compatibility
The version of Runtime Manager agent must support the version of Mule and Runtime Manager you are using. To determine compatibility, check the Runtime Manager Agent Release Notes.
Runtime Manager Agent Compatibility
| Mule version | Runtime Manager Agent version | Java version |
|---|---|---|
4.3.0 |
2.4.3 or later |
8 |
4.4.0 |
2.4.27 or later |
8 |
4.4.0 |
2.4.28 or later |
8,11 |
4.5.0 |
2.5.6 or later |
8,11 |
4.6.0 |
2.6.0 or later |
8,11,17 |
| Using a Runtime Manager Agent version earlier than the ones provided in the compatibility table can result in incompatibilities or introduce inconsistencies. |
For more information on Java compatibility, see Java Support.
Prerequisites
-
Your enterprise license is current.
-
If you must download the agent, you must have an Enterprise support account.
Install the Agent from a Mule Installation
The agent is bundled with the Mule runtime engine installation.
To install the agent:
-
Run
$MULE_HOME/bin/amc_setupand specify parameters for your installation.See amc_setup Parameters.
Install the Agent From a .zip File
If you need a different version of the agent than the version included in the software distribution, you can download it from the Support Portal.
Download the Agent from the Support Portal
To verify compatibility with your Mule runtime engine and Runtime Manager, check the corresponding Runtime Manager Agent Release Notes.
To download the agent:
-
Open MuleSoft Help Center.
-
Click the Support tile.
-
Click Login in the upper right and log in using your Anypoint Platform credentials.
You must have an Enterprise support account to download the agent. -
In the MuleSoft Support page, click the Downloads tab.
-
Click Mule Agent.
-
Locate the agent to install and click Download in the Action column.
Install the Agent
To install the agent from the downloaded .zip file:
-
Stop Mule or the API gateway runtime.
-
Extract the downloaded
agent-setup-VERSION.zipfile to$MULE_HOME/bin.If prompted, overwrite any conflicting files.
-
Run
$MULE_HOME/bin/amc_setupand specify parameters for your installation.See amc_setup Parameters.
-
Restart Mule or the API gateway runtime.
Update the Agent
If you previously installed the agent with an earlier version of amc_setup, you can update the agent and retain your existing agent configuration in $MULE_HOME/conf/mule-agent.yml.
If you keep your mule-agent.yml file, ensure that these changes are applied:
-
When upgrading to versions 1.12.0 and later:
See Upgrade Requirements.
-
When upgrading to versions 2.2.0 and later:
See Upgrade Requirements.
-
When upgrading to versions 2.7.0 and later:
See Upgrade Requirements.
To update an existing Runtime Manager agent:
-
Stop Mule or the API gateway runtime.
-
Extract the downloaded
agent-setup-VERSION.zipfile to$MULE_HOME/bin. -
When prompted, overwrite any conflicting files.
-
Run
$MULE_HOME/bin/amc_setup -U.When you run
amc_setupwith the-Uparameter, you can’t include other parameters on the command line. -
Restart Mule or the API gateway runtime.
If you update the Runtime Manager agent, you must also run the Anypoint Monitoring agent uninstall script and then re-install the Anypoint Monitoring agent. See Update the Anypoint Monitoring Agent.
What Happens When You Update the Agent
When you update the agent, the amc_setup script:
-
Backs up the current version of the agent:
-
Archives the
$MULE_HOME/server-plugins/mule-agent-pluginto$MULE_HOME/tools/mule-agent-backup.zip -
Archives any custom modules (usually located in
$MULE_HOME/server-plugins/mule-agent-plugin/lib/modules) to$MULE_HOME/tools/mule-agent-modules-backup.zip
-
-
Updates agent libraries in
$MULE_HOME/server-plugins/mule-agent-plugin/lib -
Retains the current
$MULE_HOME/conf/mule-agent.ymlconfiguration file -
Leaves modules in
$MULE_HOME/server-plugins/mule-agent-plugin/lib/modulesunchangedThis directory contains all custom modules added to the agent (not included in the agent distribution).
-
Updates the default agent truststore name from
truststore.jkstoanypoint-truststore.jks(for updates to versions 1.11.0 or 2.1.4 and later).
Roll Back the Agent
If you need to roll back the agent, for example, if problems occur when you update the agent,
restore the previous version from the mule-agent-backup.zip file.
This ZIP file includes libraries, configuration files, and compiled classes for the agent.
To roll back the agent:
-
Stop Mule or the API gateway runtime.
-
Change to the
mule-agent-plugindirectory:cd $MULE_HOME/server-plugins/mule-agent-plugin -
Ensure that you are in the
mule-agent-plugindirectory:pwd -
Remove the existing agent files:
rm -r * -
Copy the backup ZIP file to the
mule-agent-plugindirectory:cp $MULE_HOME/tools/mule-agent-backup.zip . -
Restore the previous version of the agent from the backup ZIP file:
unzip mule-agent-backup.zip -
Remove the backup ZIP file:
rm mule-agent-backup.zip -
Restart Mule or the API gateway runtime.
Disable the Agent
To disable the agent:
-
Stop Mule or the API gateway runtime.
-
Remove these files:
$MULE_HOME/conf/mule-agent.jks $MULE_HOME/conf/mule-agent.yml -
Restart Mule or the API gateway runtime.
| The agent still starts up when disabled, but it does not perform any operation. |
amc_setup Parameters
Parameters to amc_setup enable you to:
-
Register Mule with a Runtime Manager console:
-
Register Mule with Anypoint Platform PCE Runtime Manager.
Registering Mule with Anypoint Platform PCE requires additional
amc_setupparameters. See PCE Runtime Manager amc_setup Parameters.
-
Manage Mule using the local Runtime Manager agent REST API interface.
To see available options, run ./amc_setup --help.
| Parameter | Value | Description | ||
|---|---|---|---|---|
|
Displays help for the command on the command line. |
|||
|
Updates the agent, preserving the existing
|
|||
|
Encrypts the passwords in an existing Use this option alone to encrypt passwords. For information, see Encrypt Passwords in an Existing mule-agent.yml File. |
|||
|
Decrypts the passwords in an existing Use this option alone to decrypt passwords. For information, see Update the Main Password and Display Passwords in mule-agent.yml in Plain Text. |
|||
|
|
Specifies the location of the Use this option if you are running the installation script from a location other than The amc_setup script reads the |
||
|
Skips configuration of the API gateway |
|||
|
Configures the agent to use an unencrypted REST connection. Do not use this parameter with the PCE This option replaces the contents of |
|||
|
Configures the agent to establish a TLS connection with an on-premises administration console. Do not use this parameter with the PCE This option replaces the contents of |
|||
|
|
Configures the agent to connect with either Anypoint Platform PCE or cloud-based Anypoint Platform managed by MuleSoft.
|
||
|
|
Specifies the proxy configuration to use when registering with the connection. |
||
|
|
Specifies the region to deploy to. Available regions are |
||
|
Enables FIPS 140-2 compliance on Mule 4 runtime on *nix-based servers. |
Register Mule with the Cloud-Based Runtime Manager

To register Mule with the Anypoint Platform Runtime Manager cloud-based console, you need:
-
A valid registration token, which identifies a specific environment for a specific business group in Anypoint Platform
-
An instance name, which identifies Mule in the Runtime Manager console
To register Mule:
-
In Runtime Manager, click Servers in the left menu.
-
Click the Add Server button.
-
Enter a unique name for your server.
Server names can contain up to 60 alphanumeric characters (a-z, A-Z, 0-9), periods (.), hyphens (-), and underscores (_), but not spaces or other special characters. Runtime Manager supports Unicode characters in server names.
The server name must be unique in the environment, but it can be the same for the same organization in different environments.
Runtime Manager generates the
amc_setupcommand. This command includes the server name you specified (server-name) and the registration token (token) required to register Mule in your environment. The registration token includes your organization ID and the current environment.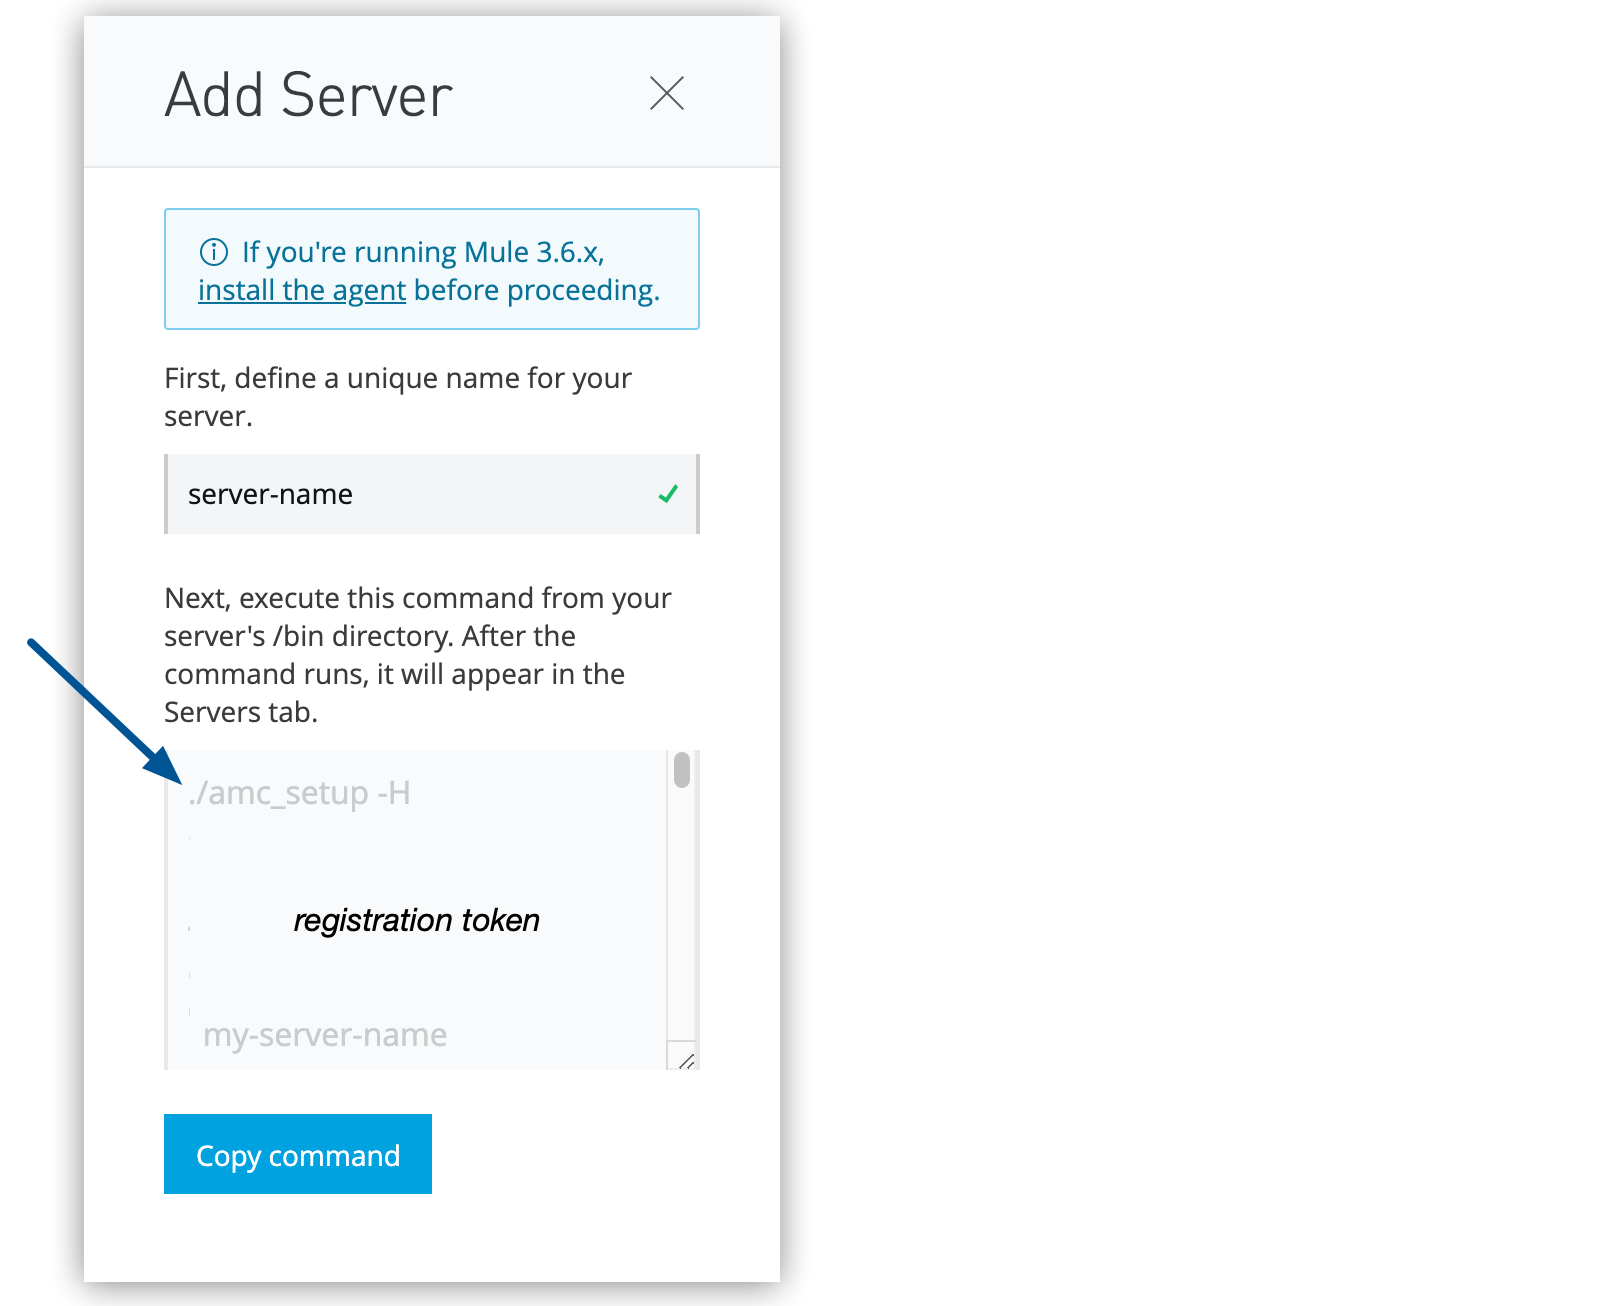 Figure 1. The arrow shows the
amc_setupcommand in the Add Server window. -
Click Copy command to copy the command.
-
In a terminal window:
-
Change to the
$MULE_HOME/bindirectory for the Mule instance that you’re registering. -
If you want to encrypt passwords in the
mule-agent.ymlfile, set theAGENT_VAR_master_passwordenvironment variable to the main password:export AGENT_VAR_master_password=myPassword -
Paste the command on the command line.
-
Include any other parameters on the
amc_setupcommand line.See amc_setup Parameters.
Here is an example
amc_setupcommand:./amc_setup -H myToken myMuleServer --proxy myProxy-host myProxy-port myProxy-user myProxy-password
-
The amc_setup command generates the $MULE_HOME/conf/mule-agent.yml file.
Example mule-agent.yml File
Here is an example mule-agent.yml file generated by the -H option, with encrypted passwords:
transports:
  rest.agent.transport:
    enabled: false
  websocket.transport:
    consoleUri: wss://runtime-manager.anypoint.mulesoft.com:443/mule
    handshake:
      enabled: true
      body:
globalConfiguration:
  security:
    keyStorePassword: "![PBEWITHSHA1ANDDESEDE,WdPmAQMIC8Atr5iK4phjmbZbs9XFLLiH1eDhA7AmnpKUaPDhp40OB4uKZ6JUMW44]"
    keyStoreAlias: agent
    keyStoreAliasPassword: "![PBEWITHSHA1ANDDESEDE,WdPmAQMIC8Atr5iK4phjmbZbs9XFLLiH1eDhA7AmnpKUaPDhp40OB4uKZ6JUMW44]"
  authenticationProxy:
    endpoint: https://data-authenticator.anypoint.mulesoft.com:443
  proxyConfiguration:
    password: '![PBEWITHSHA1ANDDESEDE,VIs82yFDp66lnsL/Rss8q8js/zPDQ8+HJpdNepdZtA9obeDj5u+z4HIocsbLvXow]'
Register Mule with Anypoint Platform PCE Runtime Manager

With Anypoint Platform Private Cloud Edition (Anypoint Platform PCE), all Runtime Manager services run on-premises rather than in a cloud environment managed by MuleSoft.
To register Mule with PCE Runtime Manager:
-
Log in to an Anypoint Platform PCE account.
-
Ensure that you have correctly set up the DNS entry for your platform.
See DNS or IP.
-
Select a business group and environment with which to register Mule.
-
Within the selected environment, click Servers in the left menu.
-
Click the Add Server button.
Runtime Manager generates the
amc_setupcommand, includingtokenandserver-name, to use to register Mule in your environment.The registration token includes your organization’s ID and the current environment.
-
Click Copy to copy the command.
-
In a terminal window, change to the
$MULE_HOME/bindirectory for the Mule instance that you’re registering. -
Paste the command on the command line.
-
Change the instance name
server-nameto the unique name to use to label Mule in the Runtime Manager console. -
Include any other parameters on the
amc_setupcommand line.See amc_setup Parameters.
-
Append parameters to the command line to specify the URLs of services used by Runtime Manager to manage your Mule instance.
Here is an example
amc_setupcommand:./amc_setup -H myToken myMuleServer -A +http://$DOCKER_IP_ADDRESS:443/hybrid/api/v1+ -W "wss://AnypointPlatformHost:8889/mule" -C https://AnypointPlatformHost/accounts -F https://AnypointPlatformHost/apiplatform
The amc_setup command generates the $MULE_HOME/conf/mule-agent.yml file.
PCE Runtime Manager amc_setup Parameters
This table lists additional parameters required to register Mule with Anypoint Platform PCE Runtime Manager. Append these parameters to the ./amc_setup -H token server-name command.
Do not use these parameters with the -I or S parameters to configure REST API connections.
| Parameter | Value | Description |
|---|---|---|
|
|
Specifies the service location URL of your local instance of Runtime Manager, for example, You can test whether the service is available at |
|
|
Specifies the service location URL of your local instance of MCM, for example, You can test whether the service is available at |
|
|
Specifies the service location URL of your local instance of Access Management, for example, You can test whether the service is available at |
|
|
Specifies the service location (URL) of your local instance of Contract Caching Service, for example, |
|
|
Specifies the service location URL of your local instance of API Manager, for example, You can test whether the service is available at |
|
|
Specifies the service location URL of your Auth Proxy, for example, |
Encrypt Passwords in an Existing mule-agent.yml File
If you didn’t set the AGENT_VAR_master_password environment variable when registering the agent
with Runtime Manager, you can encrypt the following passwords later in the mule-agent.yml file:
-
keystorePassword: Keystore password used to access themule-agent.jksfile -
keystoreAliasPassword: Keystore alias password used to access themule-agent.jksfile -
password: Password used for authenticating with a proxy server
Prerequisites
-
Runtime Manager agent version 2.4.17
To update previous versions of the agent, see Update the Agent.
Encrypt Passwords
To encrypt passwords in your mule-agent.yml file:
-
Set the
AGENT_VAR_master_passwordenvironment variable to the main password:export AGENT_VAR_master_password=myPassword -
Run the encryption utility:
$MULE_HOME/bin/amc_setup --encryptThe encryption utility replaces the passwords in the
keystorePassword,keystoreAliasPassword, andpasswordfields in themule-agent.ymlfile with the encrypted passwords, for example:globalConfiguration: security: keyStorePassword: '![PBEWITHSHA1ANDDESEDE,Fe4kl2UBnGRoyh7H2v9lq+QSG7Pe6ZP8k34xmZEHmcAb1jABAwPLk2xWrGtSt1iE]' keyStoreAlias: agent keyStoreAliasPassword: '![PBEWITHSHA1ANDDESEDE,EtqRDPq7UTxDHzZGpOGazfcveEi832Pqm1mqhlwYRGLZGh9NSNXie6nAZr09b3iT]' authenticationProxy: endpoint: https://data-authenticator.anypoint.mulesoft.com:443 proxyConfiguration: password: '![PBEWITHSHA1ANDDESEDE,VIs82yFDp66lnsL/Rss8q8js/zPDQ8+HJpdNepdZtA9obeDj5u+z4HIocsbLvXow]'
The encrypted passwords start with ! and are enclosed in square brackets [ ].
Update and Reencrypt Passwords
To update an encrypted password in the mule-agent.yml file:
-
Edit
mule-agent.yml. -
Replace the encrypted password with the new plain-text password.
-
Set the
AGENT_VAR_master_passwordenvironment variable:export AGENT_VAR_master_password=myPassword -
Run the encryption utility:
$MULE_HOME/bin/amc_setup --encrypt
Display Passwords in mule-agent.yml in Plain Text
To display the passwords in mule-agent.yml in plain text, run the decryption utility:
$MULE_HOME/bin/amc_setup --decrypt
This command outputs the contents of the mule-agent.yml file with plain-text passwords.
Update the Main Password
To update the main password:
-
Run the decryption utility:
$MULE_HOME/bin/amc_setup --decrypt -
Set the
AGENT_VAR_master_passwordenvironment variable to the new main password:export AGENT_VAR_master_password=myNewPassword -
Run the encryption utility:
$MULE_HOME/bin/amc_setup --encrypt