Selecting a Different Java Version to Run the Embedded Mule Runtime
You can select any of your installed JREs as the default Java runtime environment that Studio uses to run your Mule project.
You can select the version of the JDK to use for the project that is compatible with the Mule runtime version the project runs on.
If you change the Java or Mule runtime versions in your project, consider these facts:
-
Mule runtime 4.4 and earlier works with Java 8 and 11.
-
Mule runtime 4.6 works with Java 8, 11, and 17.
-
Standard support for Java 8 and 11 ends in March 2025 for Mule 4.8 Edge and August 2025 for 4.6 LTS, so plan your upgrade path for apps that are running on Java 8 or 11 accordingly.
-
Studio 7.21 and later builds and runs projects on Java 17 by default. To use Mule 4.9 and later, upgrade your apps to run on Java 17.
Mule Runtime and Java Compatibility in Studio
This table shows the compatibility between Mule runtime and Java versions in Studio:
| Studio Version | Mule Runtime Version | Java 8 | Java 11 | Java 17 |
|---|---|---|---|---|
7.22 and later |
|
No |
No |
Yes |
7.20 |
|
Yes |
Yes |
Yes |
|
Yes |
Yes |
No |
See the Studio release notes for the latest information about compatibility.
Select the Java Version for All Your Studio Projects
-
In Studio, click Anypoint Studio, and Preferences.
-
Under Java, Installed JREs, select the JRE version to use.
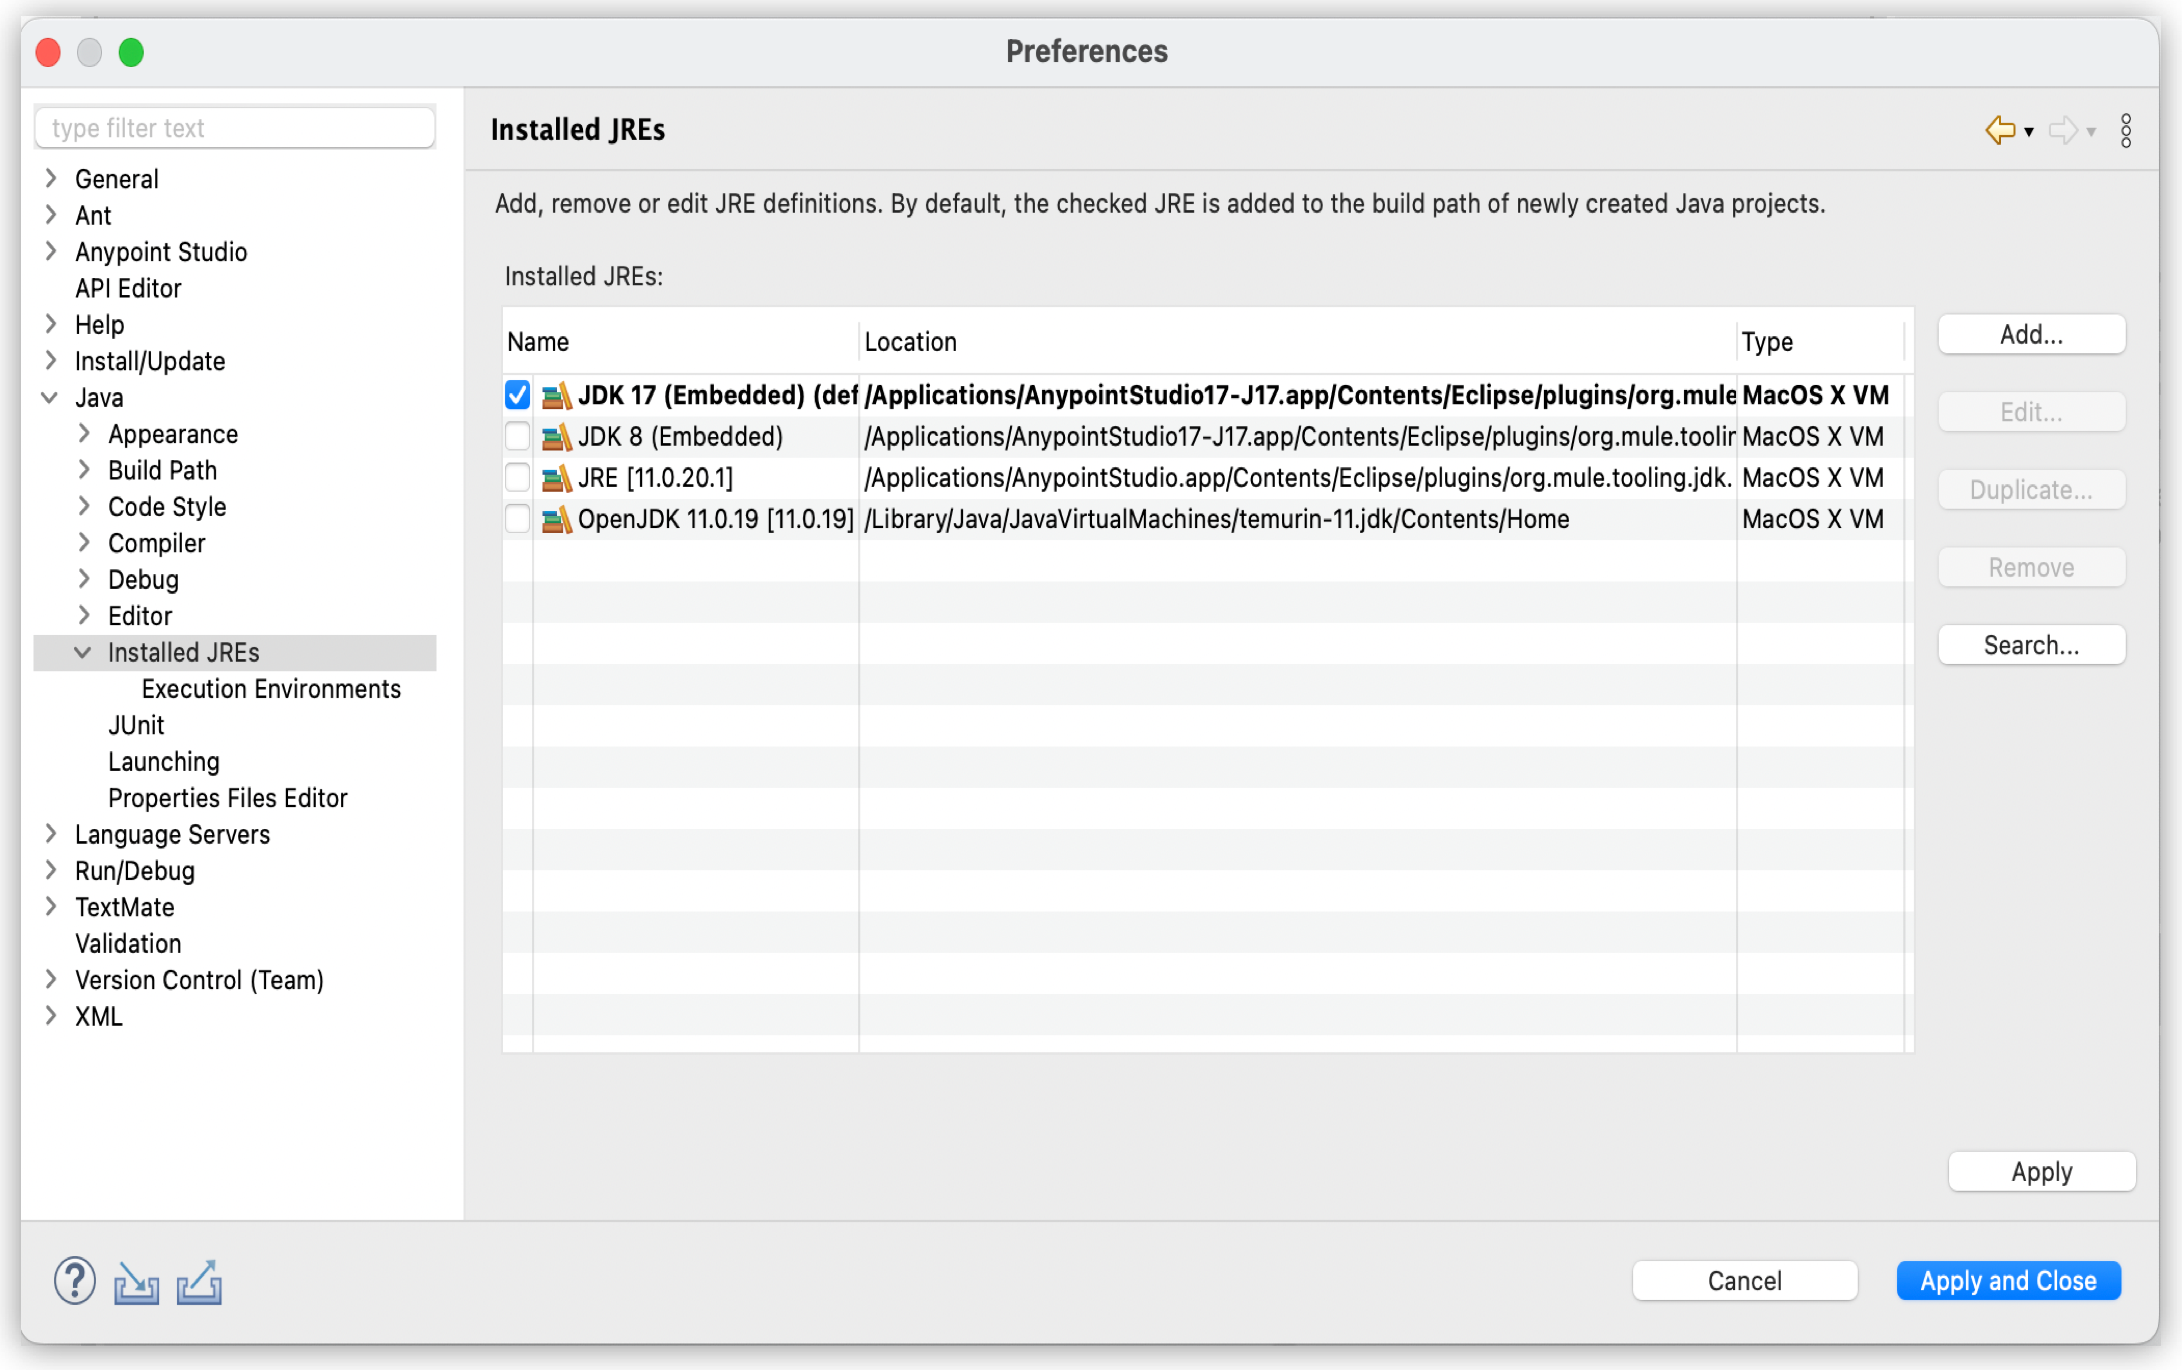
If your installed JRE version doesn’t appear, you must configure it:
-
Go to Add and select your installed JRE type:
-
MacOS X VMfor macOS. -
Standard VMfor macOS, Windows, and Linux.
-
-
Click Next.
-
In JRE Home, click Directory and select the folder where you have installed JRE.
For example,/Library/Java/JavaVirtualMachines/jdk-11.0.3.jdk/Contents/Home -
In JRE Name type in a descriptive name for the JRE.
For example,Java SE 11. -
Click Finish.
-
Migrate Your Project to a Different Java Version
Studio 7.17.0 and later are compatible with Java 17. Upgrade modules and apps in your projects to obtain its latest features.
-
Right-click your Studio project.
-
Go to Build Path, and click Configure Build Path.
-
In the Libraries tab, select your JRE System Library and click Edit.
-
Select the Alternate JRE option, and select your desired JRE from the dropdown menu.
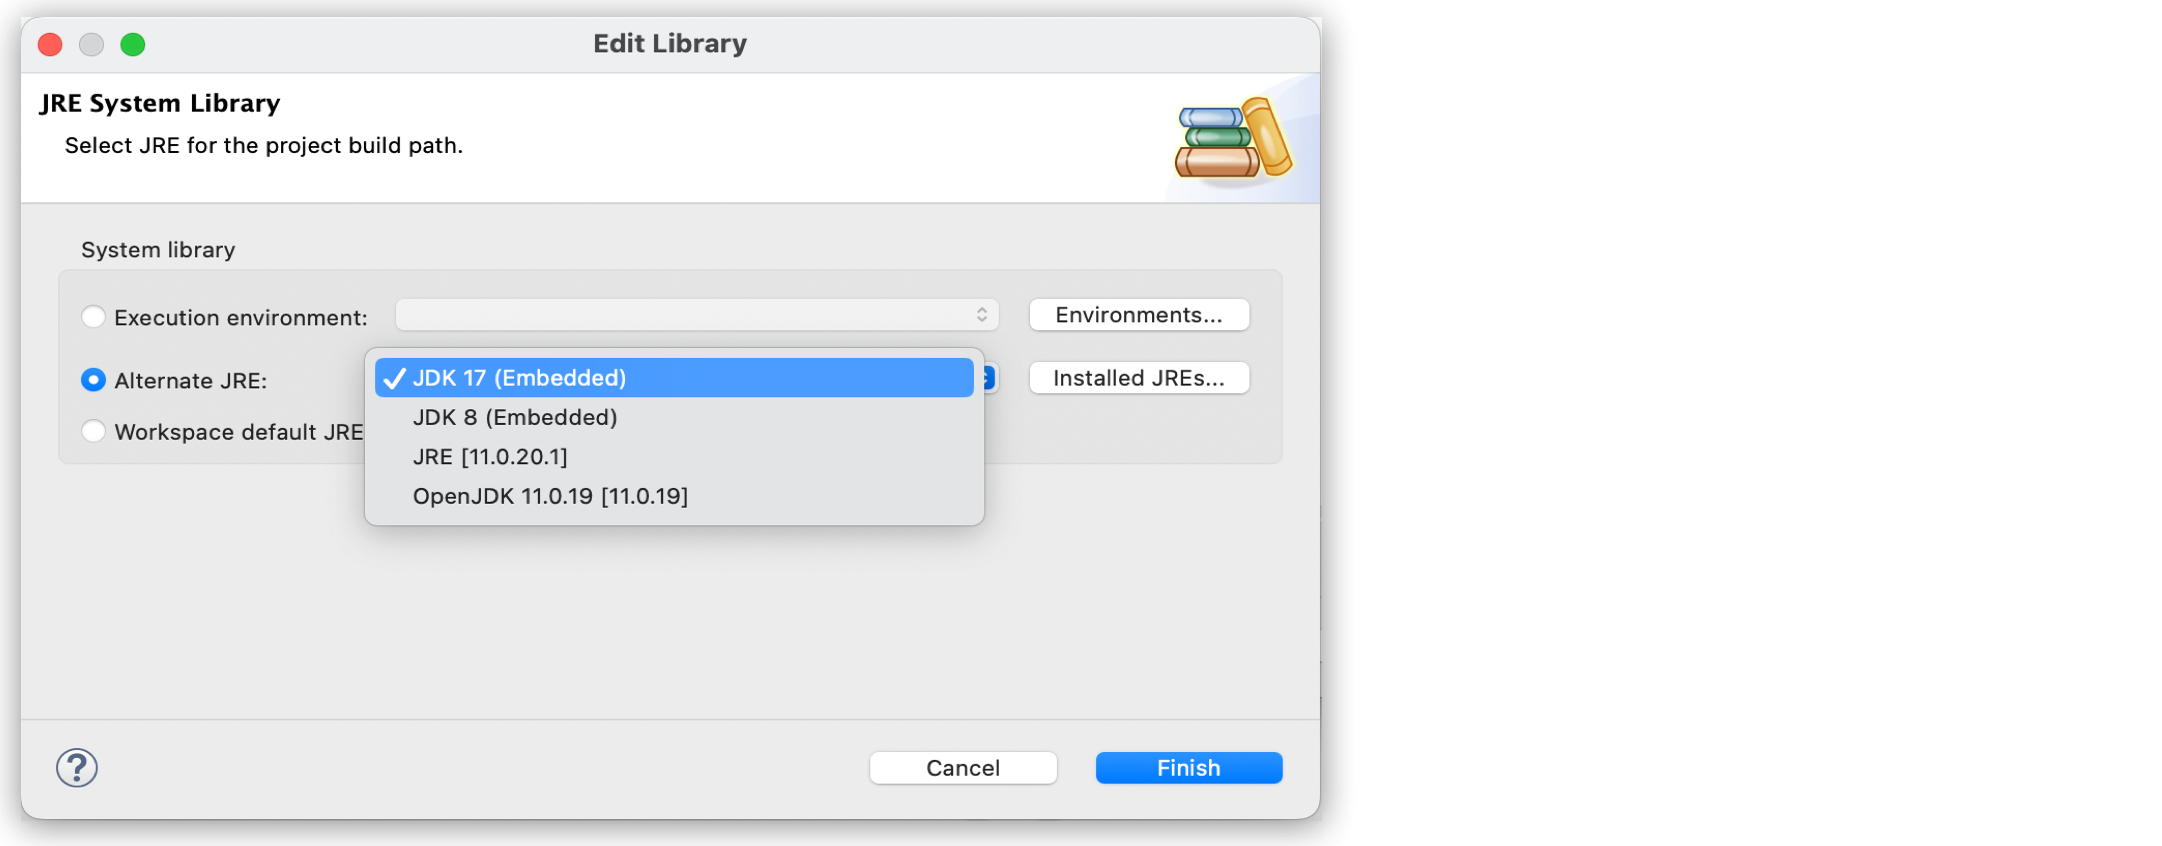
If you select Java 17 for your project, Studio automatically searches Exchange and suggests the modules and connectors to upgrade to make your app compatible with Java 17.
If you find issues, you can troubleshoot them and then deploy your project to the appropriate environment with Java compatibility checks.
Verify Java 17 Tooling
In Studio 7.19.0 and later, your new Mule projects use JDK 17 by default and the bundled modules in your Mule projects must be Java 17 compatible. If you have issues with the modules that use previous versions of Java:
-
Go to Settings > Anypoint Studio > Tooling.
-
In the Life cycle section, select Java 17 as the Java virtual machine for Studio services.
-
Click Apply and Close.
The Studio services restart and the tooling instance restarts using Java 17.
Use the Java 17 module compatibility tool to verify the modules in your Mule project are Java 17 compatible.
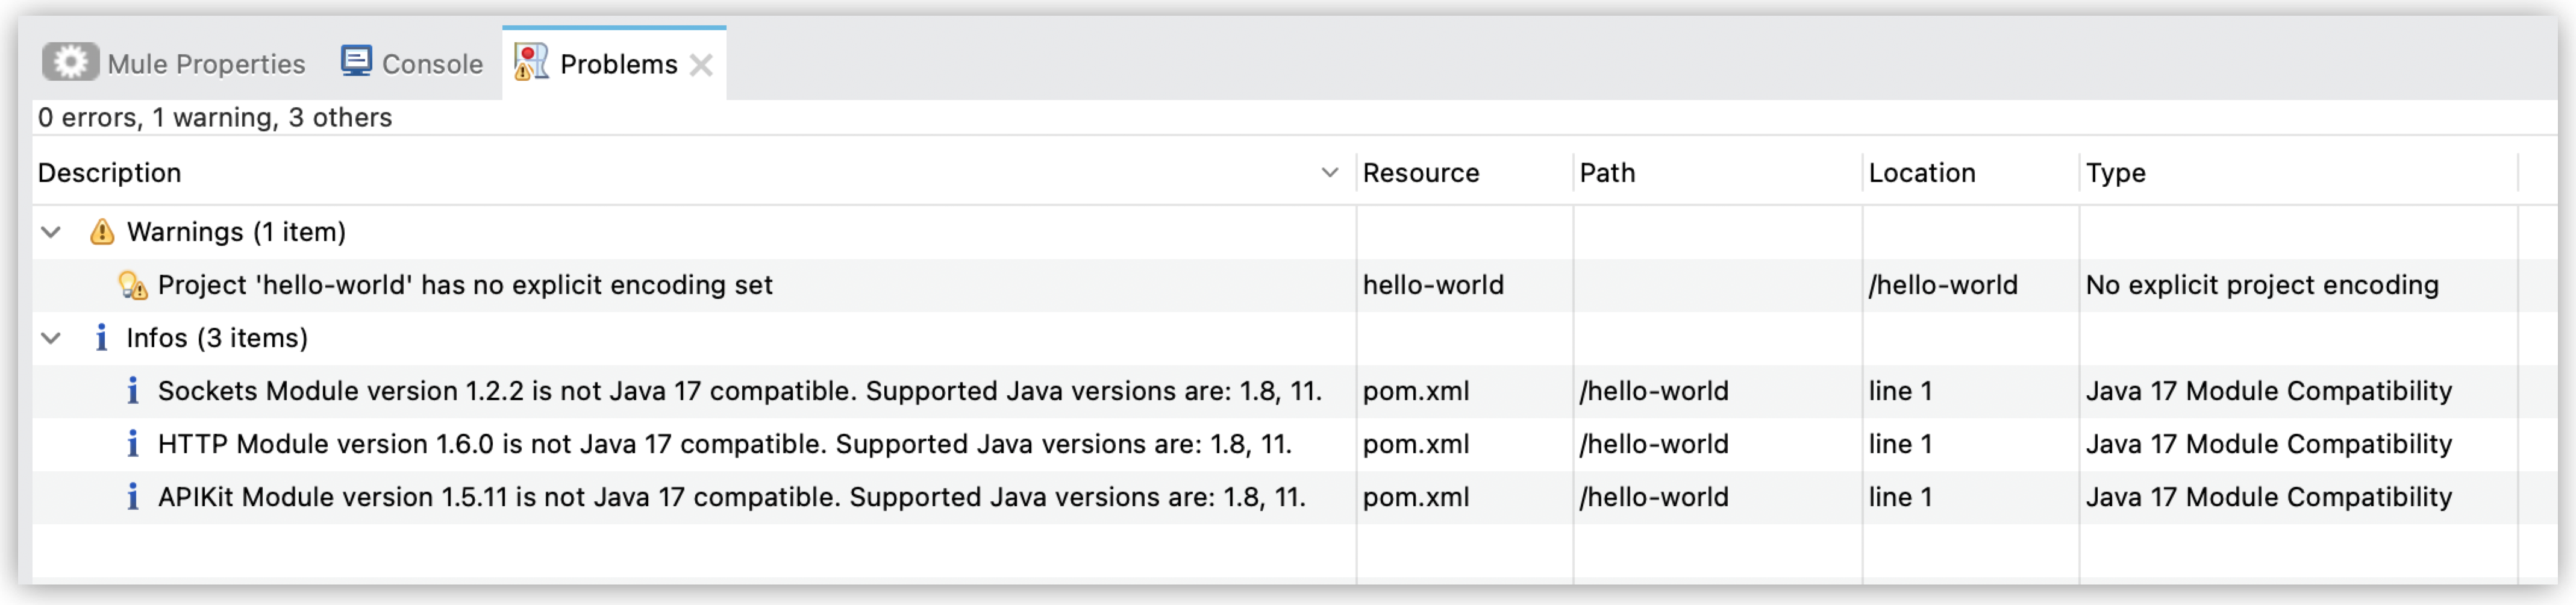
Verify Java 17 Module Compatibility
In Studio 7.19.0 and later, you can check if the modules in your Mule project are Java 17 compatible:
-
Right-click the name of your project.
-
Select Mule > Java 17 Module Compatibility.
Studio analyzes the modules in your Mule project and shows the modules that aren’t Java 17 compatible in the Problems tab.
-
Update the modules that aren’t Java 17 compatible.
Configure FIPS 140-2 in Studio
Studio supports FIPS 140-2 security model for Java 8, 11, and 17.
Configure FIPS 140-2 in Java 8
-
Download the provider files from the BouncyCastle website.
-
Provider: bc-fips-1.0.2.4
-
TLS: bctls-fips-1.0.19.jar
-
PKIX: bcpkix-fips-1.0.7.jar
-
-
Install the required JAR files into your Studio embedded JDK 8. This example shows the command for a default macOS installation. The path to the
…/jre/lib/ext/directory can be different depending on your operating system and Studio version.cp bc-fips-1.0.2.4.jar bctls-fips-1.0.19.jar bcpkix-fips-1.0.7.jar /Applications/AnypointStudio.app/Contents/Eclipse/plugins/org.mule.tooling.jdk.v8.macosx.x86_64_1.3.4/Contents/Home/jre/lib/ext/The default path on Windows is
C:\AnypointStudio\plugins\org.mule.tooling.jdk.v8.win32.x86_1.3.4\jre\lib\ext. -
Register the security providers in the
java.securityproperties file, located in your JDK 8…/lib/security/folder. Bouncy Castle must be the only provider.# # List of providers and their preference orders: # security.provider.1=org.bouncycastle.jcajce.provider.BouncyCastleFipsProvider security.provider.2=org.bouncycastle.jsse.provider.BouncyCastleJsseProvider fips:BCFIPS # ... -
Save your changes.
-
In Studio, go to your project, right click its folder, and select Run configuration.
-
Go to the Arguments tab. In VM arguments, add:
-Dmule.security.model=fips140-2 -Dorg.bouncycastle.fips.approved_only=true -
Run your application. The startup readout shows FIPS security model enabled.
* Mule Runtime and Integration Platform
* Version: 4.6.21 Build: adffffac
* MuleSoft, Inc.
* For more information go to
* https://www.mulesoft.com/platform/soa/mule-esb-enterprise
*
* Server started: 6/4/18 4:06 PM
* JDK: 1.8.0_172 (mixed mode)
* JDK properties:
  - java.vendor = Oracle Corporation
  - java.vm.name = Java HotSpot(TM) 64-Bit Server VM
  - java.home = /Library/Java/JavaVirtualMachines/jdk1.8.0_172.jdk/Contents/Home/jre
* OS: Mac OS X (10.11, x86_64)
* Host: your-hostname.local (10.250.0.81)
* Security model: fips140-2 (1)
* Mule services:
  - api-gateway-contract-service-1.0.0-mule-service.jar
  - mule-service-http-ee-1.1.1-mule-service.jar
  - mule-service-oauth-1.1.1-mule-service.jar
  - mule-service-scheduler-1.1.4-mule-service.jar
  - mule-service-soap-1.1.2-mule-service.jar
  - mule-service-weave-ee-2.1.2-mule-service.jar
* Mule system properties:
  - mule.security.model = fips140-2
  - mule.base = /Users/your-user/AnypointStudio/studio-workspace/.mule
  - mule.home = /Users/your-user/AnypointStudio/studio-workspace/.mule
1 FIPS 140-2 security model is enabled.
Configure FIPS 140-2 in Java 11 and Later
-
Download the provider files from the BouncyCastle website:
-
Provider: bc-fips-1.0.2.4
-
TLS: bctls-fips-1.0.19.jar
-
PKIX: bcpkix-fips-1.0.7.jar
-
-
Copy the downloaded files to the embedded Mule runtime
…/lib/bootdirectory. The path to this directory can vary depending on your Studio and Mule runtime versions.cp bc-fips-1.0.2.4.jar bctls-fips-1.0.19.jar bcpkix-fips-1.0.7.jar /Applications/AnypointStudio.app/Contents/Eclipse/plugins/org.mule.tooling.server.4.9.ee_7.21.0.202508051502/mule/lib/bootThe default path on Windows is
C:\AnypointStudio\plugins\org.mule.tooling.server.4.9.ee_7.21.0.202508051502\mule\lib\boot. -
Delete the wrapper.conf file at
AnypointStudio\plugins\org.mule.tooling.server.4.9.ee_7.21.0.202508051502\mule\conf. -
Edit
AnypointStudio\plugins\org.mule.tooling.server.4.9.ee_7.21.0.202508051502\mule\conf\wrapper.conf.templateand uncomment this line by deleting the starting # character:wrapper.java.additional.21=--add-opens=java.base/sun.security.provider=org.bouncycastle.fips.core -
Edit
/Applications/AnypointStudio.app/Contents/Eclipse/plugins/org.mule.tooling.jdk.macosx.aarch64_1.4.1/Contents/Home/conf/security/java.securityto list only the BouncyCastle security providers.security.provider.1=org.bouncycastle.jcajce.provider.BouncyCastleFipsProvider security.provider.2=org.bouncycastle.jsse.provider.BouncyCastleJsseProvider fips:BCFIPS -
In Studio, go to your project, right click its folder, and select Run configuration.
-
Go to the Arguments tab. In VM arguments, add:
-Dmule.security.model=fips140-2 -Dorg.bouncycastle.fips.approved_only=true -
Run your application. The startup readout shows FIPS security model enabled.
* Mule Runtime and Integration Platform
* Version: 4.9.8 Build: adffffac
* MuleSoft, Inc.
* For more information go to
* https://www.mulesoft.com/platform/soa/mule-esb-enterprise
*
* Server started: 8/10/21 5:12 PM
* JDK: 11.0.11 (mixed mode)
* JDK properties:
  - java.vendor = AdoptOpenJDK
  - java.vm.name = OpenJDK 64-Bit Server VM
  - java.home = /Library/Java/JavaVirtualMachines/adoptopenjdk-11.jdk/Contents/Home
* OS: Mac OS X (11.5, x86_64)
* Host: your-hostname.local (192.168.1.10)
* Security model: fips140-2 (1)
* Mule services:
  - ...
* Mule system properties:
  - mule.security.model = fips140-2
  - mule.base = /Users/your-user/AnypointStudio/studio-workspace/.mule
  - mule.home = /Users/your-user/AnypointStudio/studio-workspace/.mule
1 FIPS 140-2 security model is enabled.