Configuring Components
 Cloud IDE
 Desktop IDE
Configure connectors and processors within your implementation and integration projects from the canvas or the code editor.
Common tasks include the following:
Before You Begin
-
Determine which connectors and processors you intend to use.
When adding components, you can start from the canvas or the code editor for your app. You can configure components from their configuration panels in the canvas or from the code editor. For reference documentation on specific connector and component configurations, see Anypoint Code Builder Components and Commands Reference.
-
Review Get Familiar with the Basics to ensure that you are familiar with important concepts and features.
Understand the basics of Mule flows, the Mule event structure, including the payload, attributes, and Mule variables. To transform data and add expressions to your components, have some familiarity of the DataWeave language.
Add a Component to Your Project
These examples illustrate basic configurations for adding components to your project from the canvas, and the code editor. The examples assume you are beginning with an empty integration project.
-
In the Explorer, open the configuration XML file for your project:, such as
my-project-name.xml.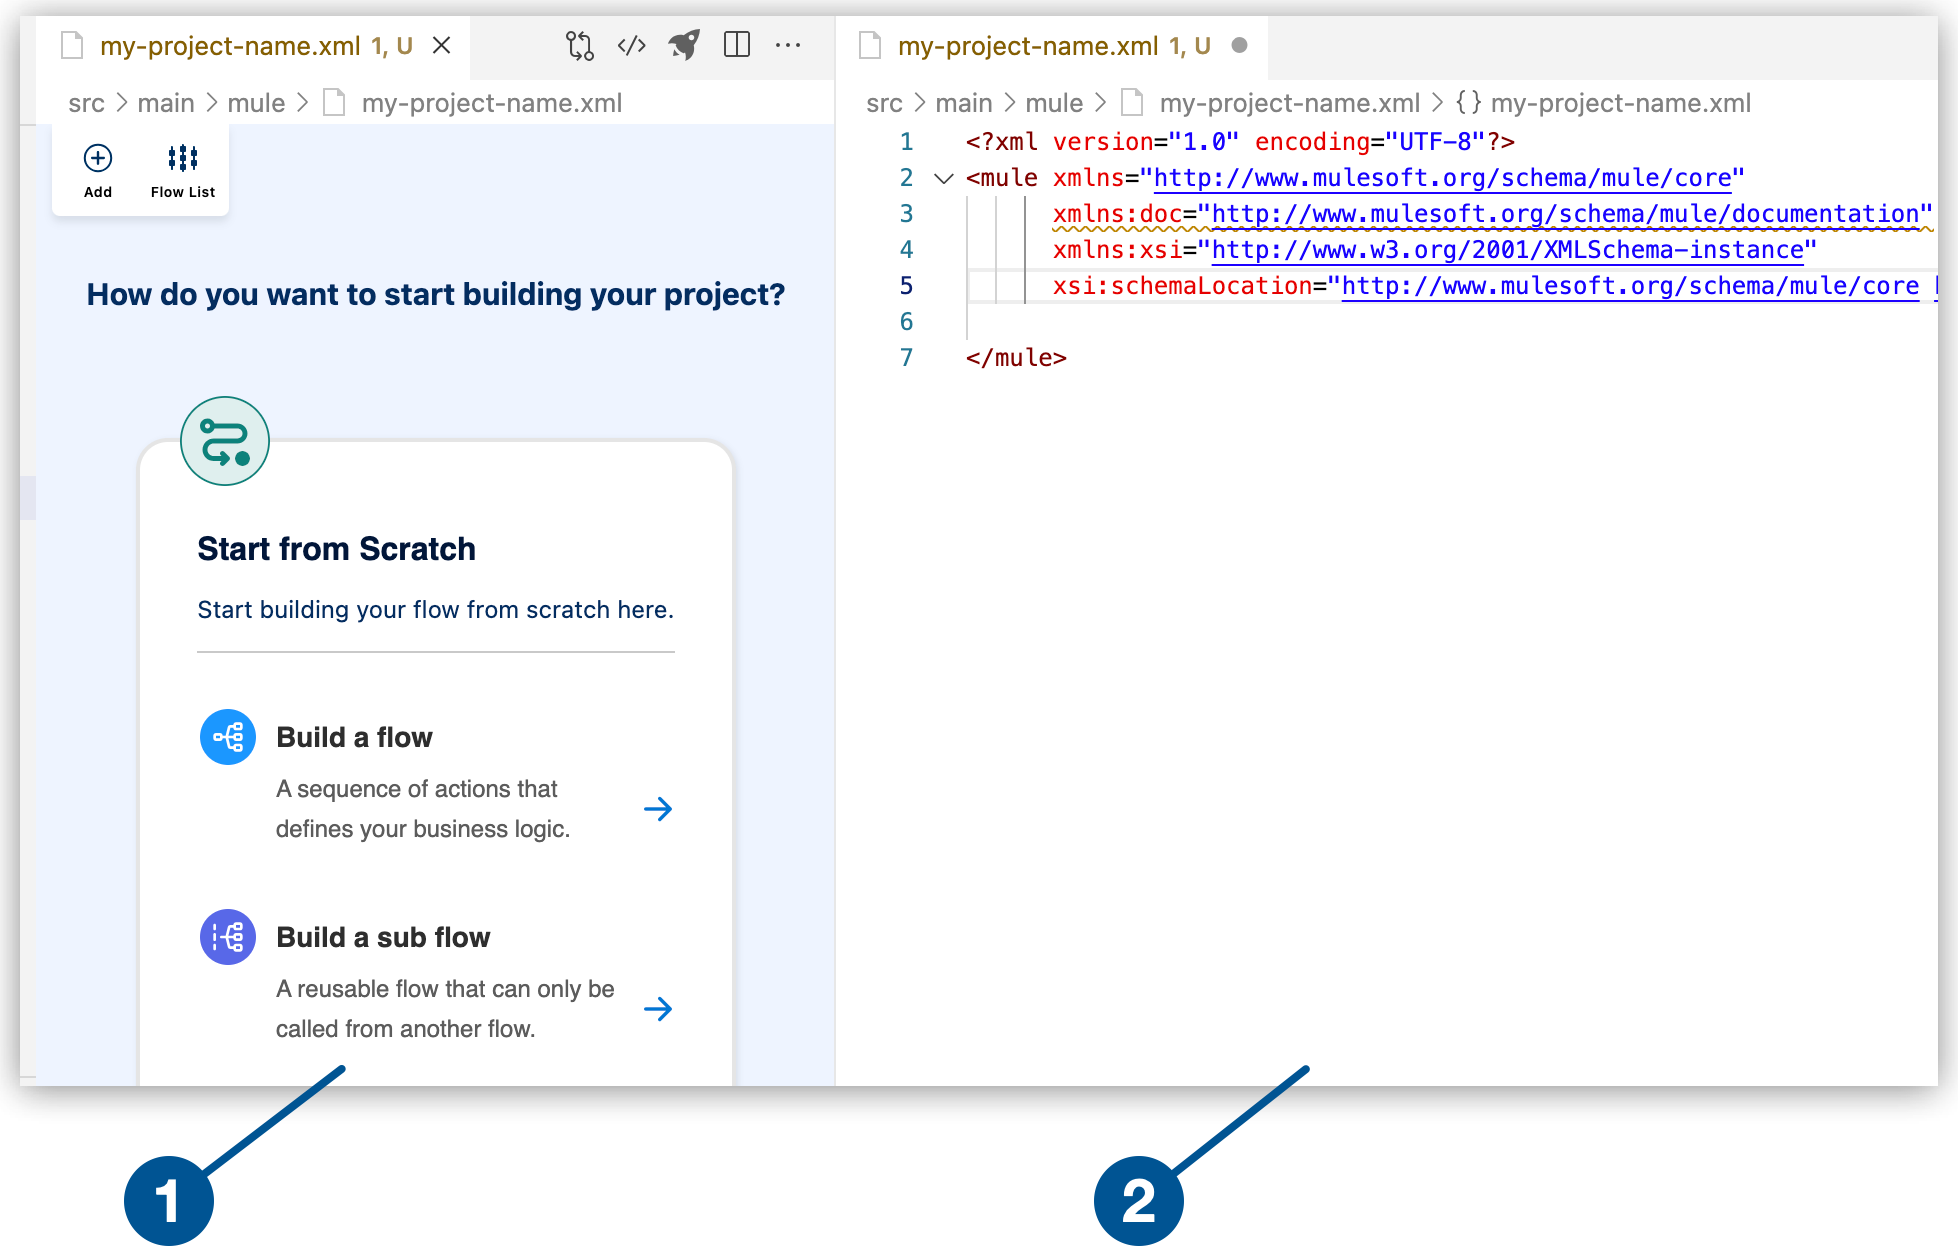
1 The canvas provides space for a visual representation of your Mule flows or subflows. 2 The code editor displays the configuration file for your Mule application. -
Select Build a Flow from the canvas to create an empty flow within a Mule integration application.
-
Change the default name of the flow from the canvas or from the code editor.
-
From the canvas
-
From the code editor
Click Flow name1 to open the configuration panel for the Flow component, change the flow name, and click the check mark to set the new name.
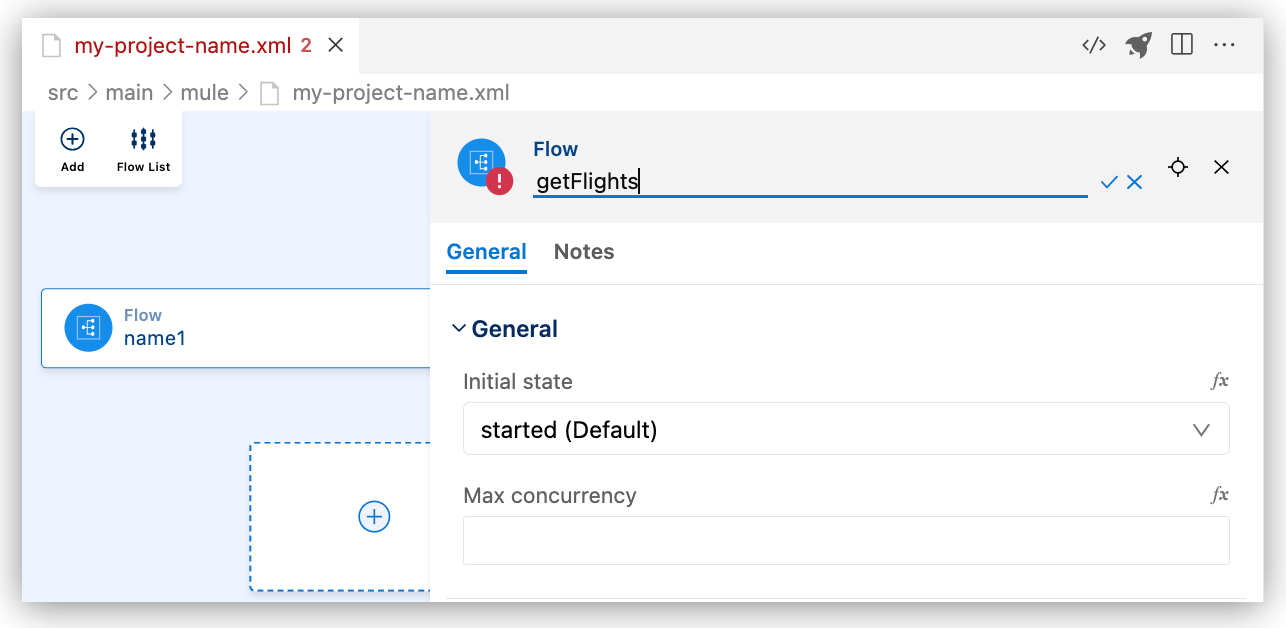
Replace the default name of the flow (
name1) with your flow name, such asgetFlights, for example:<flow name="my-flow" > </flow> -
-
Add a component to your project from the canvas.
For example, add the HTTP Listener component:
-
In the canvas, click the
 (Add component) icon.
 -
In the Add Component panel, search for and select Listener from the HTTP results:
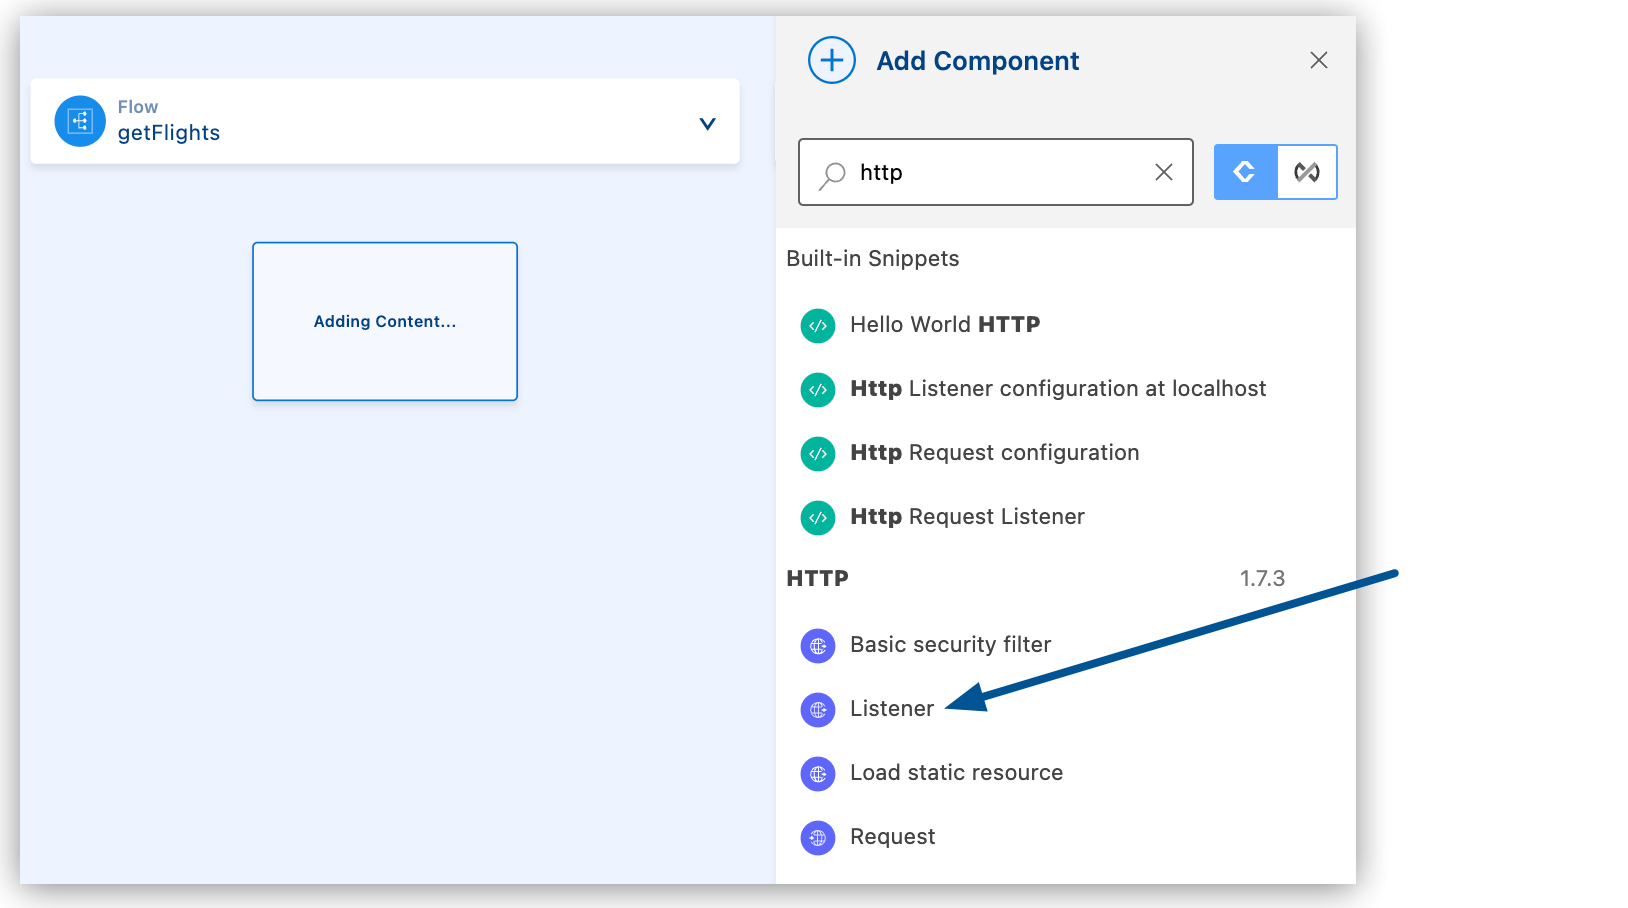
The configuration XML file now includes the XML for the HTTP Listener within the
<flow/>element, for example:<flow name="getFlights" > <http:listener path="mypath" config-ref="config-ref" doc:name="Listener" doc:id="rrjiqa" /> </flow>
-
-
Add another component, this time using the code editor.
In the code editor, place your cursor before the opening
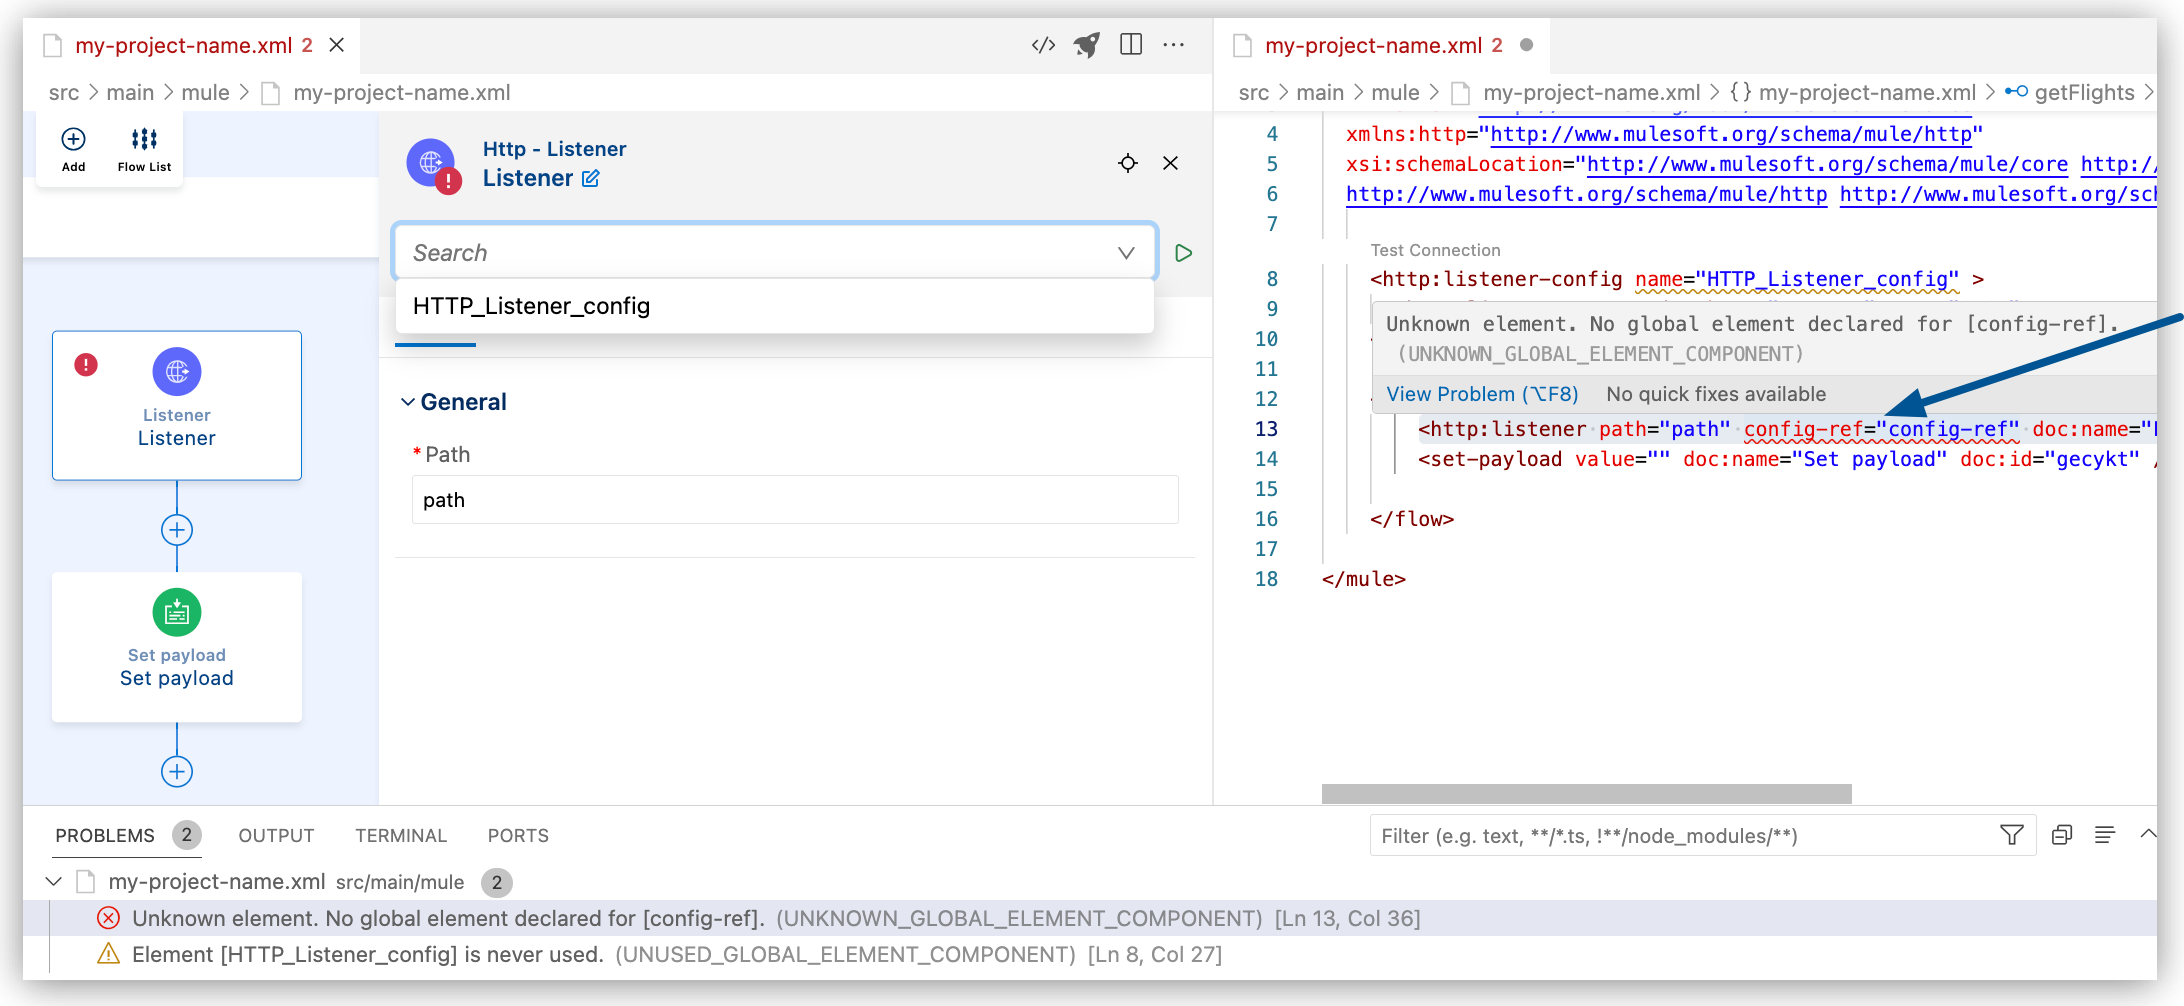
<flow>tag. Ensure that the cursor is not inside the<flow/>element. Add the following code:<http:listener-config name="HTTP_Listener_config" > <http:listener-connection host="0.0.0.0" port="8081" /> </http:listener-config>-
Notice that the Listener component in the canvas now displays an error:

-
To determine where the error is, select the processor in the canvas.
Anypoint Code Builder highlights its location in the code editor, and you can mouse over the issue for more information, for example:
-
To fix the error, change the value of the
nameattribute inhttp:listener-configto match the name of theconfig-refvalue in yourhttp:listenerconfiguration:<http:listener-config name="config-ref" > <http:listener-connection host="0.0.0.0" port="8081" /> </http:listener-config>The HTTP listener within your flow now references the HTTP listener configuration, a global connection configuration that resides outside of the flow. For more information about debugging, see Debugging Mule Applications.
-
-
Add another component to your flow.
For example, add a Set Payload component to your HTTP Listener operation:
-
In the canvas, click the
(Add component) icon. -
In the Add Component panel, search for and select Set payload from the Transformer results.
-
In the canvas, click Set payload to open its configuration panel, and add a string value, DataWeave expression, Mule variable, or configuration property.
-
To add a string, type a value such as
my value. For example: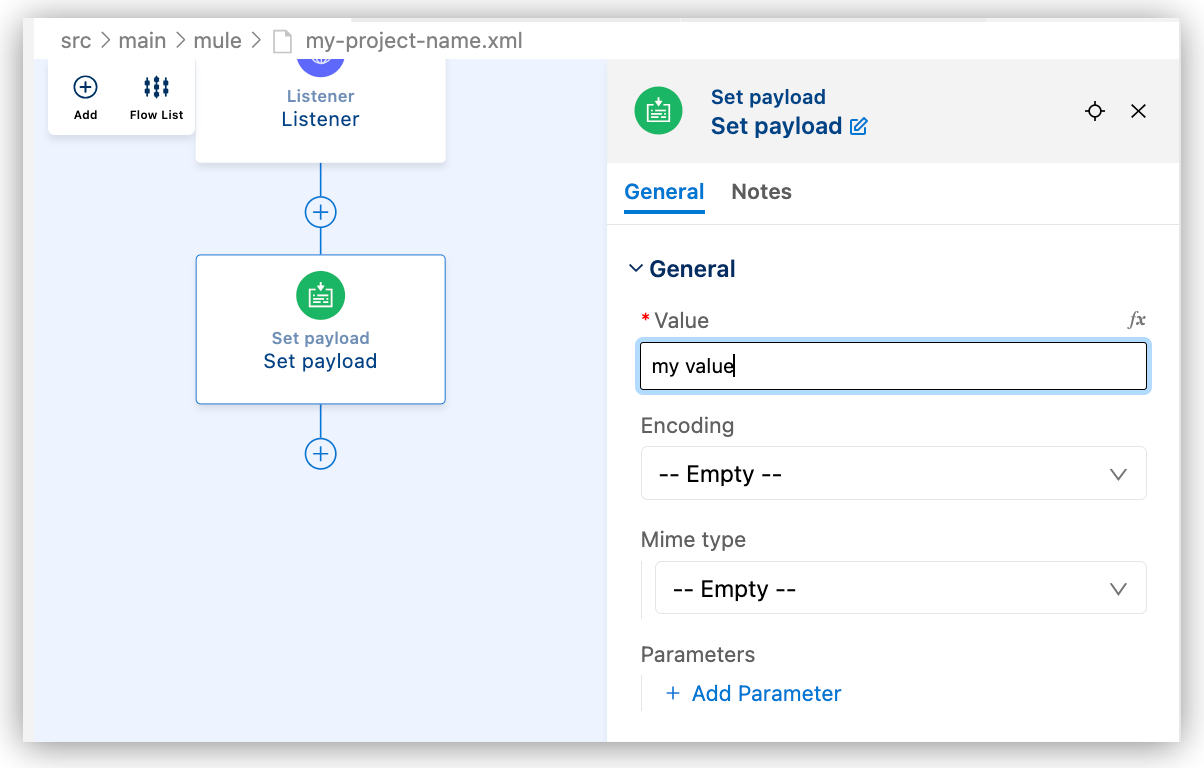
-
To add a DataWeave expression or a Mule variable as a value, such as
payload, click fx (located before the field), and provide the value, for example: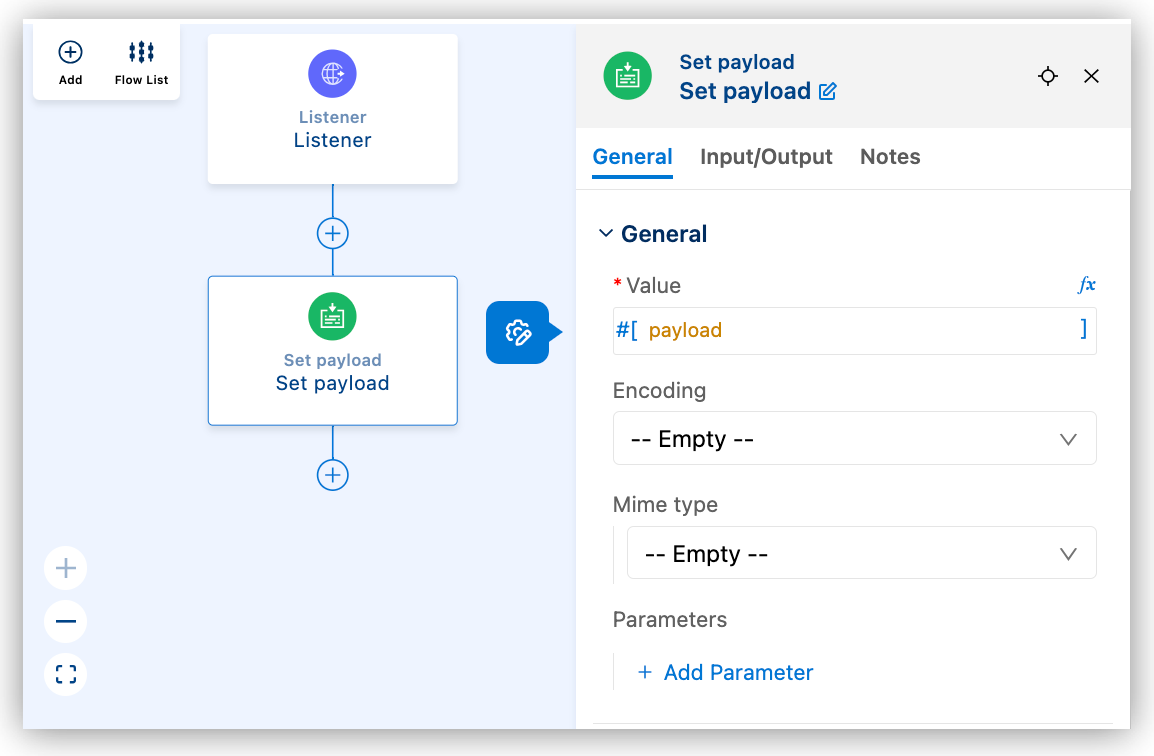
-
For more information about configuring DataWeave expressions, see Using DataWeave Expressions and Transformations in Anypoint Code Builder.
-
To add a configuration property as a value, type a value such as
${secure::mysensitiveprop}. For example: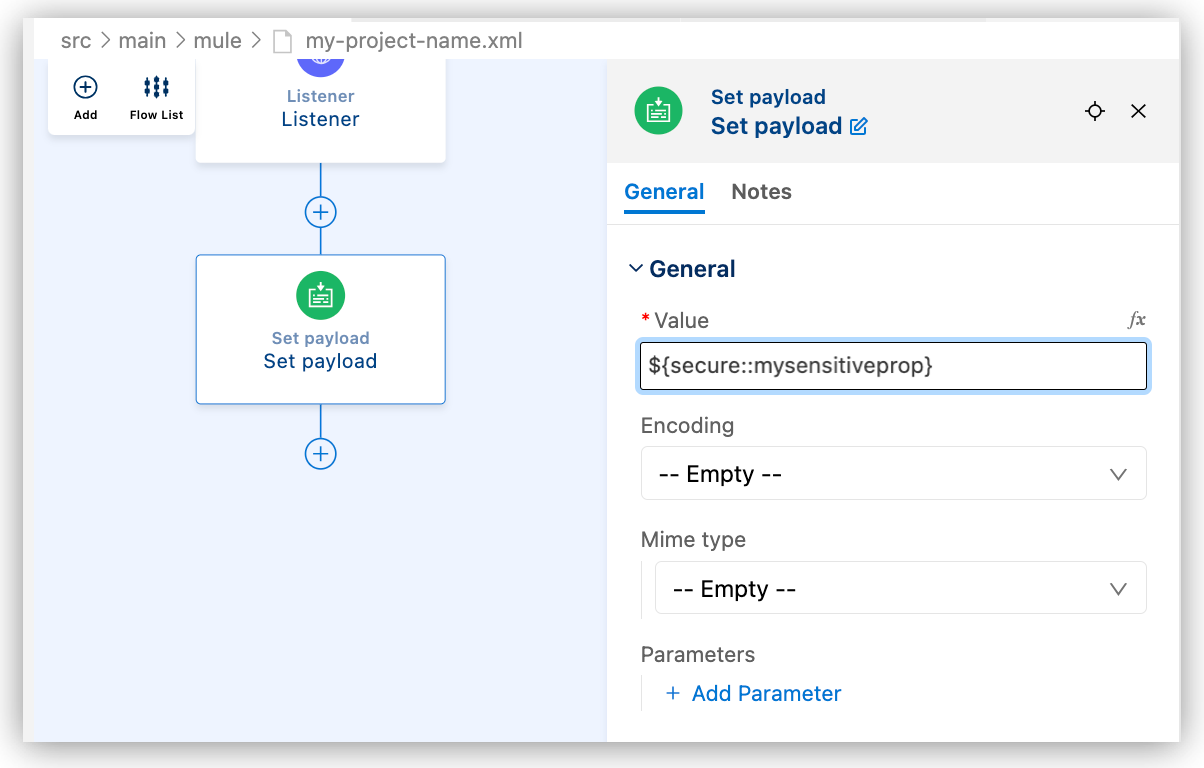
For more information about configuration properties, see Defining and Securing Properties for a Mule Application.
Your configuration XML file now looks similar to the following:
<http:listener-config name="config-ref" > <http:listener-connection host="0.0.0.0" port="8081" /> </http:listener-config> <flow name="getFlights" > <http:listener path="path" config-ref="config-ref" doc:name="Listener" doc:id="rrjiqa" /> <set-payload value="my value" doc:name="Set payload" doc:id="gecykt" /> </flow> -
-
Add another component to your flow.
For example, add the Create operation from Anypoint Connector for Salesforce to insert an Account record.
Use this pattern when your flow receives data through an HTTP Listener and must create Salesforce records. If you completed the earlier steps that add Set payload with a fixed string, remove or replace that processor so you can shape the payload before Create.
For more information about using Create with Account records, see Salesforce Connector 11.5 Examples.
-
In the configuration XML, add a global Salesforce connection element above your
<flow>element (not inside the flow).Use configuration properties for credentials instead of literals; for example:
<salesforce:sfdc-config name="Salesforce_Config" doc:name="Salesforce Config">
  <salesforce:basic-connection username="${salesforce.username}" password="${salesforce.password}" securityToken="${salesforce.token}" />
</salesforce:sfdc-config>
For more information about connection types and authentication fields, see Salesforce Connector 11.5.
-
In the canvas, click the
(Add component) icon after HTTP Listener. -
In the Add Component panel, search for Set payload, and add the component.
-
Configure Set payload with a DataWeave expression that builds a JSON object whose fields match your HTTP API (they need not match Salesforce field names yet).
For example, use fx to enter DataWeave with
output application/jsonand sample fields such ascompanyName,industry, andphoneNumber.Alternatively, add Transform Message and use the same DataWeave in
<ee:set-payload/>.For more information about Transform Message, see Transform (<ee:transform/>).
-
From the canvas, click the
(Add component) icon after Set payload (or Transform Message). -
In the Add Component panel, click Connectors, select Salesforce, and select Create.
-
In the configuration panel for Create, set:
-
Connection config: The global Salesforce configuration name (for example,
Salesforce_Config). -
Type:
Account.If Type stays empty until you establish a working Salesforce connection, set
type="Account"on<salesforce:create/>in the code editor. -
Records: A DataWeave expression that resolves to the records to create.
If the incoming payload uses different property names than Salesforce expects, map those properties in Records, as shown in the configuration XML example that follows. If the payload is already an array of Java objects with Salesforce field names (
output application/java), you can use#[payload].
For more information about connector fields for this operation, see Salesforce Connector 11.5.
Picklist fields such as Industry must use values that exist in your Salesforce organization. This configuration listens on
/accounts, builds a JSON payload, maps it to Account fields inside<salesforce:records/>, and calls Create. Alignconfig-refon<http:listener/>with thenameof your<http:listener-config/>(for example,config-reffrom the earlier steps in this topic).<http:listener-config name="config-ref" > <http:listener-connection host="0.0.0.0" port="8081" /> </http:listener-config> <salesforce:sfdc-config name="Salesforce_Config" doc:name="Salesforce Config"> <salesforce:basic-connection username="${salesforce.username}" password="${salesforce.password}" securityToken="${salesforce.token}" /> </salesforce:sfdc-config> <flow name="createSalesforceAccountFlow" > <http:listener path="/accounts" config-ref="config-ref" doc:name="Listener" doc:id="rrjiqa" /> <set-payload doc:name="Set Payload" value="#[%dw 2.0 output application/json --- { companyName: 'Anypoint Inc.', industry: 'Technology', phoneNumber: '415-229-2000' }]" /> <salesforce:create doc:name="Create" type="Account" config-ref="Salesforce_Config"> <salesforce:records>#[%dw 2.0 output application/java --- [{ Name: payload.companyName, Industry: payload.industry, Phone: payload.phoneNumber }]] </salesforce:records> </salesforce:create> </flow>If the message payload is already an array of Java objects with Salesforce field names, you can omit
<salesforce:records/>and set Records to#[payload], or use a self-closing<salesforce:create/>element with that default.You can achieve the same result by adding Transform Message with
output application/javafollowed by<salesforce:create type="Account" config-ref="Salesforce_Config"/>with Records set to#[payload]. -
-
Set Custom Metadata for a Component
To set custom metadata for a component, add or open the component in the canvas and then apply the metadata using the custom metadata options from the Metadata tab, Expression Builder, or dataweave functions. For more information, see Set Custom Metadata on the Metadata or Data Tab and see Set Custom Metadata in Transformation Builder.

Refactor Flows Using Canvas Actions
Reorganize and refactor your flows directly from the canvas. Move, copy, and extract components without manually updating the underlying XML.
These actions help you reduce rework, maintain clean flow structures, and safely evolve your implementations as complexity grows.
You can use canvas actions to:
-
Move components within a flow or across files
-
Copy and reuse components in the same or different projects
-
Extract components into a new flow or subflow
When you perform these actions, Anypoint Code Builder automatically updates references, connections, and configurations to prevent broken flows.
| Some components can’t be extracted or moved. If a selection includes unsupported components, the available actions are limited to prevent invalid configurations. In some cases, the Extract to Flow option is displayed but no extraction is performed, for example when extraction across scopes isn’t supported. |
Extract Components to a Flow
Extract one or more components into a new flow or subflow. This is useful for simplifying large flows or reusing logic.
To extract components:
-
Select one or more components in the canvas.
-
Right-click the selection and select Extract to Flow.
-
Enter a name for the new flow.
-
Select the target Mule configuration file.
-
Configure metadata preferences if needed.
-
Click Extract.
Anypoint Code Builder creates the new flow and replaces the selected components with a Flow Reference in the original flow.
By default, the current file is selected as the target configuration file.
| Some components can’t be extracted or moved. If a selection includes unsupported components, the available actions are limited to prevent invalid configurations. In some cases, the Extract to Flow option is displayed but no extraction is performed, for example when extraction across scopes isn’t supported. |
Metadata Preferences
When extracting components, you can define metadata preferences for the new flow.
You can configure:
-
Payload metadata
-
Attributes metadata
-
Variables metadata
These settings help ensure that the extracted flow has the correct input structure.
Multi-Selection Behavior
You can select multiple components by holding Shift and clicking components in the canvas.
Validation and Safeguards
Canvas actions include built-in validation to prevent invalid operations.
For example:
-
Extraction is blocked until required metadata is loaded
-
Unsupported components can’t be extracted
-
Actions are disabled while the canvas is loading
These safeguards help ensure that your flows remain valid and executable after refactoring.
Copy Components
You can copy components and paste them in the same flow or in a different file or project.
To copy a component:
-
Right-click the component. To copy multiple components, press and hold Ctrl (Windows) or Cmd (macOS), select the components, and then right-click a selected component.
-
Click Copy Component. Or press Ctrl+c (Windows) or Cmd+c (macOS).
-
Right-click the
icon in the current flow or in a different file or project and select Paste Component or press Ctrl+v (Windows) or Cmd+v (macOS). The component and its configuration are pasted in the new location. If multiple components are copied, they’re pasted in the same order as they’re copied.
| Some components, like an HTTP Listener, can’t be pasted to certain locations. An error message shows if a component can’t be pasted to the location. |
Disable Components
You can temporarily remove components from your flow without deleting them by disabling them directly from the canvas. This action is equivalent to commenting out code in the code editor.
To disable a component:
-
Right-click a component in the canvas.
-
Select Disable Component.
Disabled components appear with a dashed outline and a disabled icon. In the code editor, the component is wrapped in an XML comment (<!-- … -→), preserving the code but preventing it from executing. Disabled components appear greyed out in the canvas and are ignored at runtime.
Re-enable a Disabled Component
To restore a component: . Right-click the disabled component. . Select Enable Component.
This also removes the comment from the code editor.
If you previously set a breakpoint on a component and then disable it, the breakpoint remains associated with the component but is inactive.
You can’t add new breakpoints to a disabled component until it’s re-enabled.
Duplicate a Flow
To duplicate a flow, right-click the flow bar and select Duplicate Flow, or click the ![]() (Duplicate) icon in the Flow List.
(Duplicate) icon in the Flow List.
The new flow is named [flow name] copy. You can change the name in the configuration panel.
Navigate to Referenced Flows
If a component references another flow (for example, via a Flow Reference connector), you can quickly access the target flow in the canvas by pressing Ctrl+Alt+g (Windows) or Cmd+Option+g (macOS).
Anypoint Code Builder opens the target flow either in the application canvas or the MUnit canvas, depending on the context. In the MUnit canvas, you can use Flow Reference components to invoke or simulate execution of other flows. To help you trace and validate the logic, navigate to the referenced flow from within the test by pressing Ctrl+Alt+g (Windows) or Cmd+Option+g (macOS).
Anypoint Code Builder opens the target flow in the application canvas (or in another MUnit test flow if that’s the target). Right-click a Flow Reference in the MUnit canvas to navigate to its target flow.
Import a Connector from Exchange
Anypoint Connectors provide operations for retrieving, modifying, and sending data to and from systems. In addition to the built-in connectors that Anypoint Code Builder provides, you can download many other connectors from Anypoint Exchange. Exchange lookups in Anypoint Code Builder use platform search components, which provide a more consistent asset discovery and selection experience across supported Exchange flows.
Import a Connector from the Canvas
To import a connector from Exchange and add it to your configuration:
-
In the Explorer, open the configuration XML file for your project:, such as
my-project-name.xml. -
Click
 (Show Mule graphical mode) in the activity bar to open the UI canvas if it doesn’t open automatically.
 -
Add the connector the same way you added other components from the canvas:
-
In the canvas, click the
(Add component) icon. -
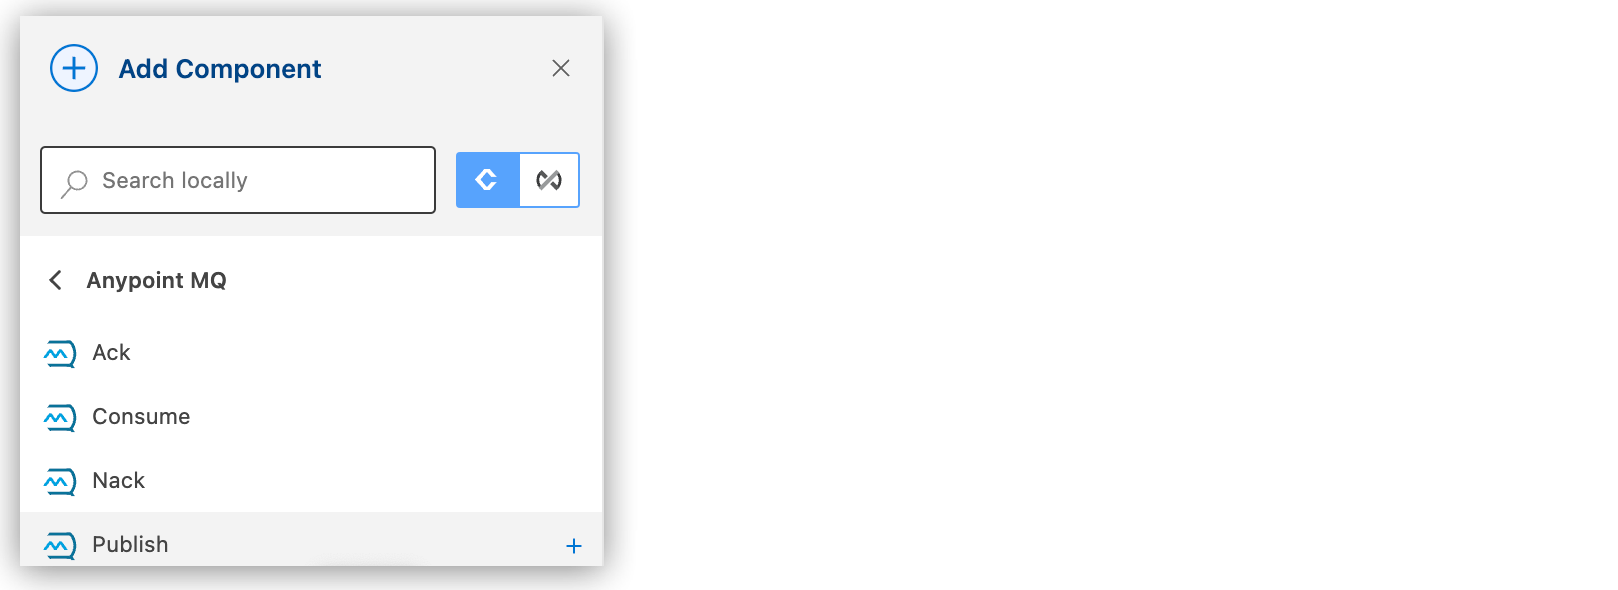
In the Add Component panel, click Connectors.
-
Click the connector name and then click the operation to add, such as Publish:
-
If the connector is not available locally, click the
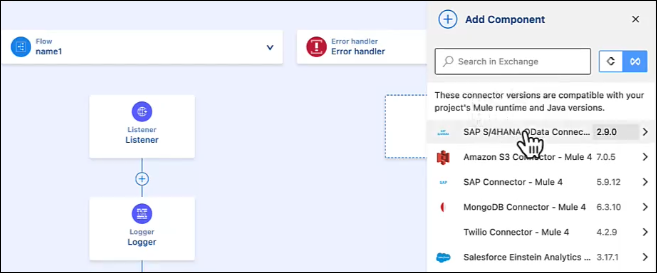
 (Search in Exchange) toggle:
1 Search locally 2 Search in Exchange -
Select the connector to add to your project. You can select from connector versions that are compatible with your Mule runtime and Java version set in Project Properties.
-
Select the operation from the Add Component panel.
-
Import a Connector with a Command
To import a connector from Exchange to use later in your project:
-
In the Explorer, open the configuration XML file for your project:, such as
my-project-name.xml. -
Click
(Show Mule graphical mode) in the activity bar to open the canvas if it doesn’t open automatically. -
Open the Command Palette.
Show me how
-
Use the keyboard shortcuts:
-
Mac: Cmd+Shift+p
-
Windows: Ctrl+Shift+p
-
-
In the desktop IDE, select View > Command Palette.
-
In the cloud IDE, click the
 (menu) icon, and select View > Command Palette.
-
-
Select the following command:
MuleSoft: Import Asset from Exchange -
Select Connector.
-
Search for the connector name to import, such as "MQ," for example:
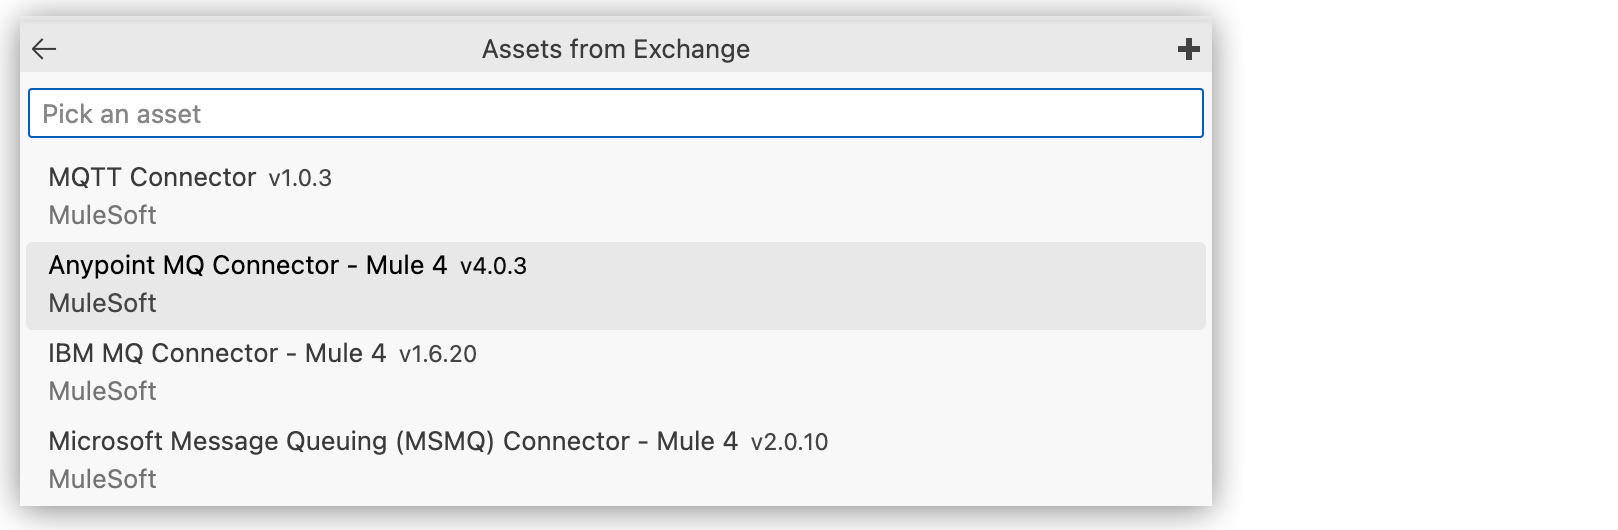
-
Select the connector.
-
At the prompt, select the version of the connector to import, such as
v4.0.3.Anypoint Code Builder imports the connector and makes it available in the Components list.
For more information about the connectors available on Exchange, see Connectors. For more information about Exchange, see Exchange (US) or Exchange (EU) and Anypoint Exchange Overview.
Test a Connection Configuration
Most connectors provide an operation, such as the HTTP Listener operation, that triggers the flow to start. These operations typically include connection configurations that you can test.
Test Connection from the Configuration Panel
You can test the connection from the connectors Configuration panel. For example, to test an HTTP Listener connection:
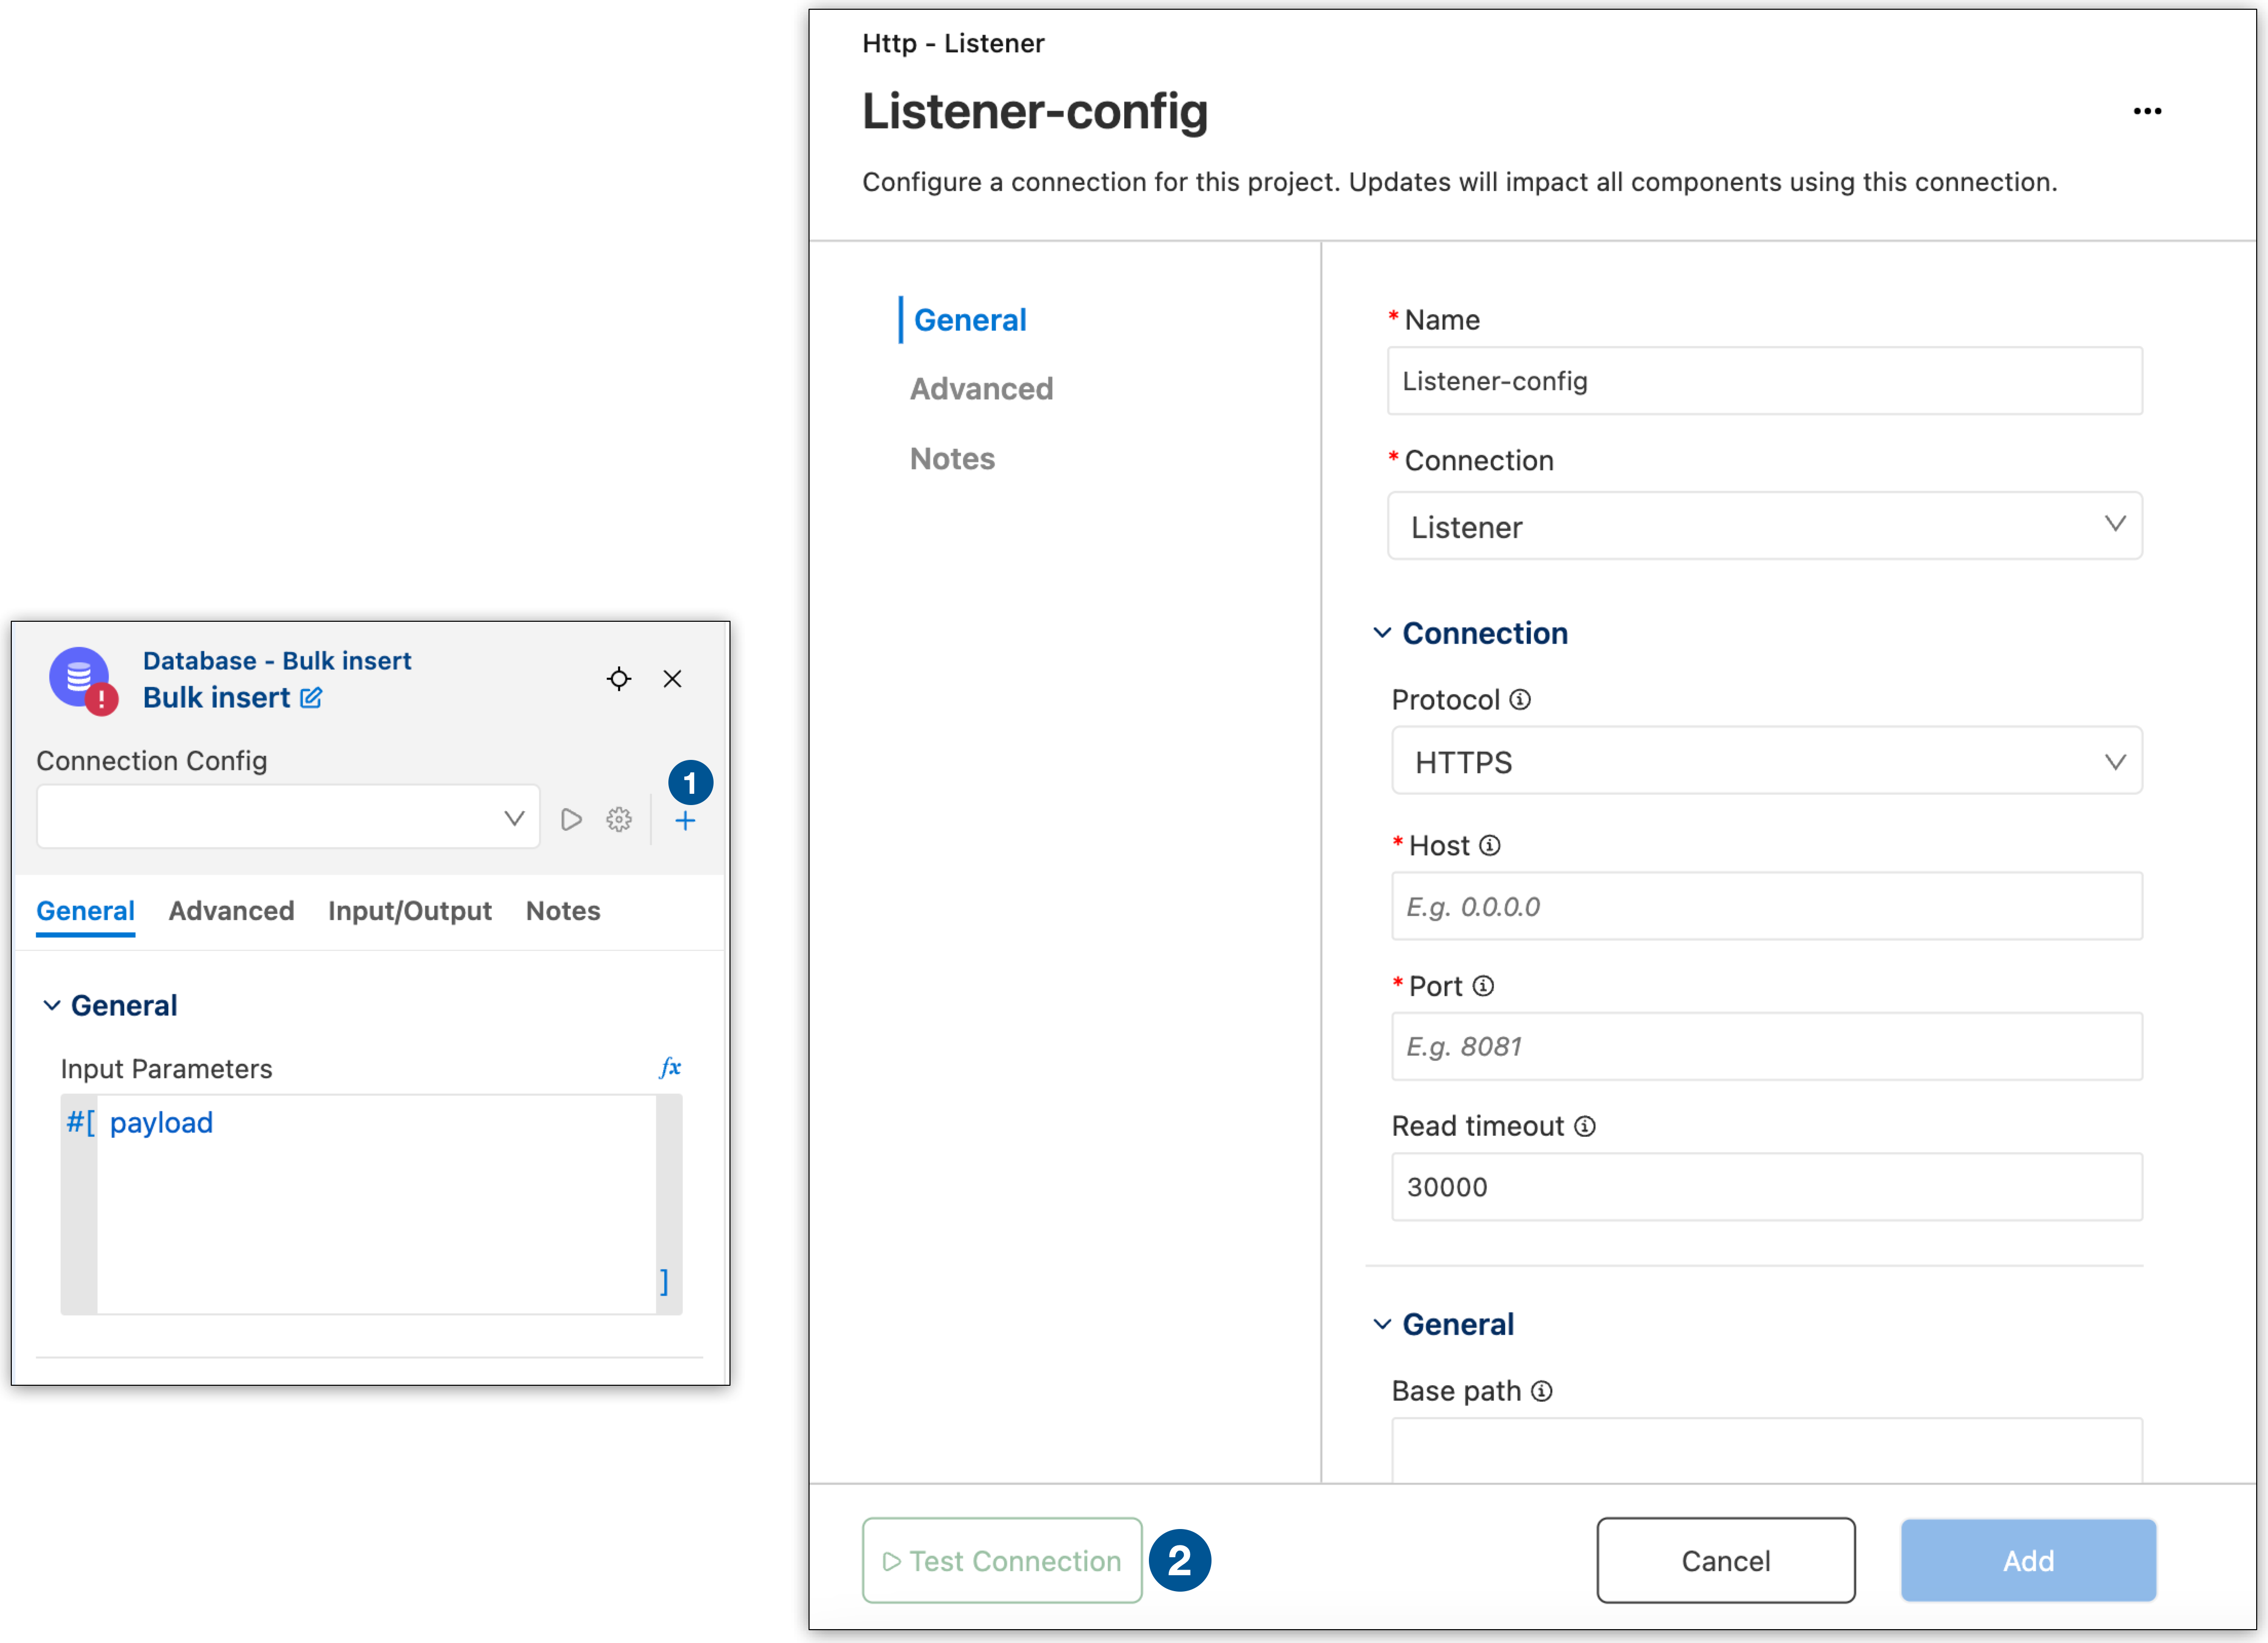
| 1 | Click the + icon on the connector to open the configuration panel. |
| 2 | After filling in the required fields, click Test Connection. |
The status bar shows the progress:
-
Verifying connection indicates that the test is in progress.
-
Connection is valid indicates a successful connection.
-
Invalid Connection Got status code: 500 when trying to resolve a Mule Runtime operation indicates a connection error.
Test Connection from the Code Editor
You can test the connection from the code editor. For example, to test an HTTP Listener connection, click Test Connection in the code editor:

The status bar shows the progress:
-
Verifying connection inbound-request indicates that the test is in progress.
-
Connection is valid indicates a successful connection.
-
Invalid Connection Got status code: 500 when trying to resolve a Mule Runtime operation indicates a connection error.
A common code
500error isport 8081: Address already in use. For port conflicts, configure a different port, such as8082, and retest the connection.
Before publishing, run your application in debug mode.
Open a Component in the Canvas from the Code Editor
You can open a component and its configuration panel in the canvas from the code editor. This feature is helpful, for example, if you want to configure the component from the UI, if a component is in another flow than the flow currently displayed in the canvas, or if the canvas is not open.
-
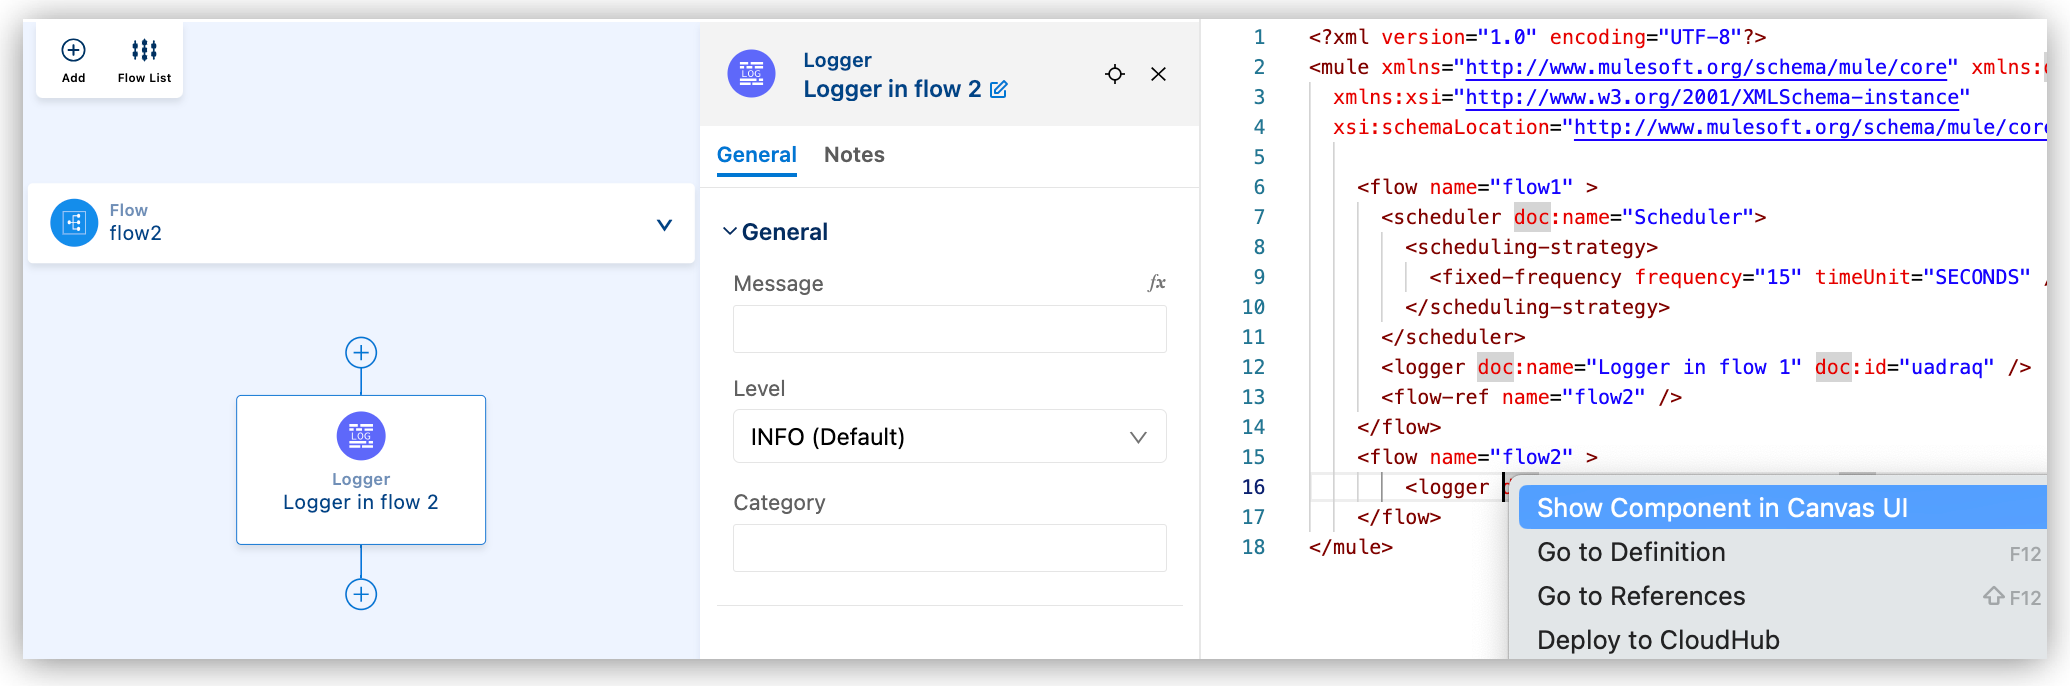
From the code editor, place your cursor within the component’s XML.
-
Right-click and select Configure Component in UI.
This action displays the component in the canvas and opens its configuration panel, for example:
Connection Configuration Panel
Use the Connection Management Configuration Panel to easily configure connections to third-party systems directly from the UI.
In this panel, you can create, edit, delete, and test connections directly within the IDE interface, automatically populate connection fields using metadata provided by the connector, and save and manage connection configurations without switching to the code editor.
To open the configuration panel:
-
Select an existing component, or add a new one.
-
Click the + icon.
This action displays the configuration panel, for example:
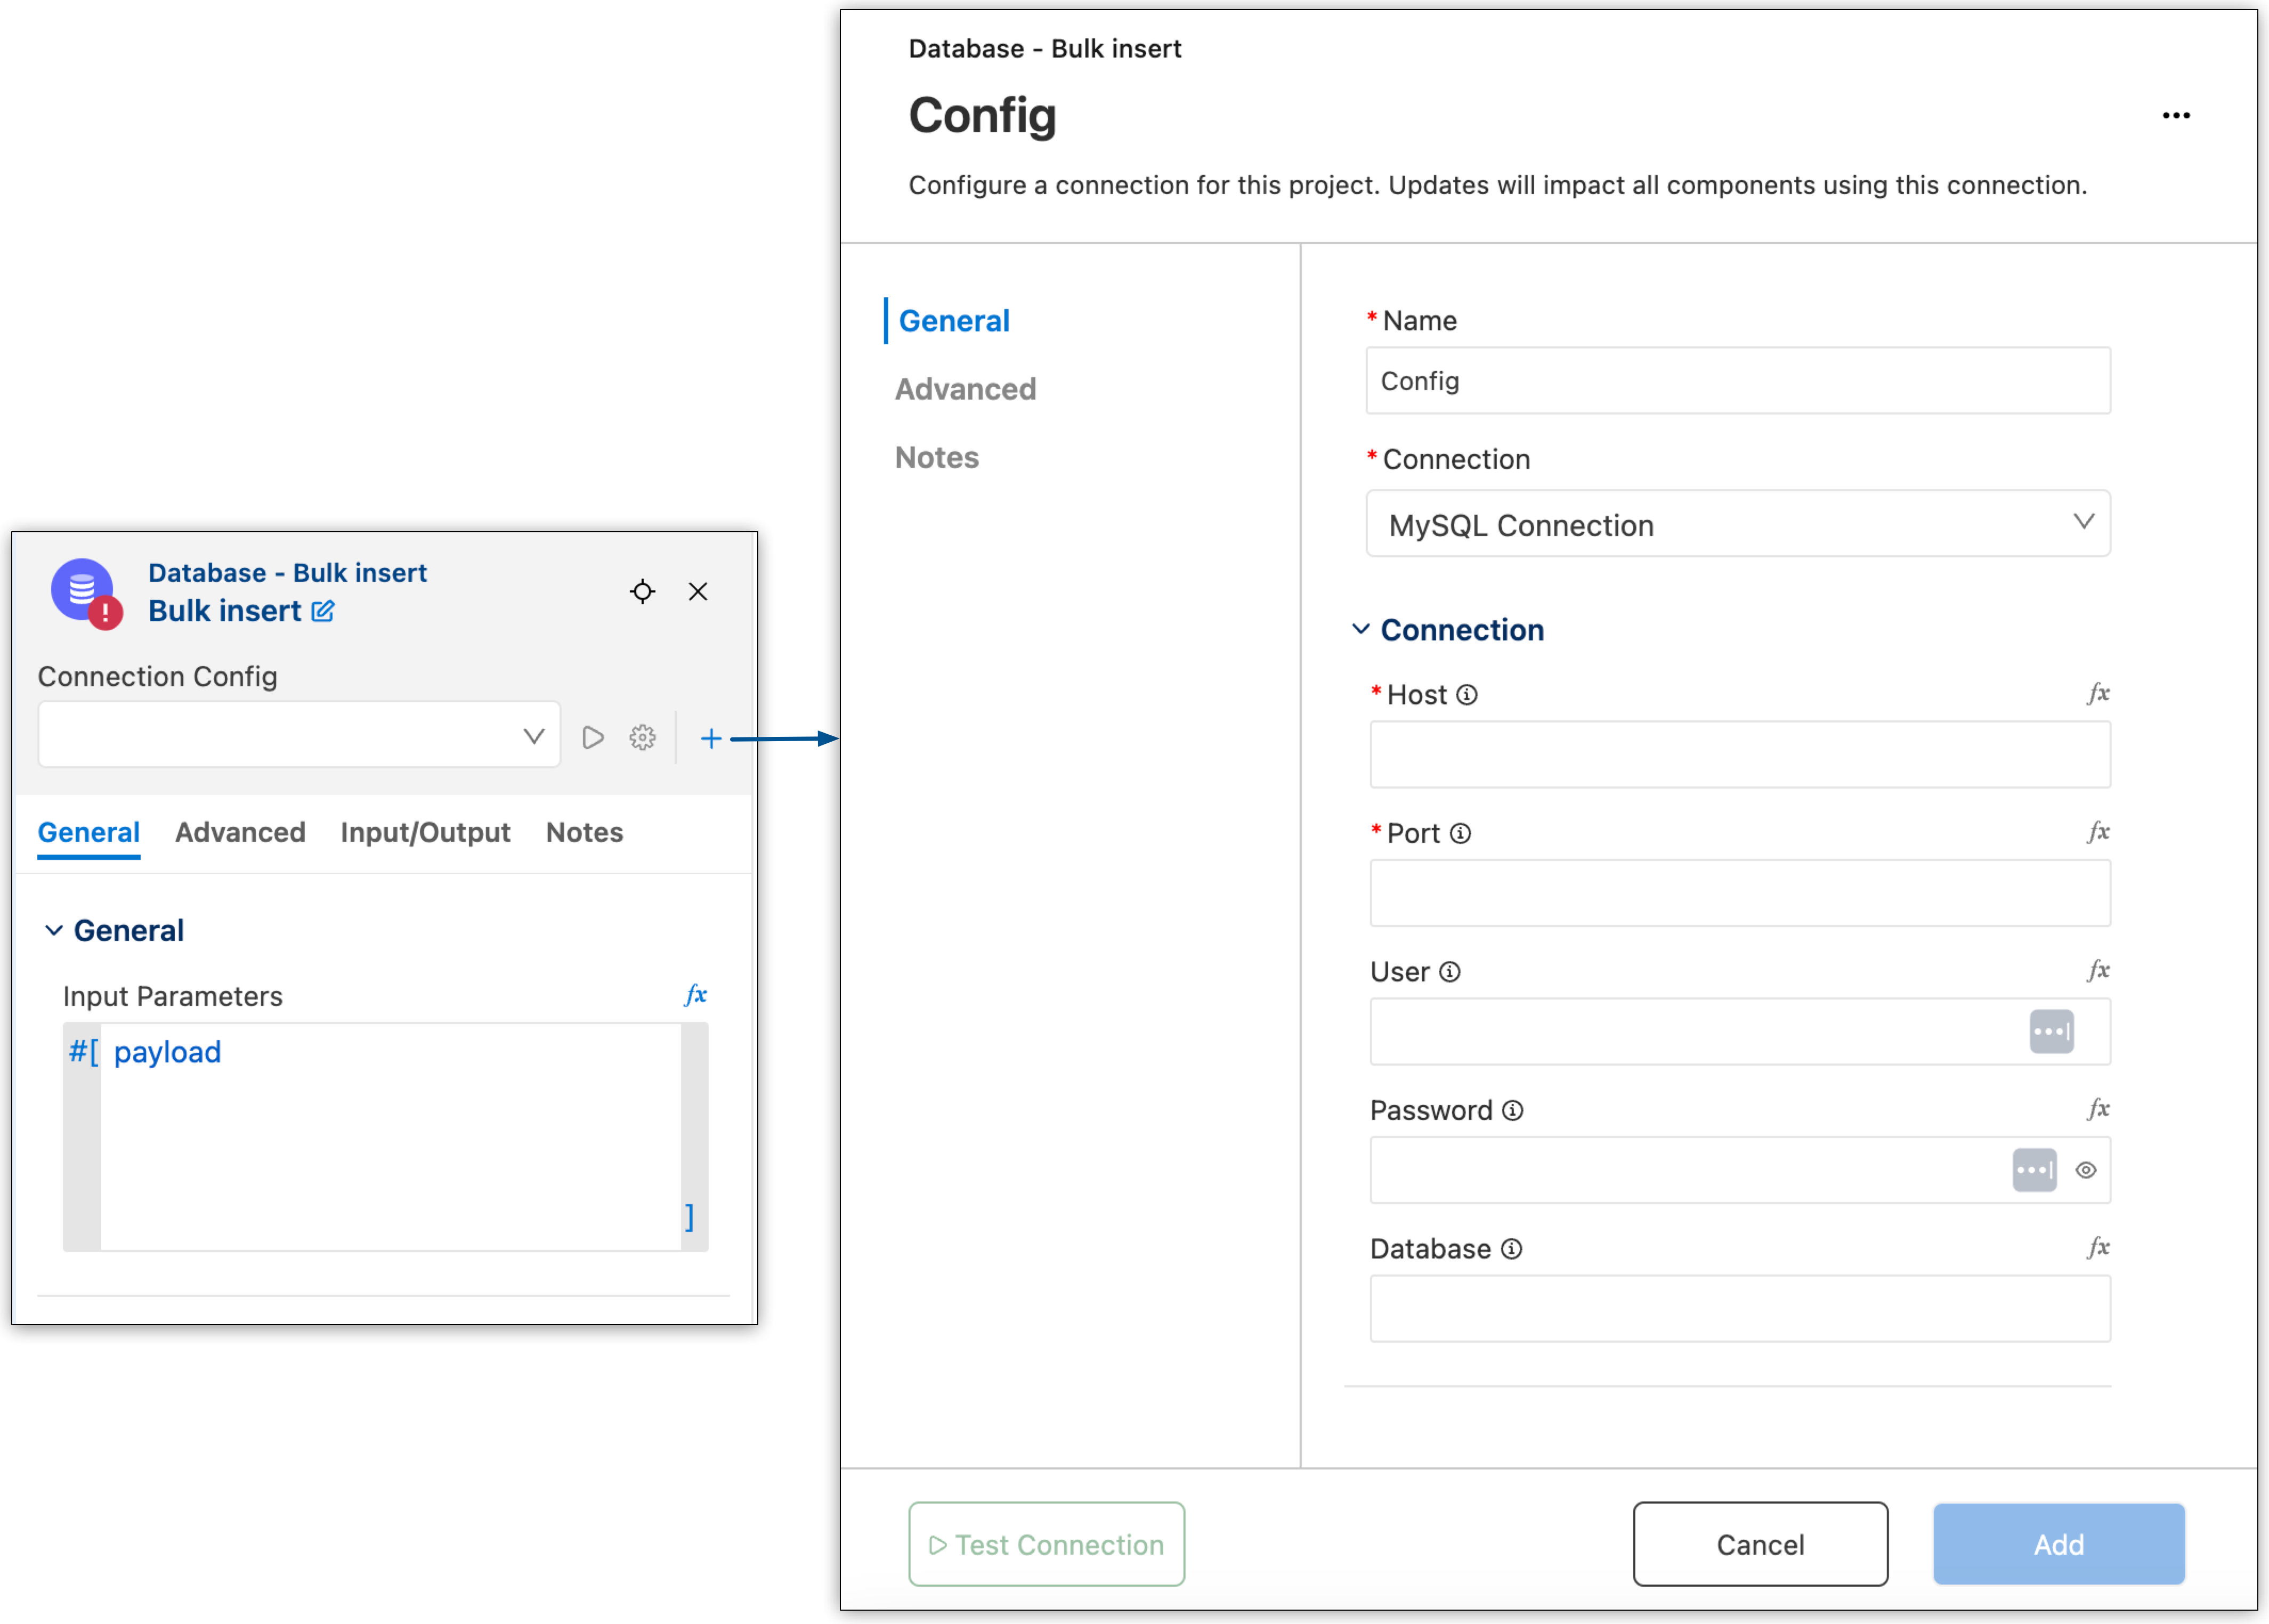
From here, you can:
-
Configure a connection for this project.
You can select a previously saved connection in the Connection field and the form is pre-populated with existing configuration data.
Changes impact all components using this connection. -
Update connection details without manually editing the XML in the code editor.
-
Test the connection directly within the panel to verify it’s correctly configured.
The test functionality helps prevent errors by allowing users to confirm that the connection is valid before committing changes.
-
Delete an existing connection if it’s no longer needed.
A confirmation message shows any affected components that use the connection.
-
View all components that depend on a connection.