Using DataWeave Expressions and Transformations in Anypoint Code Builder
DataWeave is the MuleSoft programming language for data transformation and for defining expressions.
Use DataWeave to process Mule event data, such as payload, attributes, and vars, in connector operations and other components. Develop DataWeave expressions and transformations in your Mule applications using the Expression Field, Expression Builder, or Transformation Builder, or in the code editor. Generate DataWeave transformations with AI help by providing input and output sample data, metadata, or both. AI-powered auto mapping provides comprehensive error feedback for GenAI actions, including authorization, metadata, and request limits, ensuring a more reliable and guided mapping experience.
| 1 | Expression Field: Enters a DataWeave expression or script in a component configuration panel. |
| 2 | Expression Builder: Creates and manages expressions within your Mule applications. |
| 3 | Transformation Builder: Creates DataWeave transformations in your Mule applications in a visual interface assisted by AI. |
Implementations and integrations in Anypoint Code Builder create Mule apps that run on an instance of the Mule runtime engine.
Anypoint Code Builder integrates DataWeave expressions and transformations into the Mule app development process and supports these features:
-
Hierarchical mapping
-
Object-to-object and array-to-array transformations
-
Concatenation of strings, numbers, and booleans
-
Type conversions
-
Custom metadata for inputs and outputs
-
Namespace-aware generated scripts when metadata defines namespaces (for example, qualified XML from a schema or sample)
Anypoint Code Builder supports these transform mapping use cases:
-
ObjecttoObject -
PrimitivetoPrimitive -
ObjecttoPrimitive -
PrimitivetoObject -
ObjecttoArray -
ArraytoObject -
Type conversion
ObjecttoObject -
Concatenation of simple fields
-
ArraytoArray(same level)
Before You Begin
-
Understand the functions, operators, variables, and selectors of DataWeave expressions.
For more information, see DataWeave Reference.
-
Review the built-in documentation for functions the IDE provides. For example, see List DataWeave Functions and Get Documentation.
-
Predefined Mule event variables such as
payload,attributes,vars. -
DataWeave selectors for capturing the values of fields within the payload, an attribute, or a variable within the Mule event.
For more resources, see DataWeave Overview.
-
-
Make sure you have these permissions to use the Anypoint Code Builder AI feature:
-
Anypoint Code Builder Developer
-
Mule Developer Generative AI User
-
-
Enable Einstein in Access Management. For more information, see Enabling Einstein for Anypoint Platform.
-
AI-assisted features support multiple languages.
-
If you have issues with the AI-assisted transformations, see Troubleshoot AI-Assisted Transformations.
Open the Expression Field
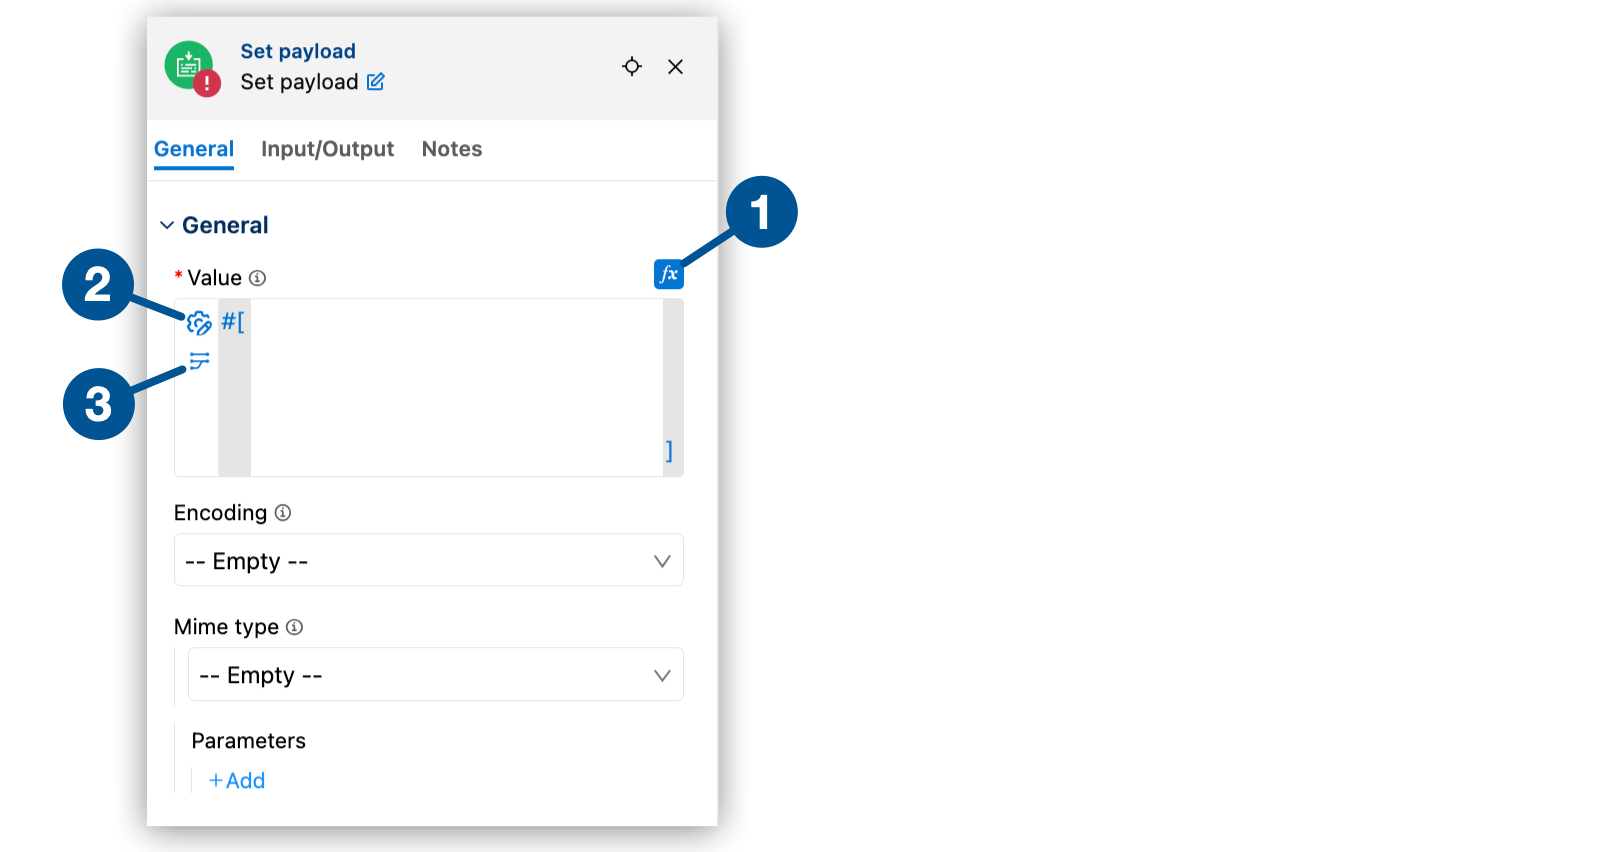
Most connector operations and components provide at least one field that accepts DataWeave expressions and scripts. In the configuration panel for a component, the fx button indicates that the field accepts an expression. In the code editor, these fields have the #[] markup. Expression fields accept DataWeave expressions, including DataWeave functions and Mule event data, such as payload, attributes, and vars.
To open a component expression field (fx):
-
Open a component that accepts expressions from the canvas in your implementation or integration project.
-
Click fx to change the field from a string field to an expression field.
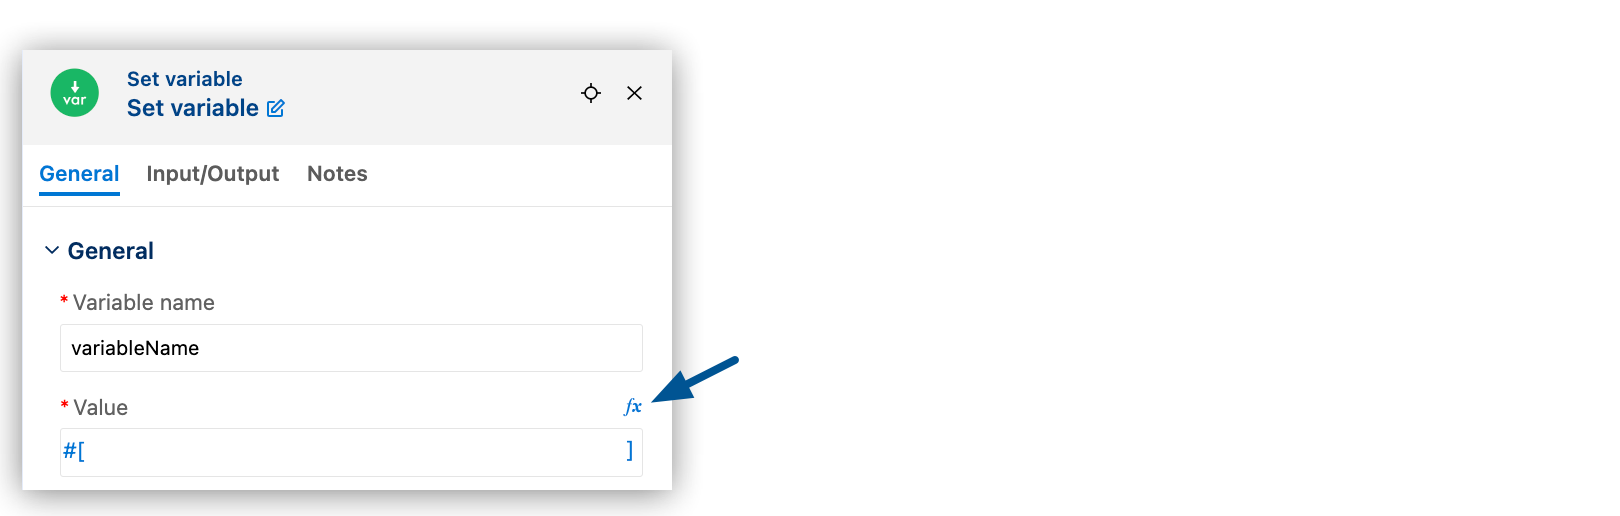
The markup
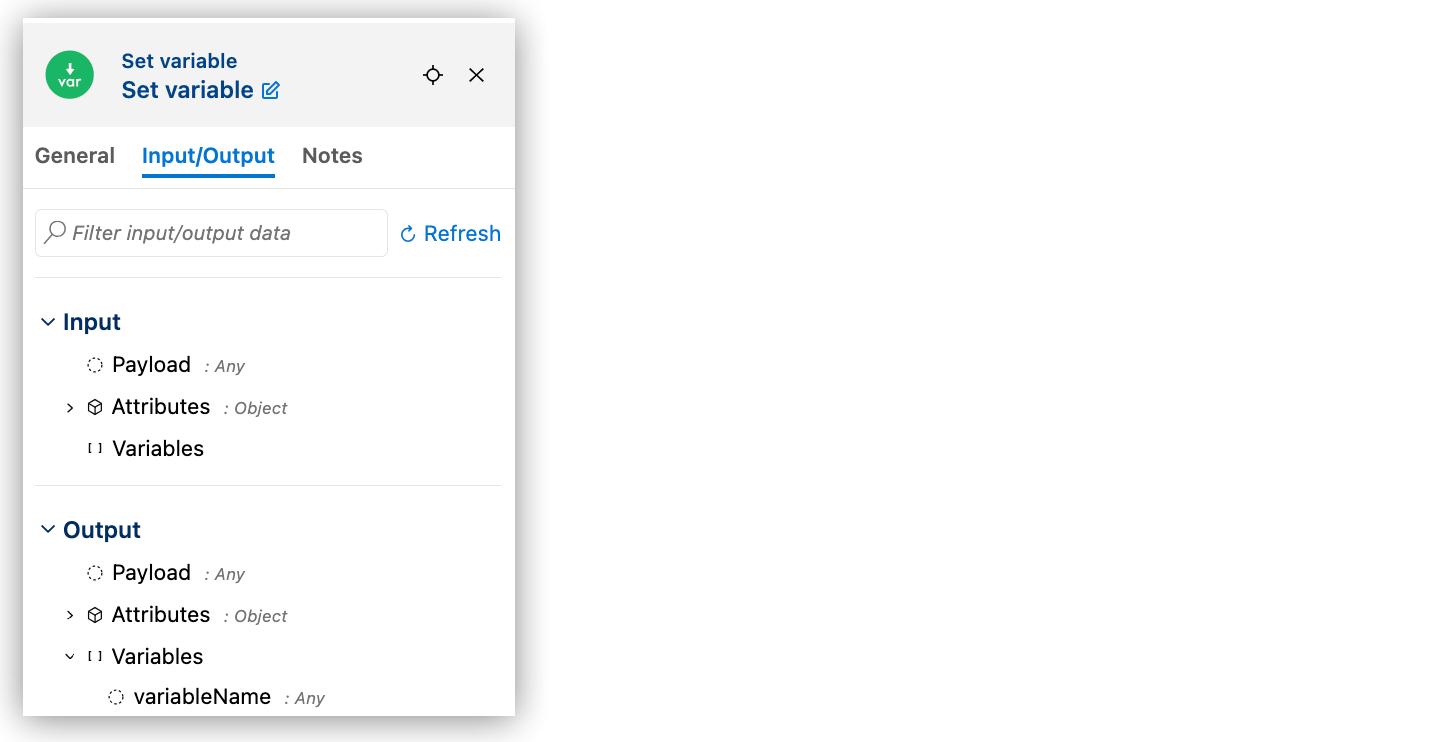
#[]in the fx field also appears in the code editor to indicate that the field is for an expression.<set-variable variableName="variableName" value="#[]" doc:name="Set variable" doc:id="ndpiap" /> -
Click Expression Builder to configure the component.
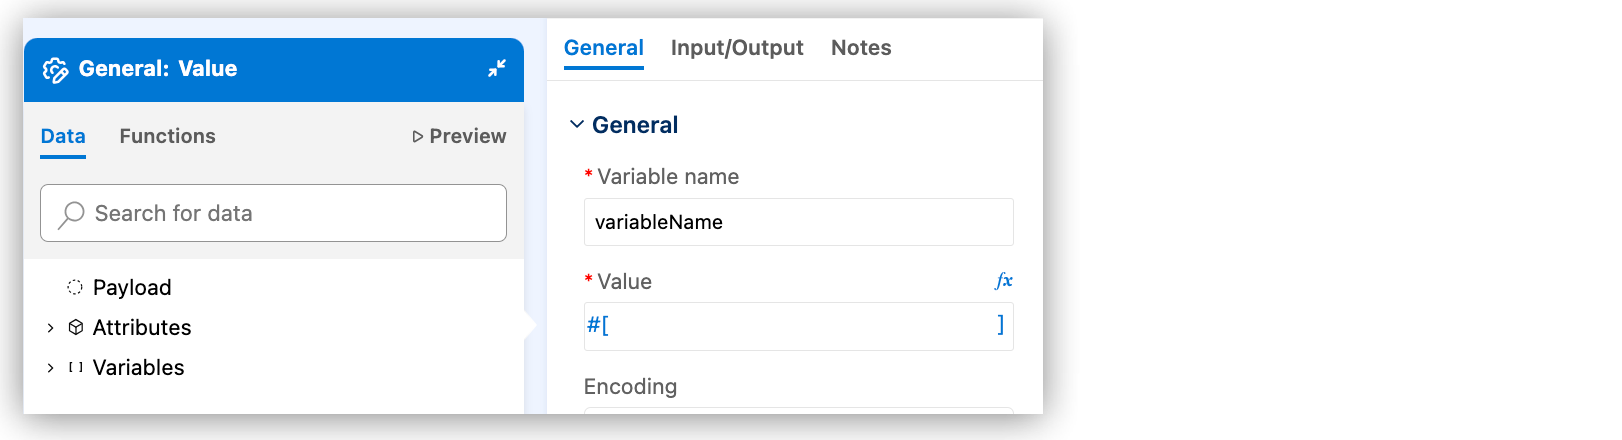
Use the Data, Functions, and Preview tabs to ease configuration of expressions in your components. Select custom metadata for the payload, attributes, and Mule variables. Preview the expression output without running your Mule app with data from external sources:
Open Expression Builder
Expression Builder simplifies the process of creating and managing expressions within your Mule applications. The builder provides a visual interface to create DataWeave expressions and transformations.
Check the Data Structure
To review the data structure of the Mule event, including the payload, attributes, and Mule variables, use the Data tab. The tab includes any sample data and custom metadata and is part of Expression Builder for a component fx field. For example:
| Data tab (with automatically generated data) | Data tab (expanded) |
|---|---|
|
|

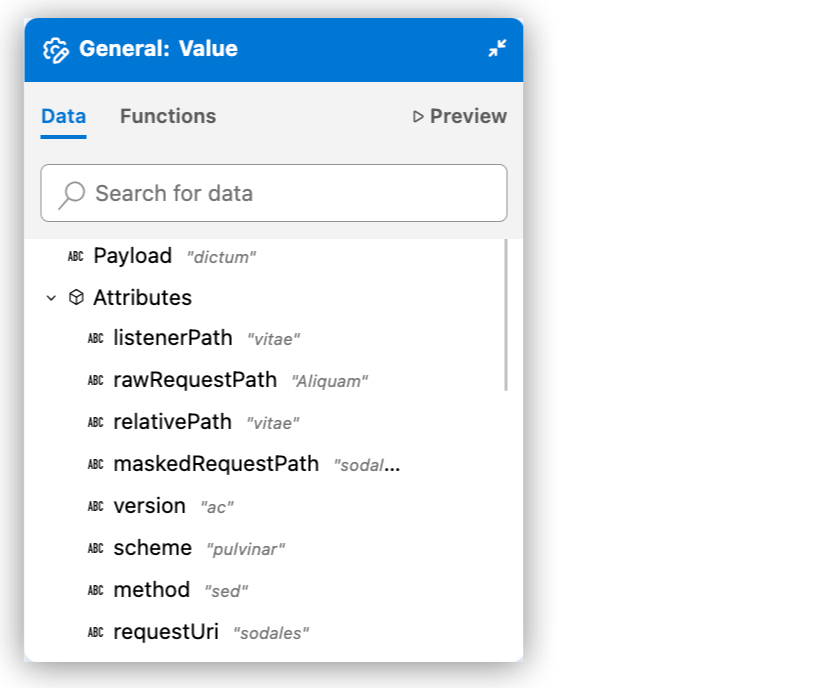
The IDE shows the automatically generated strings as mock values and uses them to generate output for previews, such as in the Preview tab. The attribute metadata keys in the example come from the configuration of an HTTP Listener component in the flow.
Set Component Custom Metadata on the Metadata or Data Tab
The Metadata tab shows the structure of data entering (Input) and exiting (Output) components. For example:
From the Metadata tab or the Data tab of Expression Builder, manage component metadata by setting, clearing, or editing custom definitions for inputs and outputs. Each payload, attribute, or variable supports only one custom metadata assignment at a time.
To set custom metadata from the Metadata tab or the Data tab of Expression Builder:
-
Click No metadata selected if metadata isn’t already set or click the name of the custom metadata. If default metadata is being used, click Default.
-
Click Set Custom Metadata.
-
Select, edit, or preview existing custom metadata or create new custom metadata. See Create Custom Metadata for more information about creating custom metadata. See Edit Custom Metadata for more information about editing custom metadata.
-
Click Apply and Close.
To clear custom metadata, click the name of the custom metadata and then click Clear Custom Metadata. The metadata is cleared from the component.
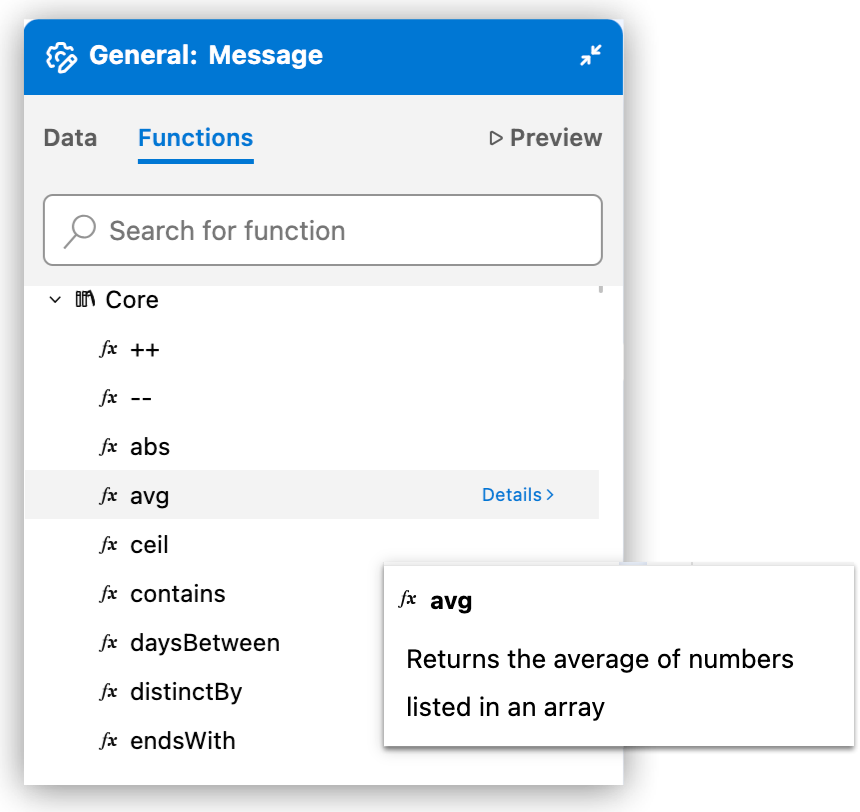
List DataWeave Functions and Get Documentation
To get a list of available functions from a component Functions tab, the fx field, or the auto complete menu in the code editor:
-
Open a component that has the fx expression field.
For guidance, see Open the Expression Field.
-
List available functions:
-
To show a list of DataWeave functions from the
Coremodule from an empty fx field, press Ctrl+Space in an empty fx field. For example: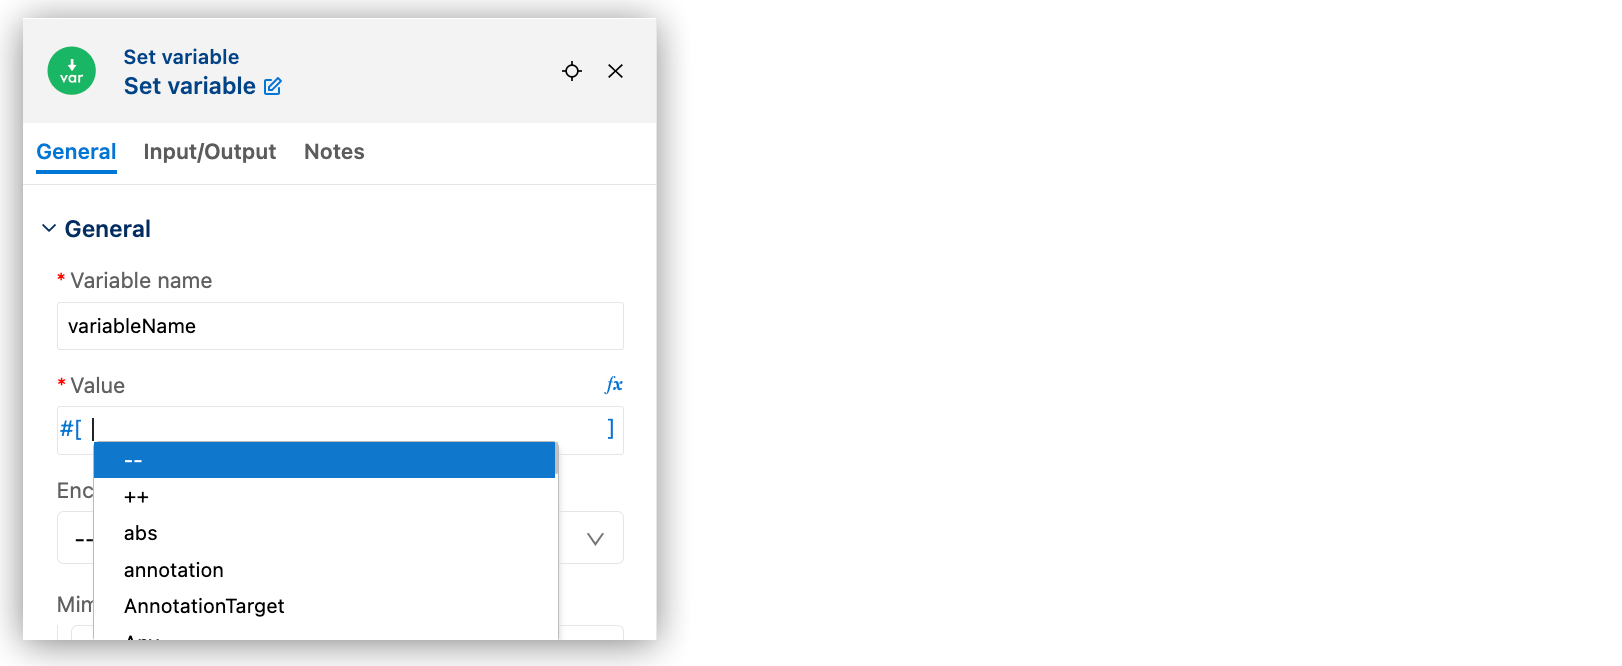
-
To show functions from all DataWeave modules, such as
String,Array, andCoremodules:-
Click the fx field to open Expression Builder.
-
Click the Functions tab.
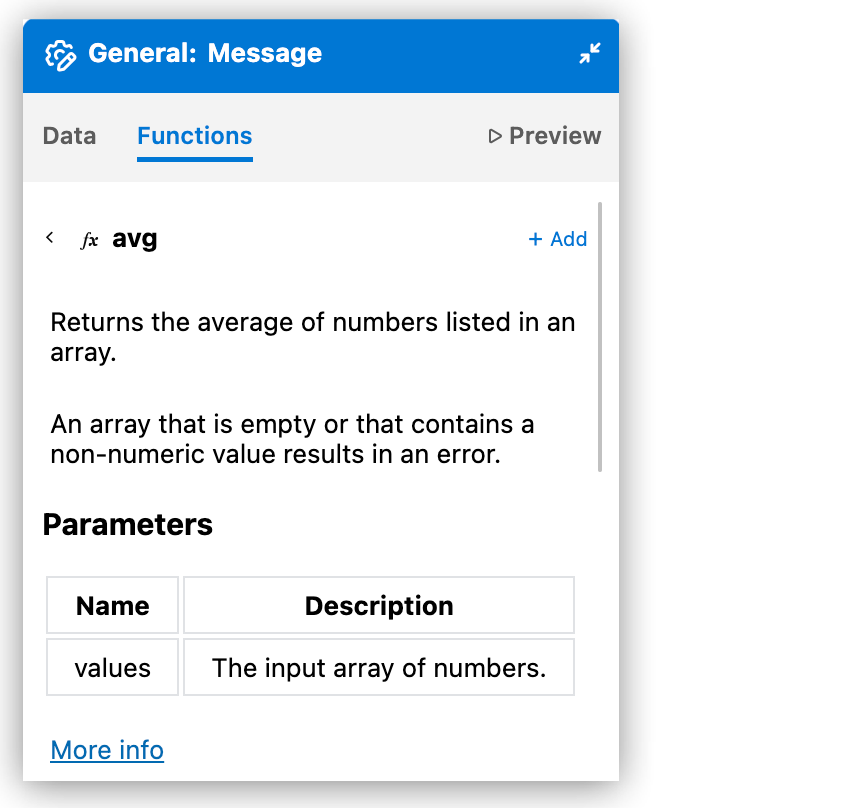
DataWeave Functions Function Reference Hover over a function to get a short description:
Click Details to get complete documentation:
-
-
Preview Output of DataWeave Expressions
Preview output of DataWeave expressions from the canvas or from the code editor. The preview feature acts on sample data that you provide in the fx (expression) field in the code editor for the payload (payload) or Mule variables (for example, vars.somevar).
To provide your own sample data, see Provide Sample Data for a DataWeave Expression.
Preview Results in the UI
Preview auto generated sample data, or preview your own sample data. Preview the output in the Preview tab of Expression Builder for a component expression field.
| Preview Auto Generated Sample Data | Preview Your Sample Data |
|---|---|
Output results from auto generated sample data:
|
Outputs results from an expression with user-created sample data:
|
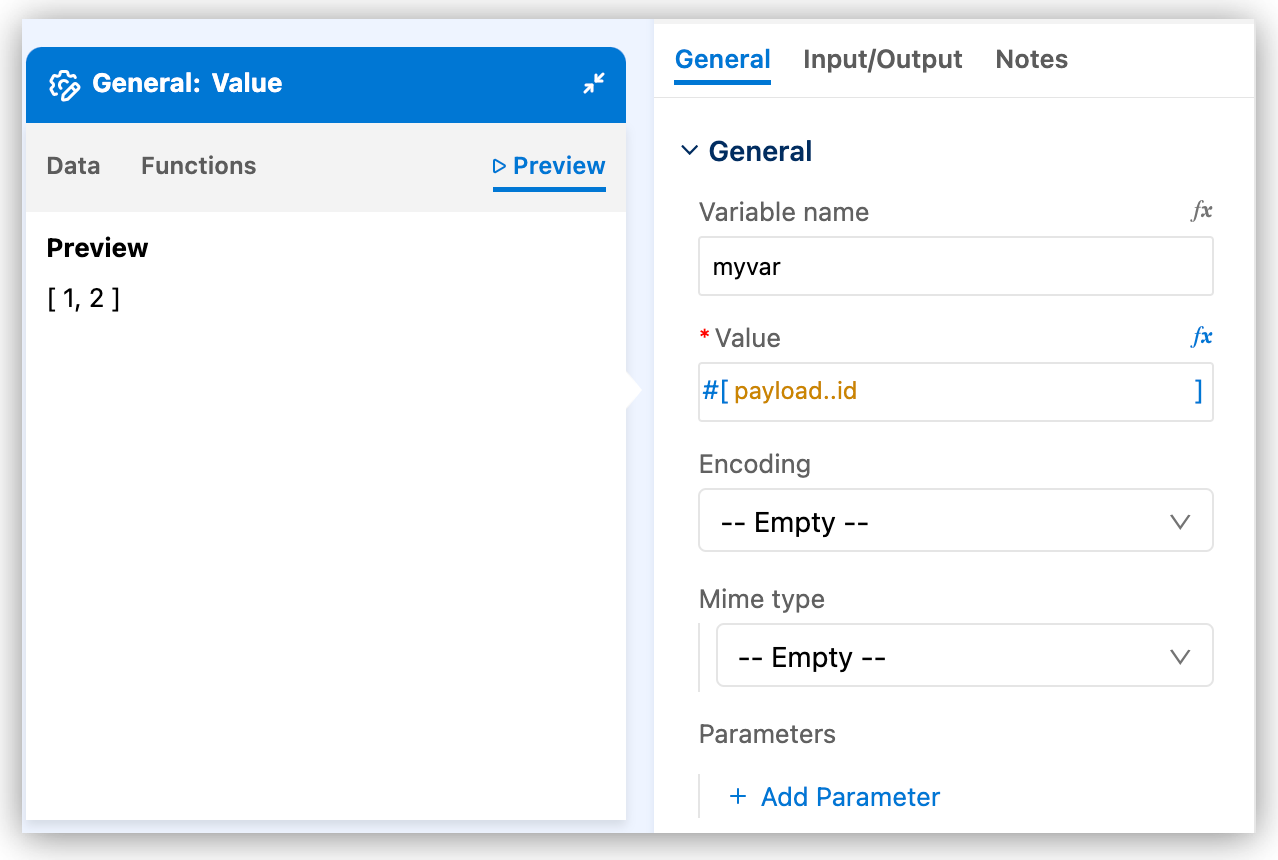
You can apply DataWeave selectors and functions to your sample data. To create sample data that has the structure and data types you expect, see Provide Sample Data for a DataWeave Expression.

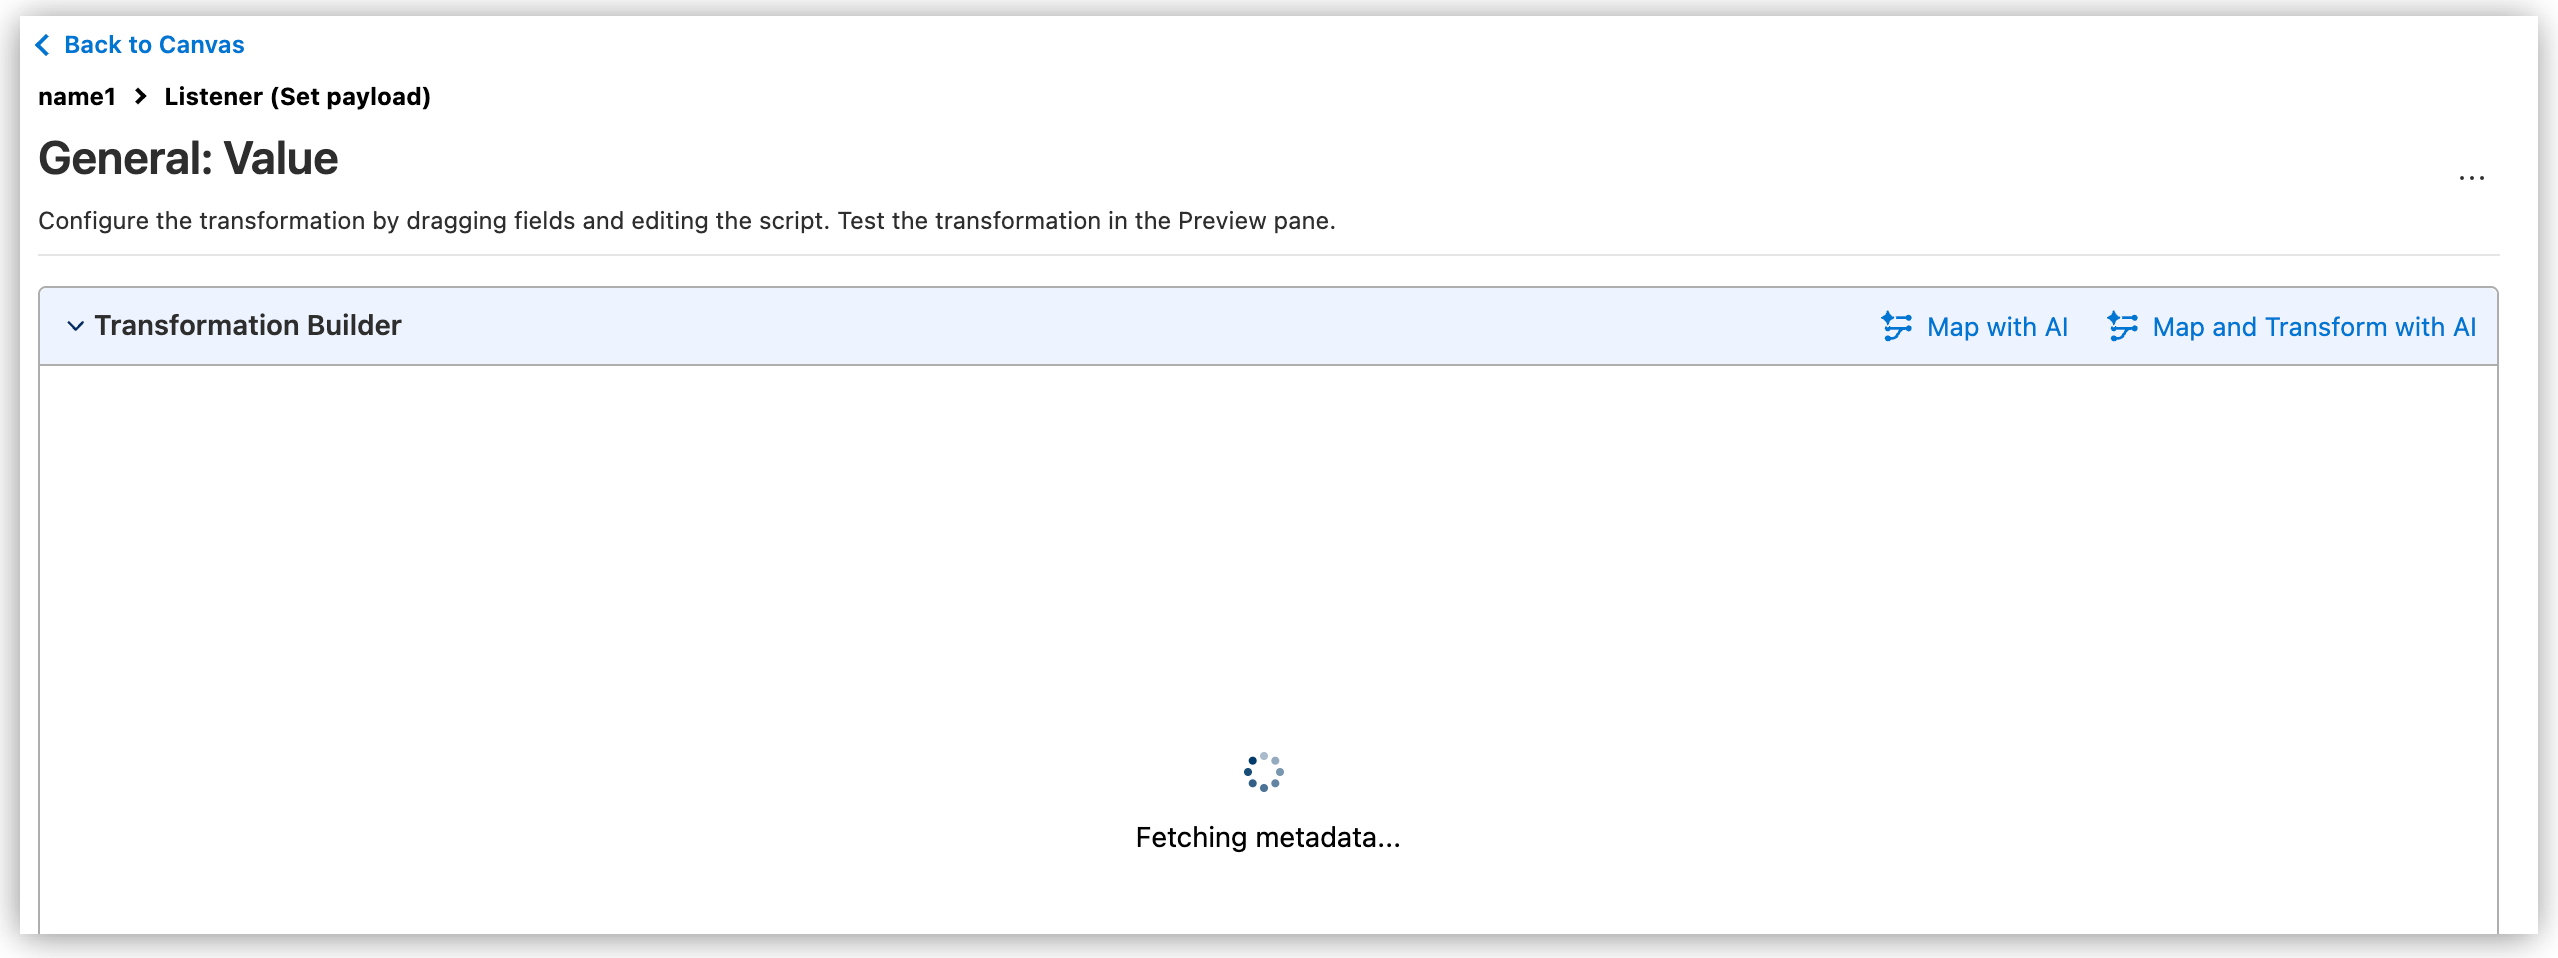
Open Transformation Builder
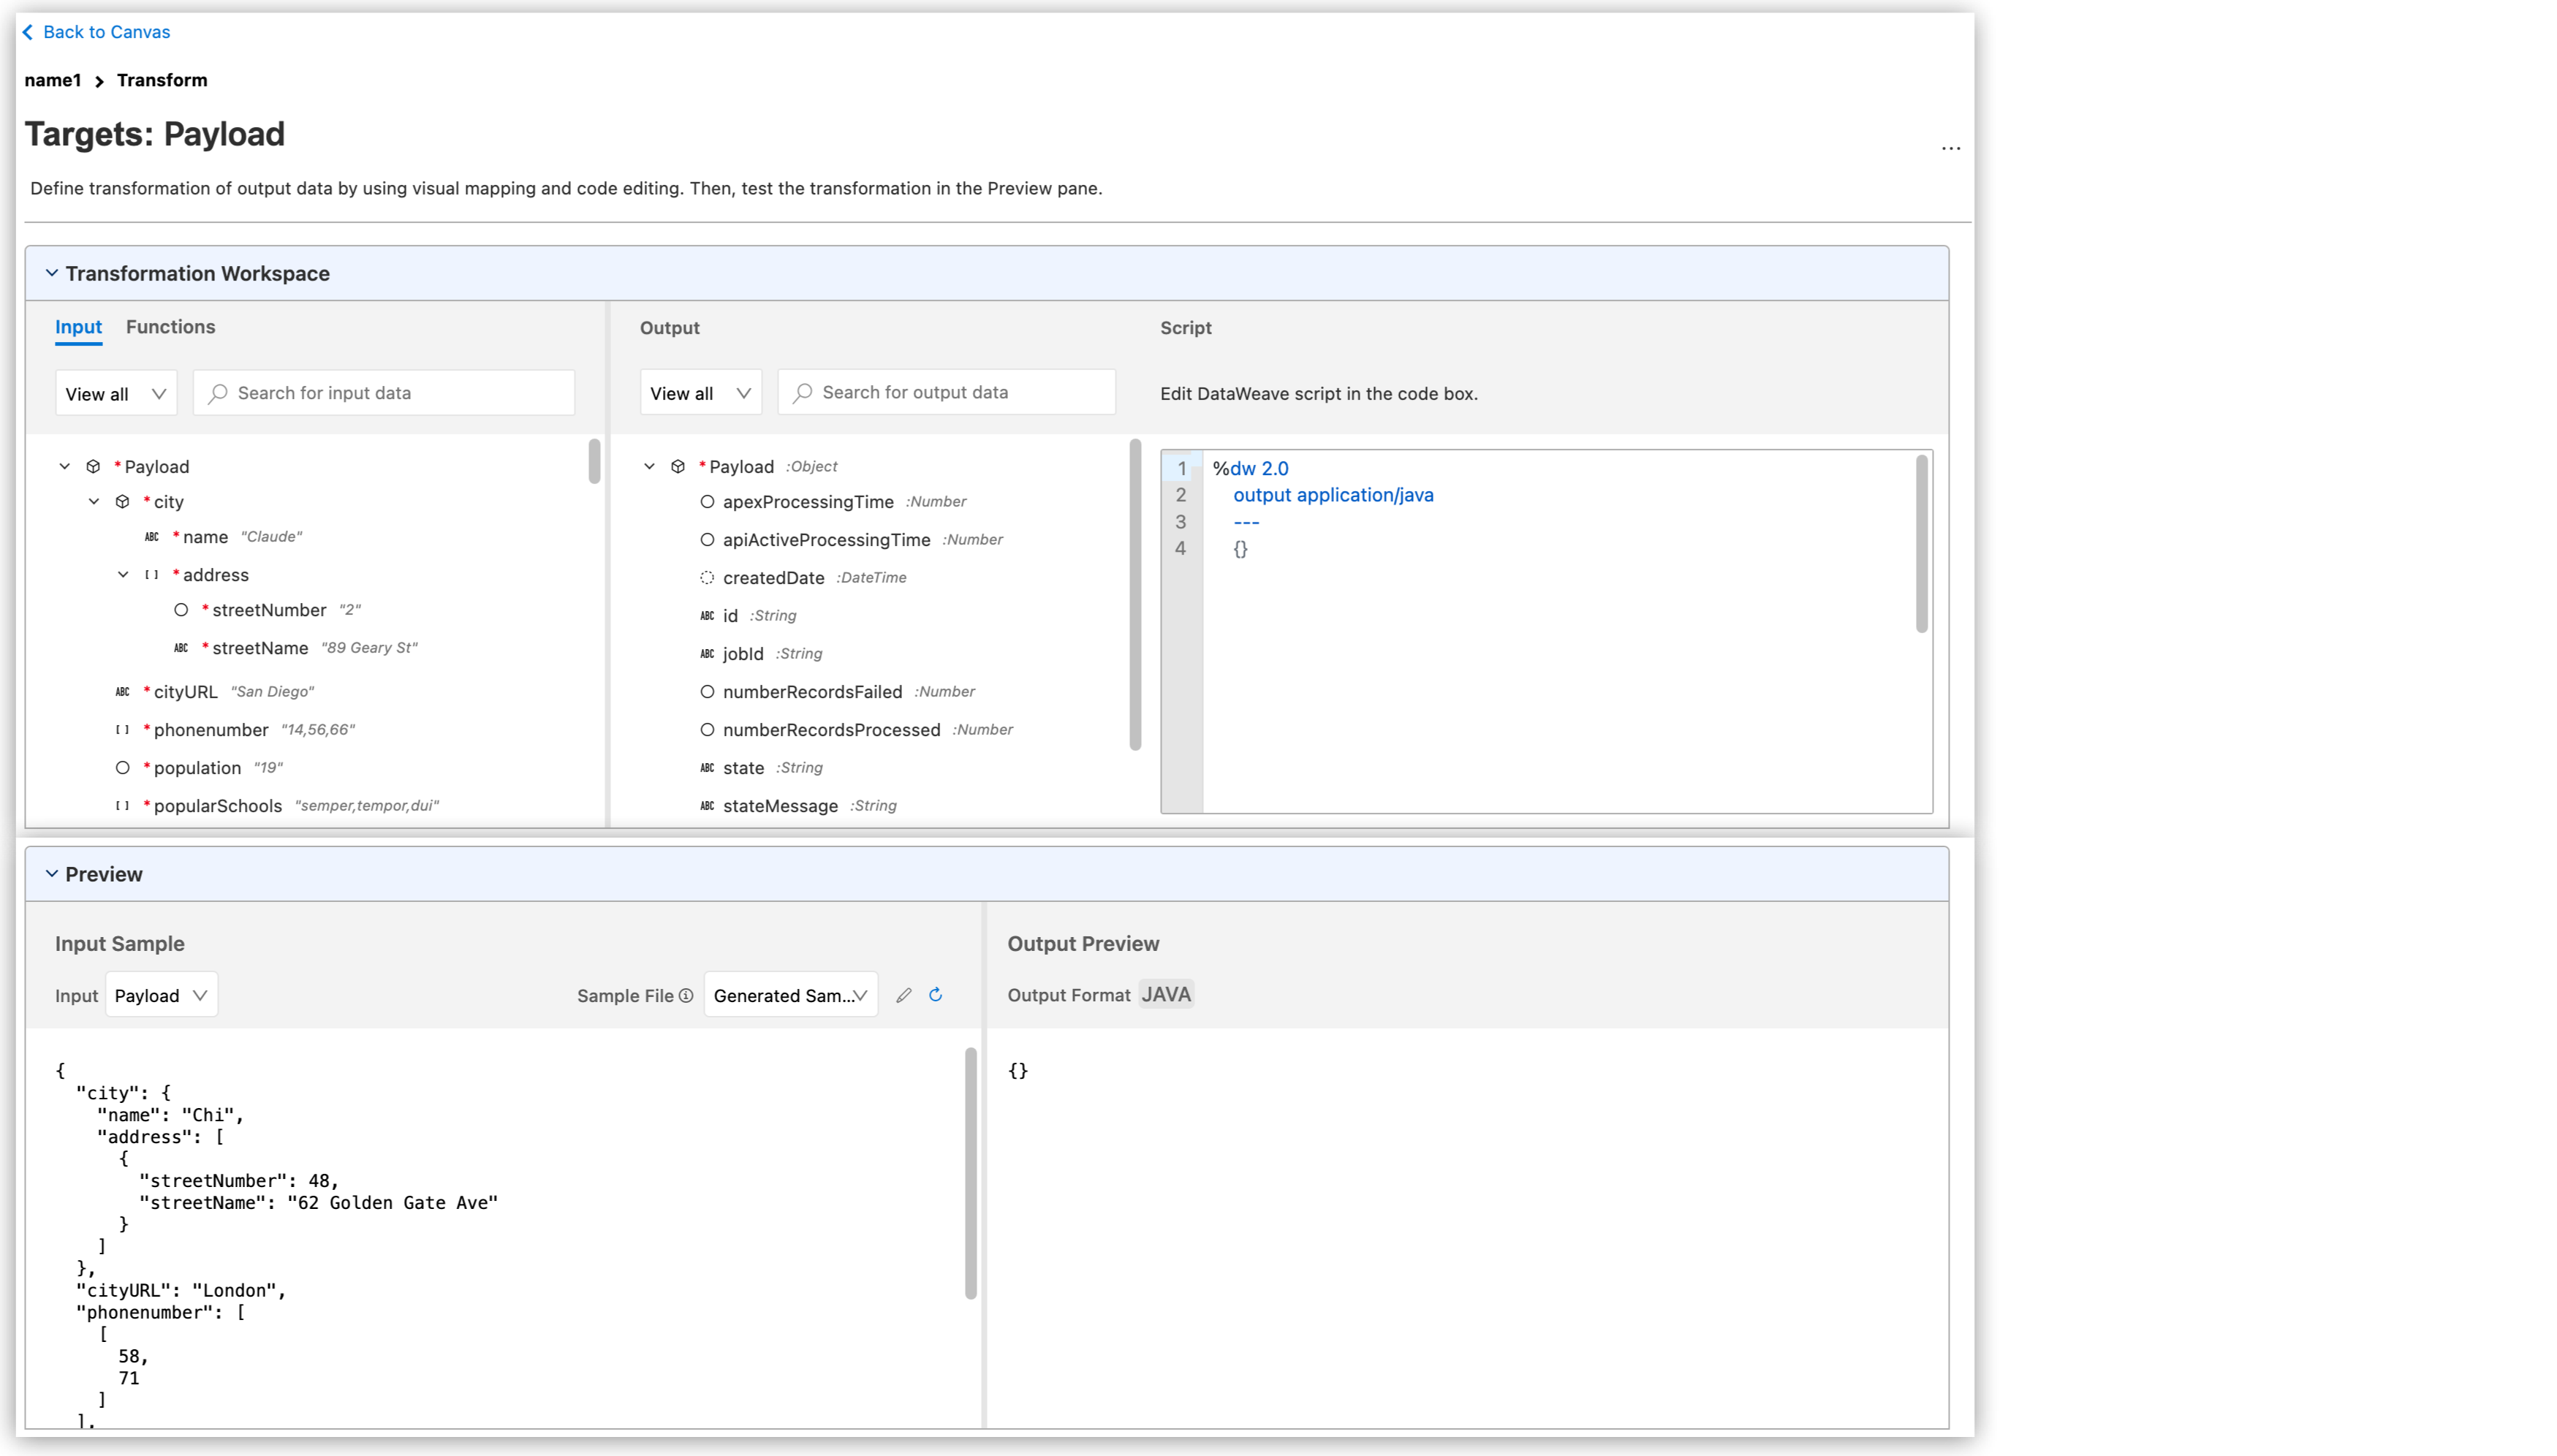
Create DataWeave transformations in your Mule applications with Transformation Builder, assisted by Einstein generative AI. Provide input and output sample metadata or data to generate DataWeave scripts.
Customize the Transformation Builder Layout
Customize Transformation Builder to make the workspace match your mapping and scripting needs. Collapse and expand the Input Preview and Output Preview sections independently, resize the vertical spacing between the input and output mapper areas, and adjust the Script panel for better code visibility.
These layout controls provide more flexibility when working with complex transformations and large metadata tree structures because you can focus on the section you need most at each step.
On Transformation Builder, select the option that best suits your needs:
Namespaces in Generated DataWeave Scripts
If your input or output metadata includes namespace URIs, Anypoint Code Builder updates the generated DataWeave script for visual mapping to XML and similar targets. The IDE adds ns directives to the script header for each URI that needs a declaration and maps fields using qualified names with a generated prefix. Prefixes are unique in the script (such as ns0, ns1), and Anypoint Code Builder reuses any existing ns line if it binds the same URI.
Namespace handling applies to AI-assisted mapping and manual drag mapping in Transformation Builder. It also applies to other flows that generate scripts from metadata, for MIME types where the type system exposes namespaces. Provide accurate custom metadata or sample data so element namespaces are present in the structure the builder uses.
If you declared namespaces in the header, the tooling preserves those declarations when it updates the output section of the script where supported.
For the DataWeave language rules that govern ns directives and qualified keys, see DataWeave formats and DataWeave documentation.
Considerations for AI-Assisted Transformations
If using AI-assisted transformations, evaluate these considerations:
-
To generate a DataWeave script using Map and Transform with AI, provide input and output samples. While optional, providing metadata helps AI understand the data structure and improves the accuracy of the transformation.
-
Sample data provides the context to generate functions or expressions for calculations, conditions, and other operations. You can provide Web Services Description Language (WSDL) files with sample data. See Provide Sample Data for a DataWeave Expression for supported data formats (MIME types) for sample data.
-
For field-to-field mapping using Map with AI, provide both input and output metadata. Use Map with AI even when a DataWeave script is already present in the component. Click Map with AI to trigger it.
-
AI requires valid data to create the transformation script. Write it manually if needed.
-
AI chat history isn’t available in Transformation Builder.
-
Avoid using real personally identifiable information (PII) in sample data or AI inputs. Provide input and output sample data that contains only fictional or masked data.
-
AI-assisted transformations provide comprehensive error feedback for GenAI actions. If you encounter errors related to authorization, metadata, or request limits, the error messages guide you to resolve the issue. See Troubleshoot AI-Assisted Transformations for detailed troubleshooting steps.
Map with AI
The Map with AI feature suggests a field-to-field mapping using AI-powered auto mapping. Click Map with AI to trigger it. Use it even when a DataWeave script is already present in the component. Provide both input and output metadata for the component. Mapping is performed based on the metadata you provide.
Map with AI provides comprehensive error feedback for GenAI actions, including authorization errors, metadata issues, and request limits. If you encounter errors during the mapping process, see Troubleshoot AI-Assisted Transformations for detailed guidance on resolving specific error types.
If you don’t have access to Map with AI, you must:
-
Make sure your configuration meets the prerequisites for using AI-assisted transformations. See Before You Begin.
-
Review that the provided input and output metadata are valid.
-
Open your Mule project.
-
Select a component that has a fx field.
-
Open Transformation Builder.
-
Click Map with AI to start the mapping. Provide both input and output metadata if not already provided.
The mapping is applied to the XML file, and the Preview tab shows the output of the transformation.
-
After the mapping is complete, you must:
-
Click Apply Mapping to apply suggested mapping to your project.
-
Click Revise Mapping to get new suggestions from the AI.
-
-
Map and Transform with AI
Create a DataWeave transformation script assisted by AI by providing input and output sample data. You can also provide optional metadata to help define the data structure and instructions to guide the AI.
-
Open your Mule project.
-
Select a component that has a fx field.
-
Open Transformation Builder.
The mapping starts automatically considering the data provided. The mapping is applied to the XML file.
-
Click Map and Transform with AI.
-
Provide this information if needed, or modify it as needed:
-
Input sample data
-
Output sample data
-
Optional instructions to guide the AI
If modifying the input and output sample data, provide the same information to help the AI understand the intended transformation. The input data can come from payloads, attributes, or variables.
-
-
Click Transform.
Einstein AI analyzes your input and output samples, and the instructions, if any, to generate DataWeave script suggestions that aim to perform the suggested transformation.
-
Click View Suggested Scripts to insert one if appropriate, or copy the suggested script to the clipboard without losing its format.
After inserting a script, the XML file is updated, and you can regenerate the script by clicking Revise.
Troubleshoot AI-Assisted Transformations
AI-assisted transformations in Transformation Builder provide comprehensive error feedback to help you resolve issues. Error messages indicate the type of error and provide guidance to resolve it.
If you encounter errors when using AI-assisted transformations, identify the error type and follow the corresponding resolution steps:
Authorization Errors
Authorization errors occur when your Anypoint Platform account lacks the required permissions or when Einstein generative AI isn’t properly configured for your organization.
If you receive an authorization error:
-
Verify that you are logged in to Anypoint Platform from Anypoint Code Builder.
For more information, see Log in to Anypoint Platform from the IDE.
-
Contact your Anypoint Platform organization administrator to verify:
-
You have the Mule Developer Generative AI User permission assigned in Anypoint Platform access management.
-
Einstein generative AI is enabled for your organization. For more information, see Enabling Einstein for Anypoint Platform.
-
You have accepted the terms and conditions for using Einstein generative AI.
-
Your Anypoint Platform organization is current and active.
-
-
If you are the organization administrator, verify that:
-
The Salesforce organization connected for requests has generative AI enabled.
-
The Salesforce organization has an established tenant relationship with your Anypoint Platform organization, and the connection is enabled.
-
The Salesforce organization is valid and not expired or disabled.
-
Metadata Errors
Metadata errors occur when the input or output metadata provided to Map with AI or Map and Transform with AI is invalid, missing, or improperly structured.
If you receive a metadata error:
-
Verify that both input and output metadata are provided when using Map with AI.
Map with AI requires both input and output metadata to perform automatic field-to-field mapping.
-
Check that your metadata structure is valid:
-
Ensure the metadata follows the expected schema format.
-
Verify that required fields are present in the metadata.
-
Confirm that data types match between input and output metadata where applicable.
-
-
Review the metadata source:
-
If metadata is generated from sample data, verify that the sample data structure is correct.
-
If metadata is imported from an API specification, verify the specification is valid and complete.
-
Refresh metadata by clicking More Actions in Transformation Builder and selecting Refresh metadata.
-
-
For Map and Transform with AI, verify that:
-
Input sample data is provided and valid.
-
Output sample data is provided and valid.
-
Sample data formats match the expected MIME types. See Provide Sample Data for a DataWeave Expression for supported formats.
-
Request Limit Errors
Request limit errors occur when you exceed the rate limits for GenAI API requests. These limits help ensure fair usage and system stability.
If you receive a request limit error:
-
Wait before retrying your request:
-
The error message indicates when you can retry the request.
-
Avoid making multiple rapid requests in succession.
-
-
Reduce the frequency of AI-assisted transformation requests:
-
Batch multiple transformations when possible.
-
Use manual mapping for simple transformations to reduce API calls.
-
-
Contact your Anypoint Platform organization administrator if:
-
Request limits are consistently reached during normal usage.
-
You must understand your organization’s specific rate limits.
-
-
Consider alternative approaches:
-
Use Manually Adding Data Sources and Targets for straightforward mappings. See Manually Adding Data Sources and Targets.
-
Write DataWeave scripts manually for complex transformations that don’t require AI assistance.
-
General AI Errors
If you encounter other errors with AI-assisted transformations:
-
Log in to Anypoint Platform and try again.
-
Verify that your Anypoint Platform organization has access to Einstein generative AI.
-
Ensure you have accepted the terms and conditions for using Einstein generative AI.
-
Check your network connection and try again.
-
If the error persists, contact your Anypoint Platform organization administrator or MuleSoft support.
Manually Adding Data Sources and Targets
You can manually add data sources and targets to your transformation script.
-
In the Transformation Workspace section, drag the source field from the input payload to the target field to map the source data to the target data.
The mapped fields show a green dot and are highlighted to indicate that the mapping is successful. The Script section updates with the new mapping, and the Output Preview section displays the output of the transformation.
If needed, map multiple source field to a target field, and then the Transform Builder concatenates them.
-
Click More Actions to refresh metadata or remove all mappings.
-
Verify the input sample generated from the field mapping.
You can select the generated sample or provide your own sample data.
Set Custom Metadata in Transformation Builder
In Transformation Builder, you can manage component metadata by setting, clearing, or editing custom definitions for inputs and outputs. Each payload, attribute, or variable supports only one custom metadata assignment at a time.
To set custom metadata:
-
Click No metadata selected if metadata isn’t already set or click the name of the custom metadata. If default metadata is being used, click Default.
-
Click Set Custom Metadata.
-
Select, edit, or preview existing custom metadata or create new custom metadata. See Create Custom Metadata for more information about creating custom metadata. See Edit Custom Metadata for more information about editing custom metadata.
-
Click Apply and Close.
To clear custom metadata, click the name of the custom metadata and then click Clear Custom Metadata. The metadata is cleared from the component.
Provide Sample Data for a DataWeave Expression
Test and preview DataWeave expressions locally in Anypoint Code Builder. Add sample data for Mule variables such as payload in fx fields to preview outputs without running your application. For AI-assisted transformations, providing sample input and output data helps AI understand the intended transformation and generate the correct DataWeave scripts.
You can create sample data in these formats:
-
JSON
-
XML
-
CSV
-
Java
-
Text
-
YAML
-
Avro
-
Excel
-
NDJSON
-
URL Encoded
-
Protobuf
-
Multipart
|
To create sample data for a Mule variable:
-
Open your project.
-
In the code editor, hover over the Mule event variable (such as
payload), for example:
-
Click Quick Fix to open the Quick Fix menu.
-
Select Create sample data for your-value, such as Create sample data for payload, for example:

-
In the menu that opens, select a format, such as JSON, for the sample data.

The IDE opens a tab for your sample data.
-
Add content in the selected format to the sample data file. For example, for JSON:
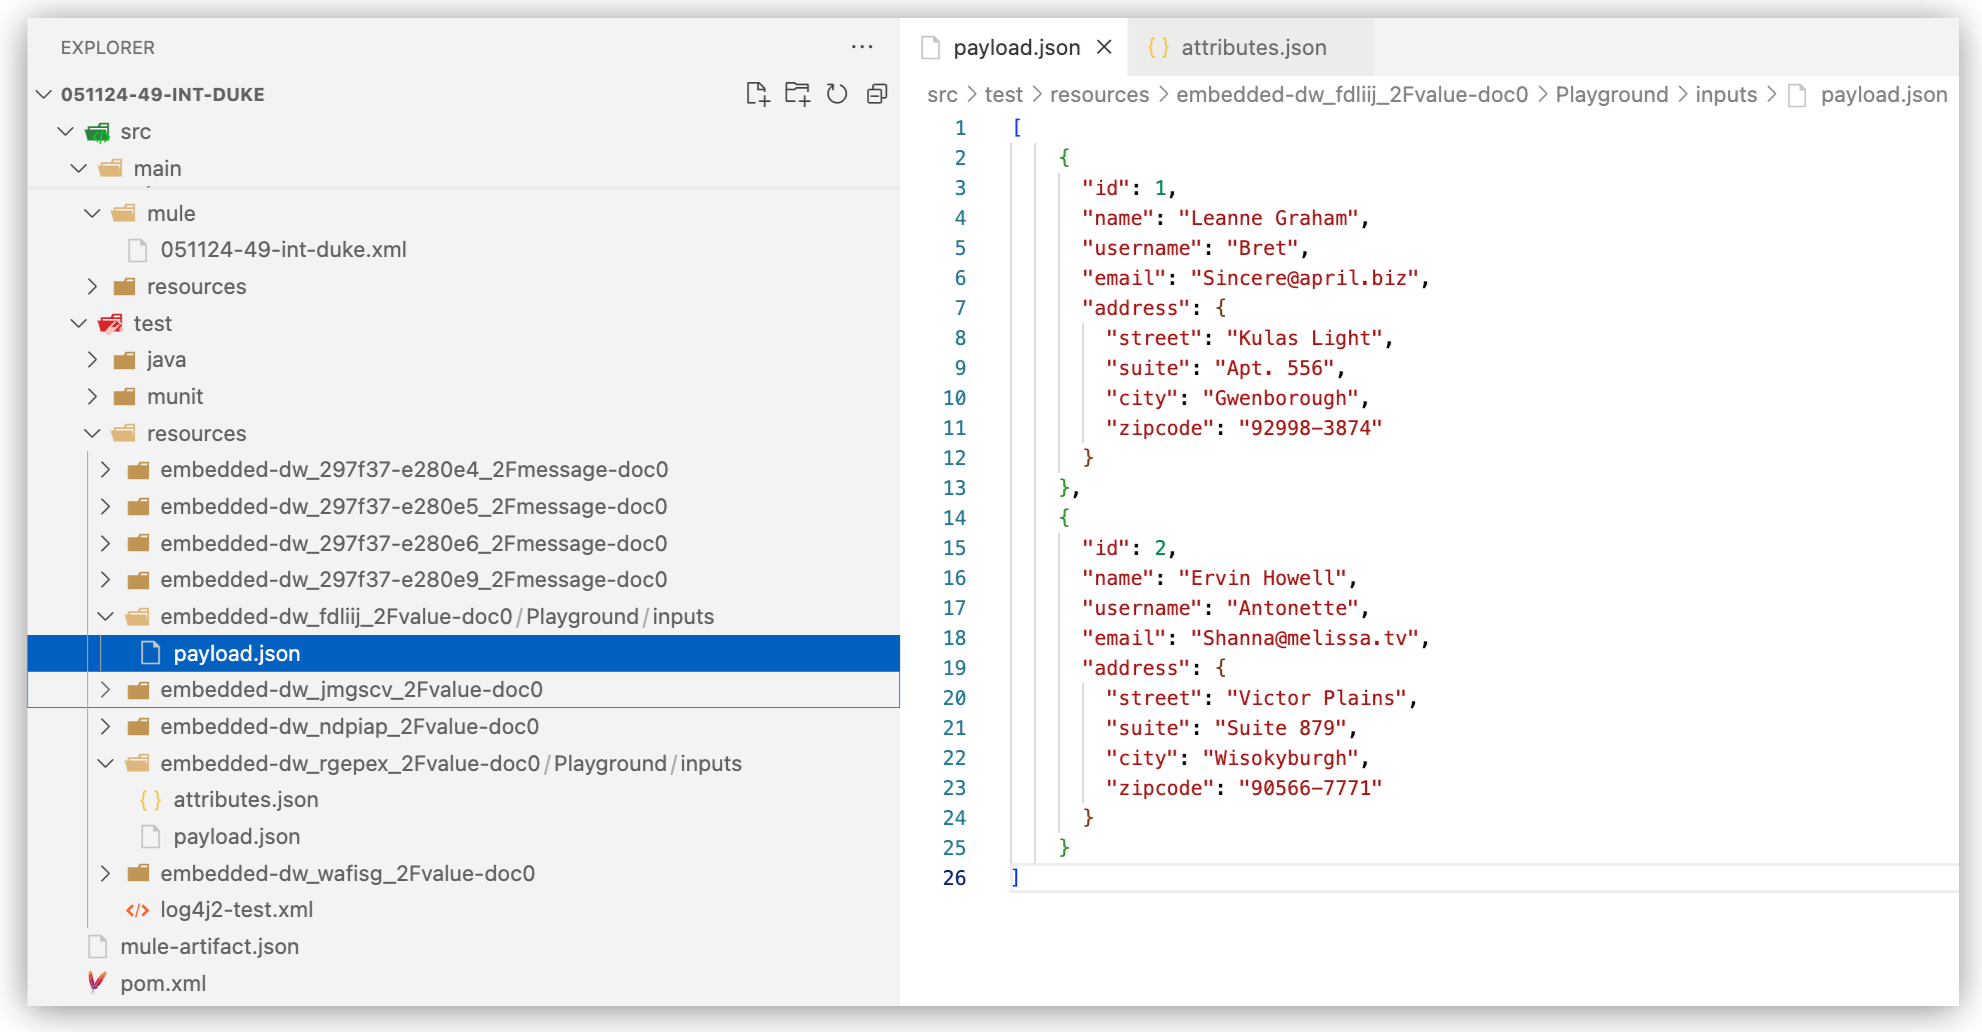
The file name is
payload.json. Files for your sample data and for the automatically generated sample data is stored in the project directorysrc/test/resources.Custom sample data files should be created under
src/main/resources/user-sample-data.See Important before adding sample data.
Hover over the value in the code editor to show the structure, data keys, and data types of your sample data, for example:

-
Preview your sample data in Expression Builder:
-
From the canvas, click the component that contains your sample data to open Expression Builder for that field.
-
Click fx of the component that has sample data to open Expression Builder for that field.
-
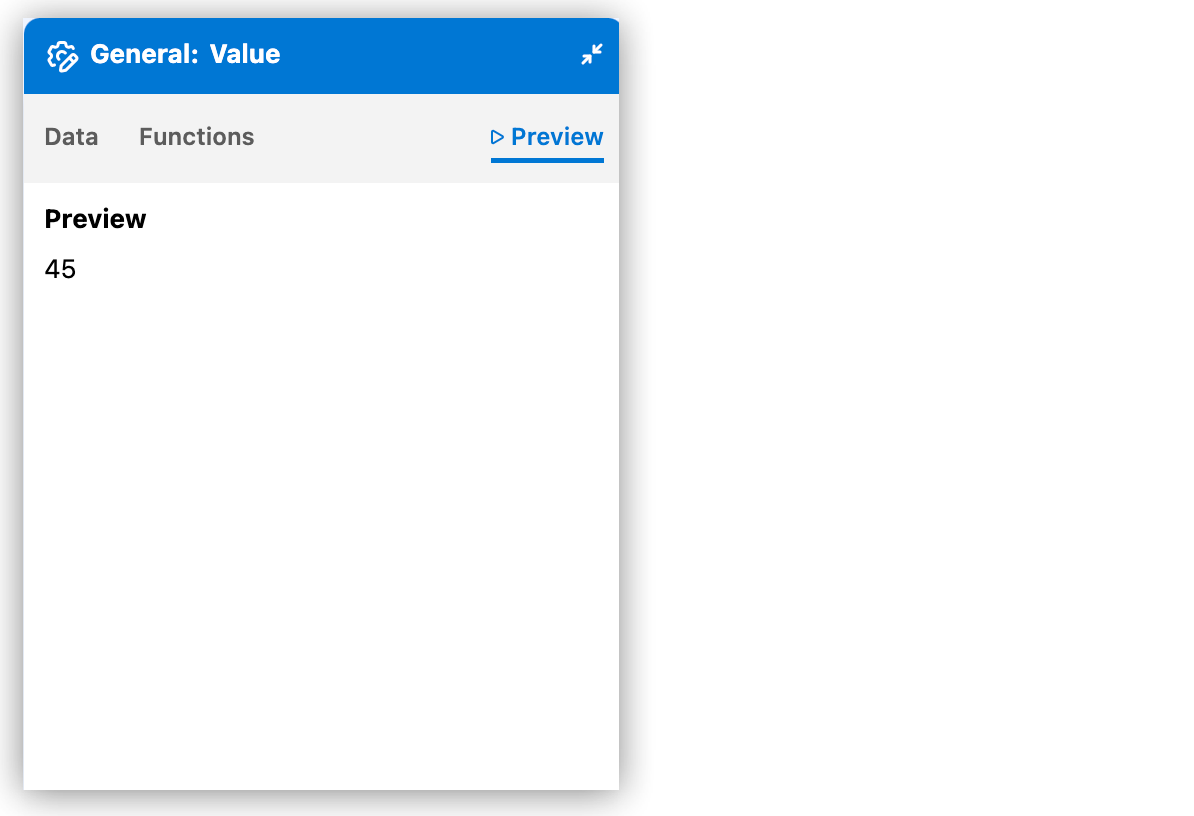
Click Preview to display the sample data. For example:
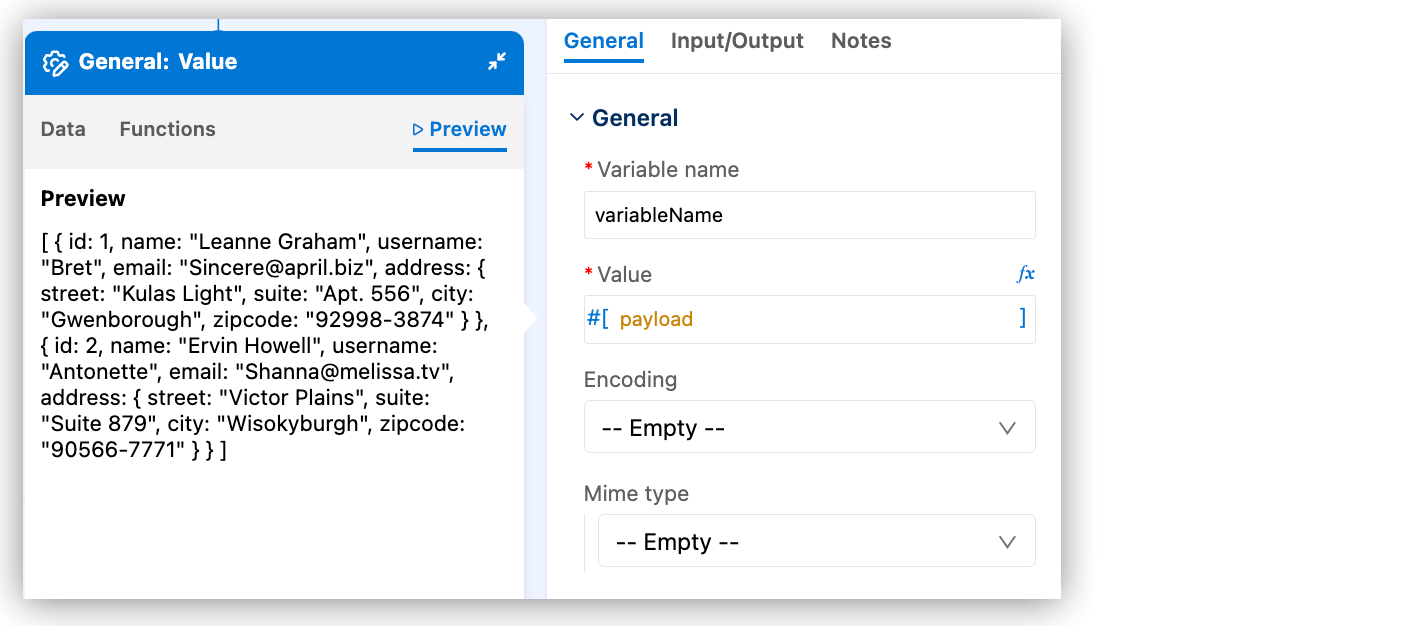
You can modify the value. For example, add DataWeave selectors or functions:
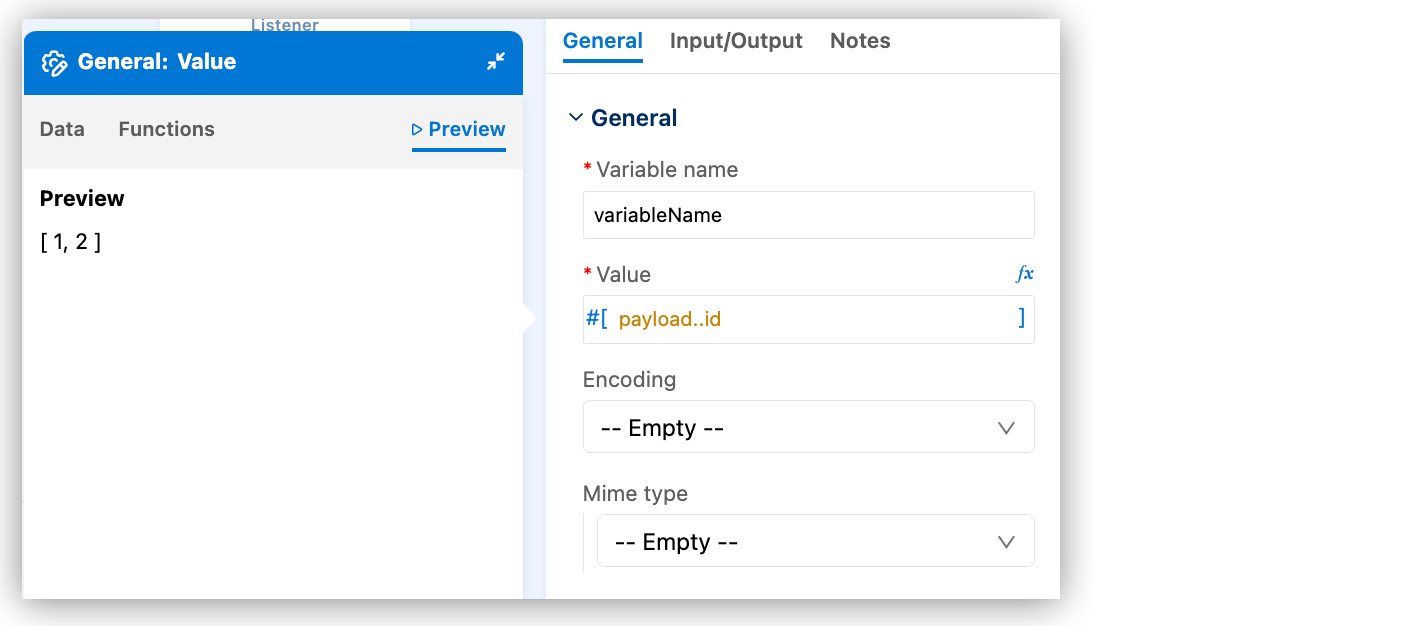
The example now returns an array of
idvalues.
-
Address DataWeave Errors
When your DataWeave code contains a syntactic or semantic error, Anypoint Code Builder highlights the error and offers a suggested fix. Issues include:
Add a Missing Import Directive for a DataWeave Module
Many DataWeave modules require an explicit import directive in the expression. Only the Core module doesn’t require this directive.
For example, if you don’t import the string module to which this function belongs, the function camelize( "hello world") produces an error Unable to resolve the reference of 'camelize'.
<set-payload value='#[ camelize( "hello world")]' doc:name="Set payload" doc:id="vyvcds" />Expression Builder identifies the error. For example:
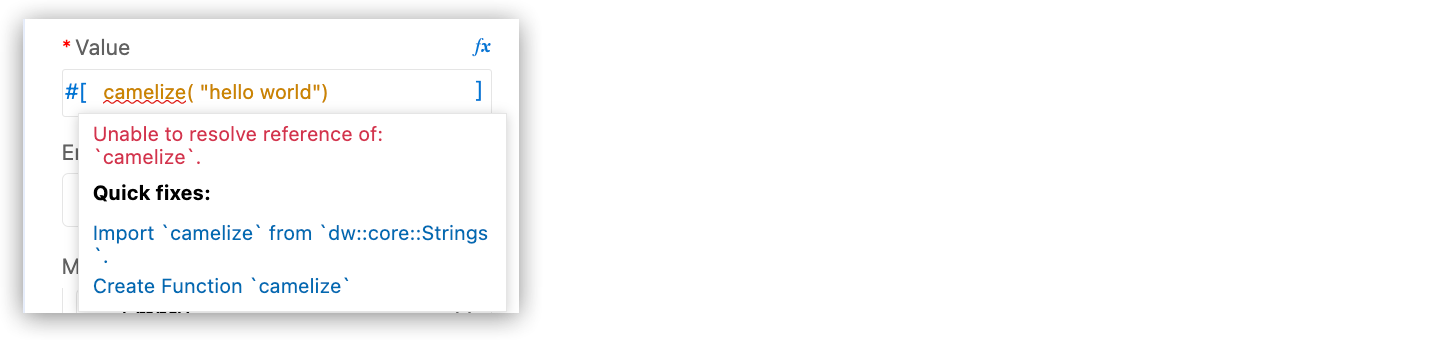
To fix this issue, click to add the import directive automatically, for example:

The XML for the fix is similar to this example:
<set-payload value='#[%dw 2.0
import camelize from dw::core::Strings
---
 camelize( "hello world")]' doc:name="Set payload" doc:id="vyvcds" />
Fix an Undefined Function Error
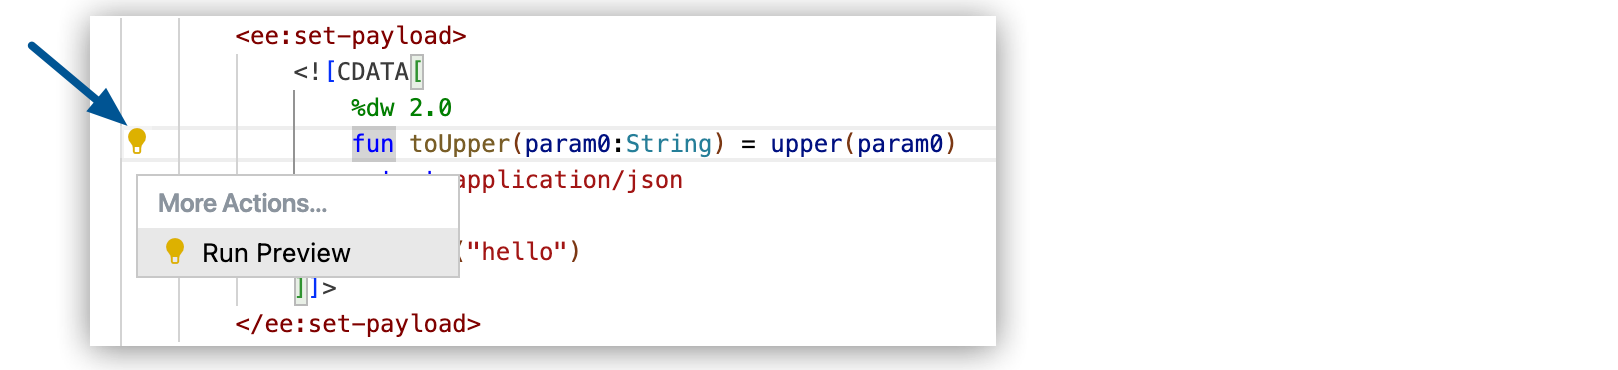
Anypoint Code Builder flags undefined functions automatically.
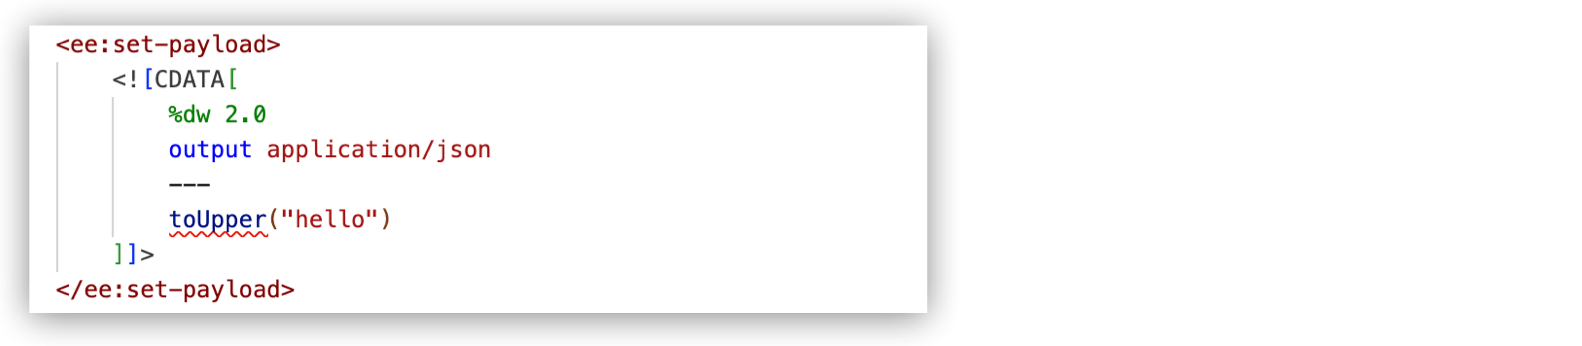
For example, in this code, DataWeave flags an error with toUpper:
When you place your cursor on the function, DataWeave provides information about the error:
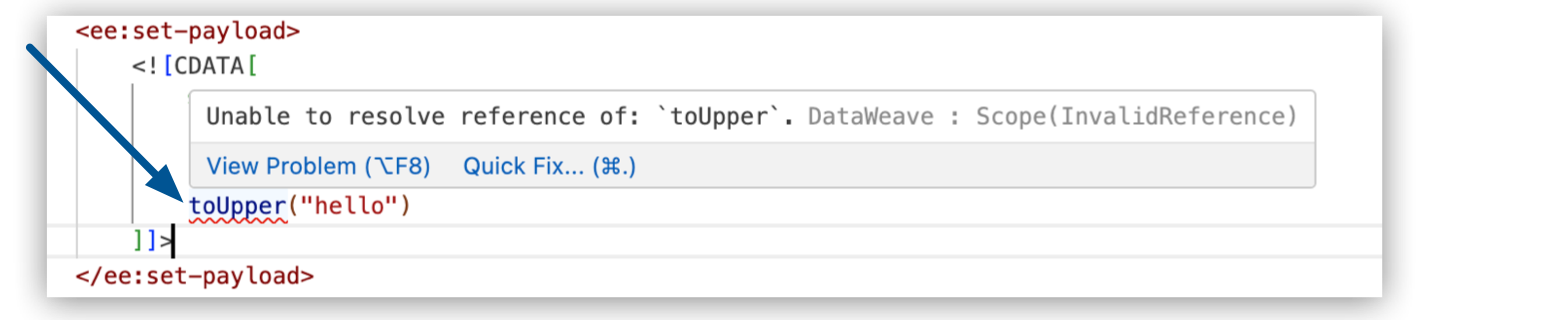
To fix this issue:
-
Click the error to display the popup.
-
Click Quick Fix, and then click Create Function.
Anypoint Code Builder automatically adds a function definition with the
???placeholder for you to define your function:fun toUpper(param0: String) = ??? -
Update the function to use the
upperfunction to return the provided String in uppercase characters:<set-payload value="#[%dw 2.0 fun toUpper(param0: String) = upper(param0) output application/json --- toUpper('hello')]" doc:name="Set payload" doc:id="xiyfpa" />
Import a DataWeave Library
Use Anypoint Code Builder to import DataWeave libraries from Exchange into your Mule application.
A DataWeave library is a reusable package of DataWeave modules, mapping files, and resource files, such as JSON, XML, and CSV files.
You can import a DataWeave library the same way you import any other asset from Exchange:
-
Open your integration project in Anypoint Code Builder.
-
Open the Command Palette.
Show me how
-
Use the keyboard shortcuts:
-
Mac: Cmd+Shift+p
-
Windows: Ctrl+Shift+p
-
-
In the desktop IDE, select View > Command Palette.
-
In the cloud IDE, click the
 (menu) icon, and select View > Command Palette.
-
-
Enter
importand select the following command:MuleSoft: Import Asset from Exchange -
Select DataWeave Library.
To search for a library, type the search term and press Enter. For example, enter DataWeave:
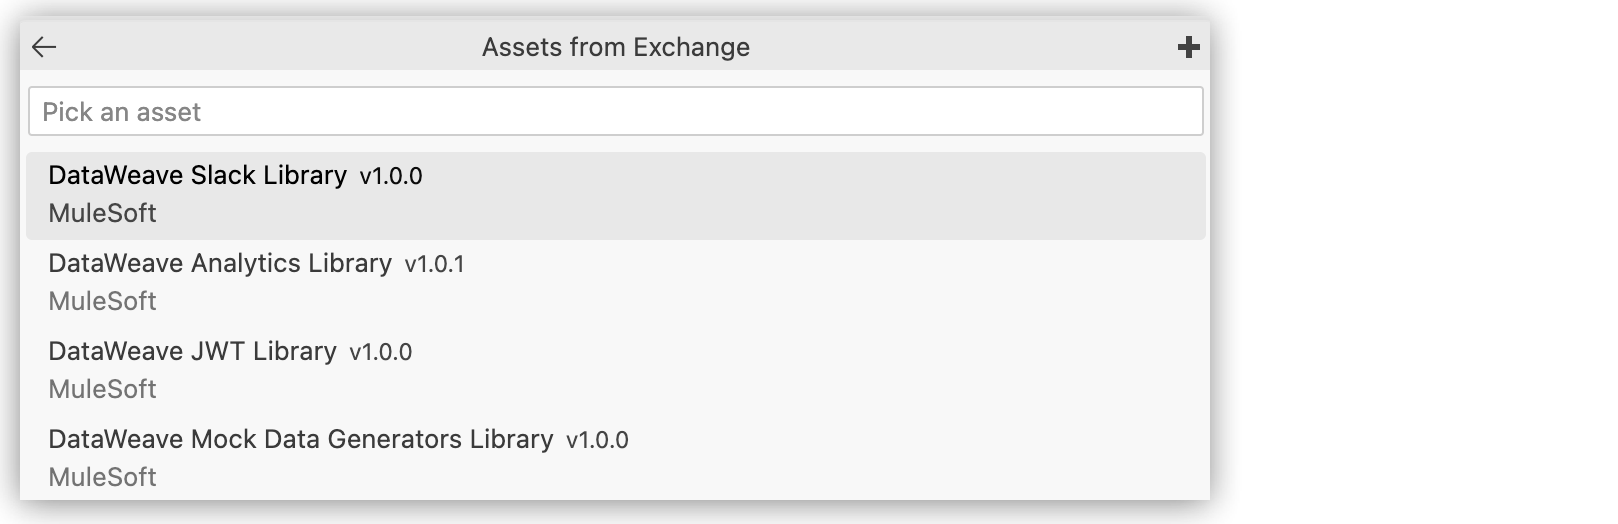
-
Select the DataWeave library from the Assets From Exchange menu.
-
Select a version of the DataWeave library.
The status bar shows the progress.
When complete, Anypoint Code Builder shows a message that the dependency was successfully added to the project.