
Getting Started with Self-Managed Omni Gateway in a Kubernetes Cluster
Get started with Omni Gateway in a Kubernetes cluster or an OpenShift cluster, which is based on Kubernetes. Set up an Omni Gateway deployment that connects to Anypoint Platform, and use the deployment to route traffic to your API. This guide covers the following high-level tasks:
-
Downloading, registering, and deploying Omni Gateway in Connected Mode with a token
-
Creating a simple API in Anypoint API Manager that runs on your gateway
-
Protecting the API with a basic authentication policy that you configure in API Manager
The Omni Gateway deployment process requires a working Kubernetes cluster that you create or that is provisioned for you by a Kubernetes professional.
Setting up a Kubernetes cluster requires a level of skill and expertise that is beyond the scope of this guide to provide. Cluster configuration in Kubernetes differs significantly by service provider and platform. For cluster configuration questions, consult documentation from your Kubernetes service provider or use the Kubernetes documentation.
If you lack a Kubernetes cluster but want to try out Omni Gateway quickly, without creating a cluster, see Getting Started with Omni Gateway (on Docker). That guide uses Docker exclusively and does not require you to perform any cluster configuration.
Before You Begin
Before starting the procedures in this guide, ensure that the following prerequisites are in place:
-
A username and password for your Anypoint Platform organization. If you do not have an Anypoint Platform account, create a Trial organization on Anypoint Platform.
-
A Docker installation.
Run
docker --versionfrom a terminal window to determine if this tool is installed. If you need to install Docker, try Docker Desktop.
-
A minimum Helm version of 3.0.0 is required.
Run
helm versionfrom a terminal window to determine if this tool is installed and check the version. To install or upgrade, use the Helm website.
-
The Kubernetes
kubectlcommand-line tool.Run
kubectl version --output=yamlfrom a terminal window to determine if this tool is installed. If not, findkubectlamong the installation tools available through the Kubernetes documentation.
-
The
curlcommand-line tool.Run
curl --versionfrom a terminal window to determine if this tool is installed. If not, you can download it with a package manager for your machine.
Cluster Requirements
The host for your Kubernetes cluster can be any supported Kubernetes provider, including common cloud-based services, such as Amazon Elastic Kubernetes Service (EKS), Azure Kubernetes Service (AKS), or Google Kubernetes Engine (GKE).
When deploying Omni Gateway to a Kubernetes cluster that enables role-based access control (RBAC), you must have cluster-level permissions to permit installation of custom resource definitions (CRDs) used by Omni Gateway.
In OpenShift, the cluster-admin role provides this level of access.
To complete the procedures in this guide, you must create a Kubernetes cluster or use an existing one for your Omni Gateway deployment. In this guide, you use Helm to deploy Omni Gateway to a Kubernetes cluster and connect it to Anypoint Platform.
The following minimum requirements apply to a small Kubernetes cluster used for demonstration purposes in this guide and do not apply to requirements of a production environment:
-
At least one node.
-
Support for the creation of a
Serviceresource of theLoadBalancertype.This requirement avoids deployment errors when you use this guide. However, it is possible to customize the
Servicetype when deploying a gateway. Omni Gateway supports the following services:ClusterIP,NodePort,LoadBalancer(default),ExternalName. See theservice.typekey in the Helm chart for Omni Gateway. -
Compute resources needed for the deployment procedure are very unlikely to exceed the following values (equivalent to the EKS t3.micro instance type):
-
vCPU: 2 vCPUs
-
Memory: 1 GiB
-
Network: Up to 5 Gigabit
-
Max ENI: 2
-
Max IPs: 4
-
To determine whether your cluster is ready for the deployment procedure, review Check Your Cluster before starting the deployment. The checks require you to run a set of kubectl commands.
Step 1: Download the Omni Gateway Image
Use Docker to download the Omni Gateway image from the Docker Hub registry.
This procedure is a prerequisite to registering the Omni Gateway with Anypoint Platform in Step 2: Register Omni Gateway. Registration is required during the gateway deployment through Helm in Step 4: Deploy and Connect Omni Gateway.
-
Check that Docker is running by executing the following command in a terminal window:
docker infoIf you receive an error after executing this command, see the information about Docker troubleshooting.
-
Run the following command in a terminal window:
docker pull mulesoft/flex-gateway:latestWhen successful, this command prints a message similar to the following one in your terminal window:
latest: Pulling from mulesoft/flex-gateway
Digest: sha256:e55555abcdefg1234567zxynwo33333fadjf
Status: Image is up to date for mulesoft/flex-gateway:latest
docker.io/mulesoft/flex-gateway:latest
Use
sudoif you encounter permission issues when running this command.
Step 2: Register Omni Gateway
Register the Omni Gateway image from a terminal window using a temporary token generated by Anypoint Runtime Manager. This procedure produces a local registration.yaml file that contains registration properties for a named gateway. These properties are incorporated into a Helm chart in Step 4: Deploy and Connect Omni Gateway.
-
From a terminal window, prepare a directory for an Omni Gateway registration file (
registration.yaml).-
Create a directory:
mkdir flex-registration -
Navigate to the new directory:
cd flex-registration
-
-
Log in to Anypoint Platform and select Runtime Manager.
-
From Runtime Manager, locate the procedure for registering Omni Gateway:
-
Click Omni Gateways in the side navigation panel.
-
Click Self-managed Omni Gateways.
-
Click Add Managed Omni-Gateway.
-
Select one of the following environments:
-
Kubernetes
-
OpenShift
-
-
In the page that opens, locate the command in the Register your gateway section.
Kubernetes Example:
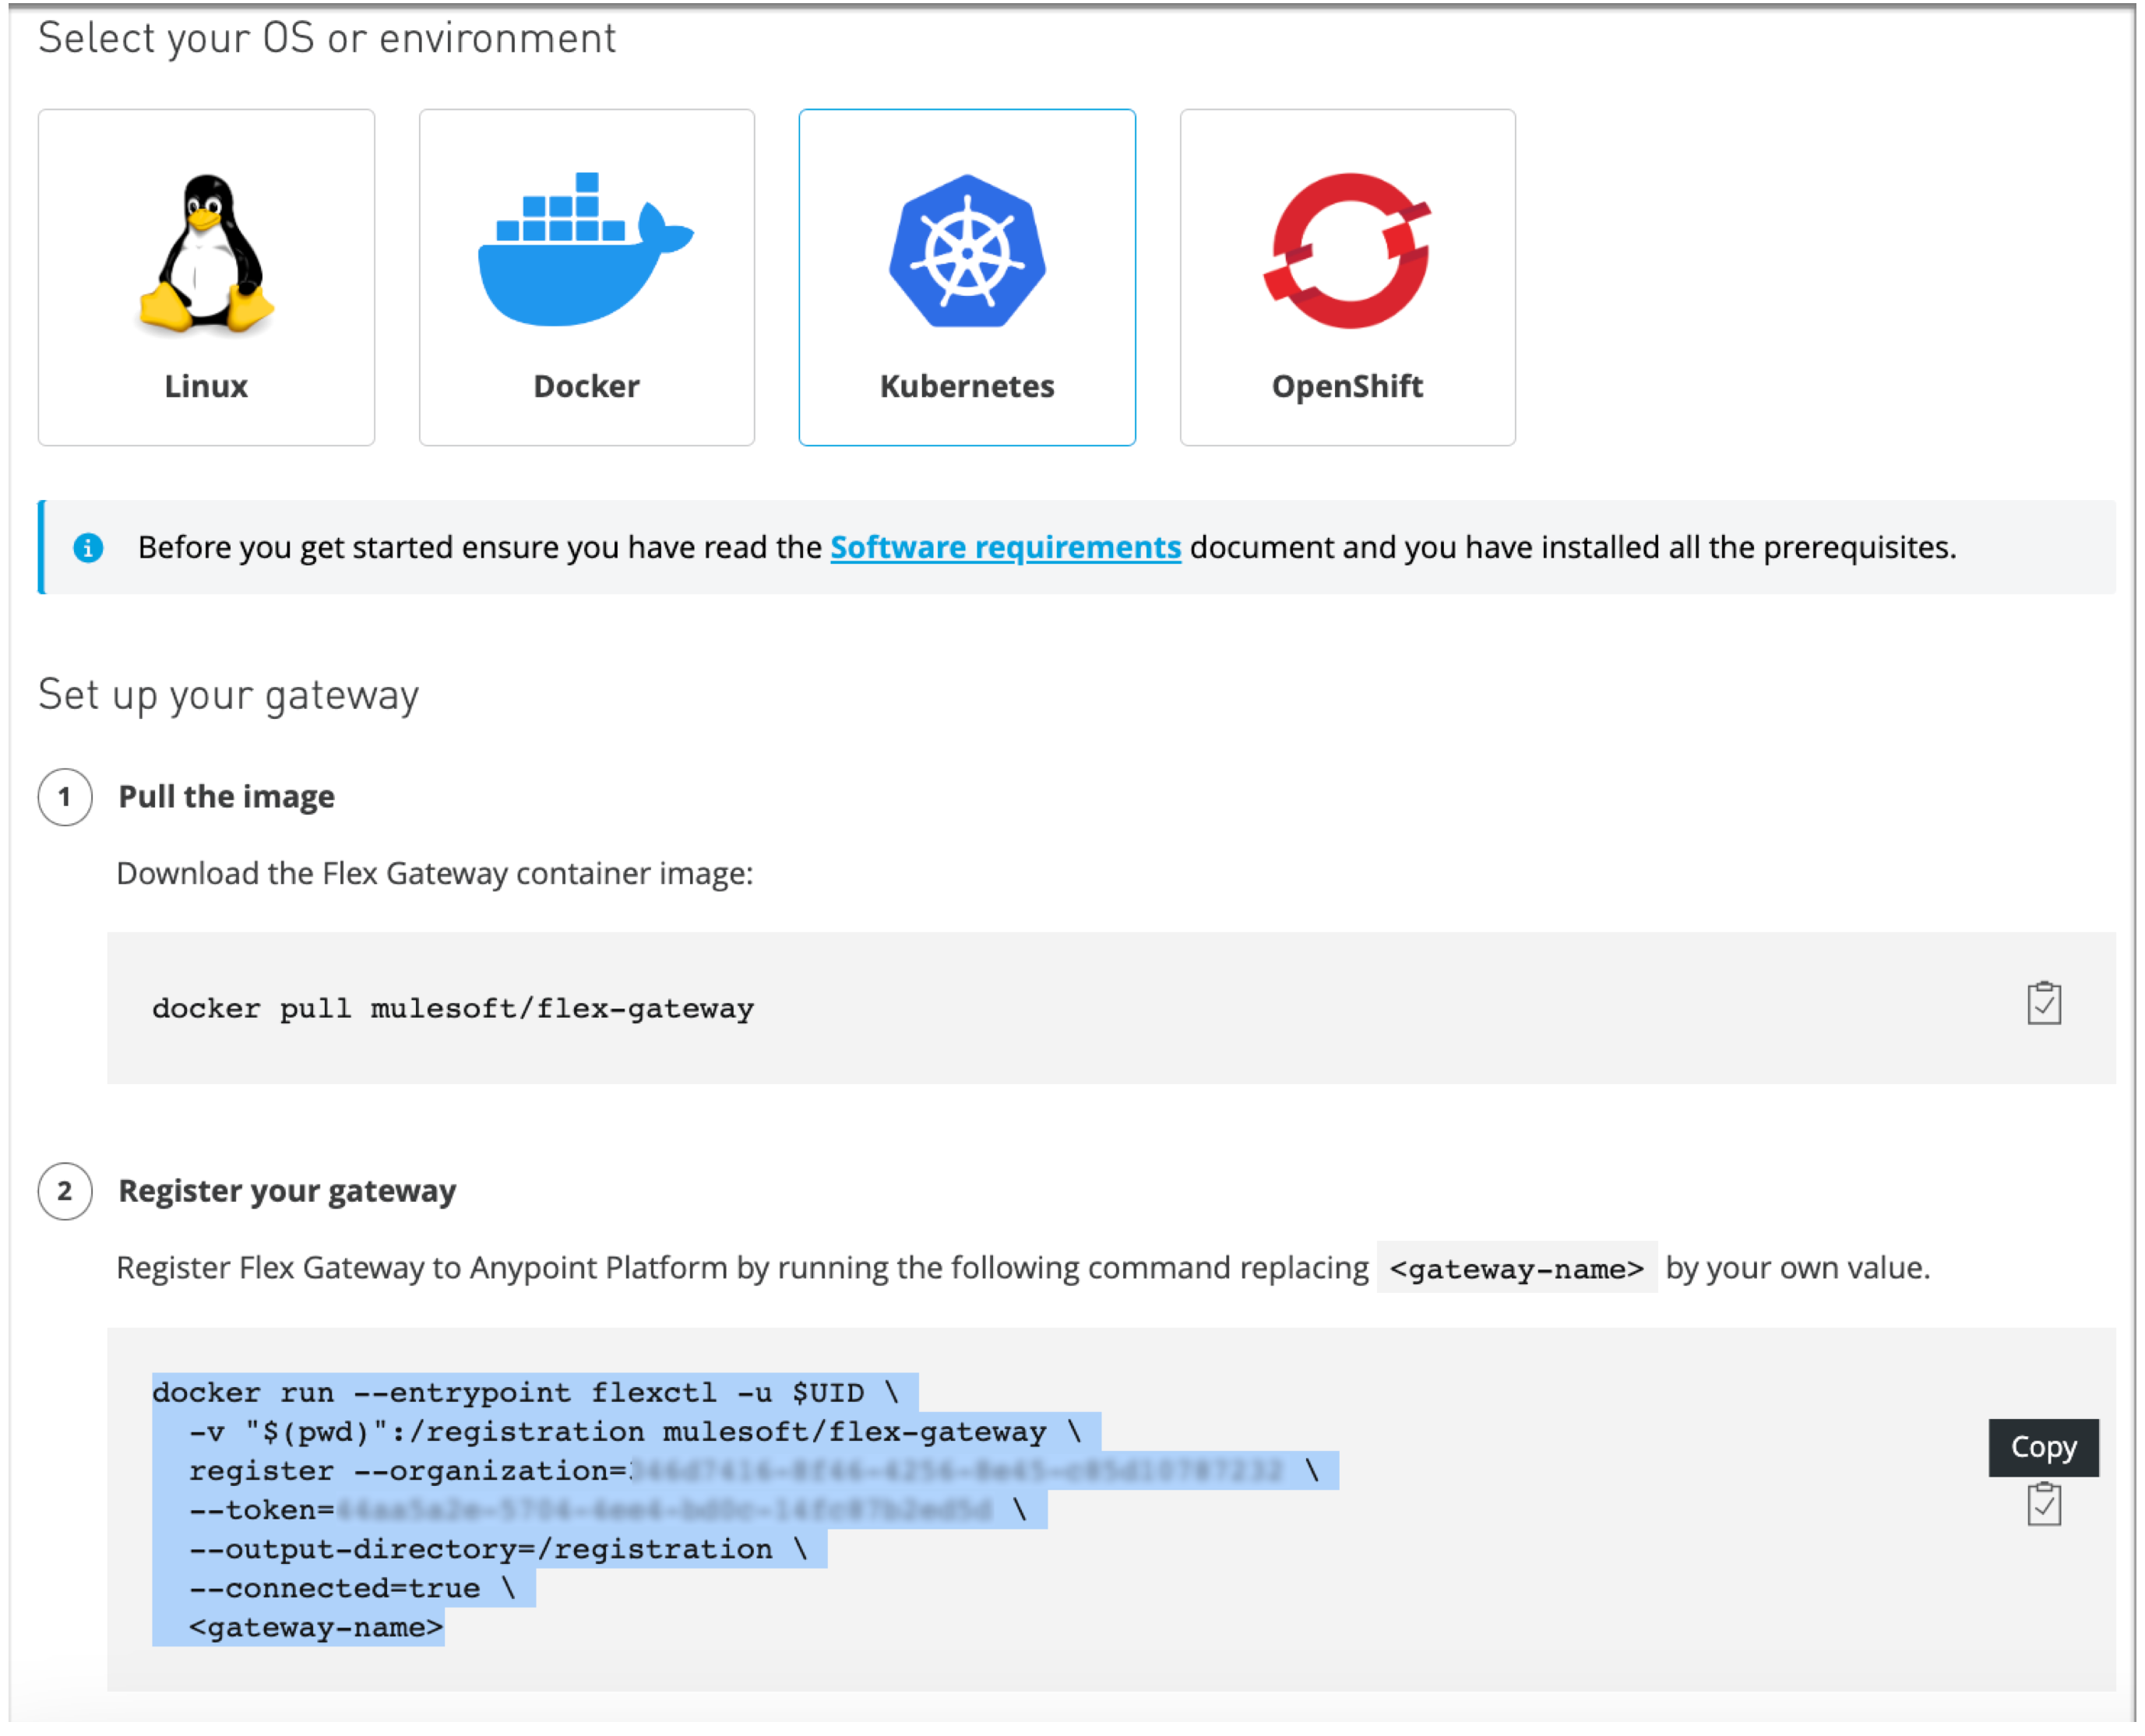
The highlighted command block includes your unique organization ID and a temporary token.
-
-
In your terminal window, copy the command block from Runtime Manager to your
./flex-registrationdirectory.Notice that Runtime Manager provides the required organization and token values.
-
Before running the command, replace
<gateway-name>at the end of the command block with a unique name for your gateway, such asmy-gateway.The name that you provide for your gateway must be unique within the scope of your Anypoint Platform organization and environment. Completing this registration step is required once and allowed no more than once per named gateway and organization.
-
Run the edited command from your terminal window.
When successful, the command produces a
registration.yamlin your./flex-registrationdirectory and displays the following message in your terminal window:Starting registration, please be patient. Registration completed, the configuration files were written in directory "/registration". For security, modify the file permissions to restrict production scenario access to the user running flex.
Note that the message in the terminal window refers to a
/registrationdirectory that resides within the Docker container.Use
sudoif you encounter file permission issues when running this command. If your token expires before you run the command, a400 Bad Requesterror occurs. In this case, you must refresh the Runtime Manager page to generate a new token and run the modified command that appears on the page.
Step 3: Add a Repository for the Helm Chart
Add the Omni Gateway chart repository. Note that you can get more information about the properties of the Helm chart for Omni Gateway in ArtifactHUB.
-
Add a Helm repository named
flex-gatewayfor your Helm chart:helm repo add flex-gateway https://flex-packages.anypoint.mulesoft.com/helmThe command either adds the repository or skips this process if a Helm repository with that name already exists on your machine:
-
If the repository is new, the command returns the following message:
"flex-gateway" has been added to your repositories
-
If the repository already exists, the command returns the following message:
"flex-gateway" already exists with the same configuration, skipping
-
-
Run
helm repo up.The command returns the following message:
Hang tight while we grab the latest from your chart repositories...
...Successfully got an update from the "flex-gateway" chart repository
Update Complete. ⎈Happy Helming!⎈
If you have more than one Helm repository on your machine, the message in your terminal window lists all of the repositories.
Step 4: Deploy and Connect Omni Gateway
Use Helm to deploy Omni Gateway to a node in your cluster and connect it to Anypoint Platform. After deploying, use Runtime Manager to verify that the gateway is present and connected to Anypoint Platform.
Before you begin:
Confirm that your Kubernetes cluster is available by following the steps in Check Your Cluster. Review Cluster Requirements if you have not done so already. These prerequisites help avoid deployment errors.
After confirming that your Kubernetes cluster is ready, deploy and connect your gateway:
-
Run the Helm command for deploying your gateway in Connected Mode:
helm -n gateway upgrade -i --create-namespace \
ingress flex-gateway/flex-gateway \
--set gateway.mode=connected \
--set-file registration.content=registration.yaml
This command creates the
gatewaynamespace andingressrelease if they do not exist. The command syntax for the Helm repository and chart names is<helm-repo-name>/<helm-chart-name>.The command uses
--set gateway.mode=connectedbecause the default for the Helm chart is Local Mode.When you install Omni Gateway, a Service type
LoadBalanceris created by default. You must have the appropriate permissions to create a load balancer in your cloud. If the load balancer is not provisioned or has issues with the provisioning process, you must choose another type by changing theservice.typeproperty during the installation.When successful, the command prints a message indicating an upgrade to your
ingressrelease:Release "ingress" does not exist. Installing it now. NAME: ingress LAST DEPLOYED: Mon Mar 20 21:36:19 2023 NAMESPACE: gateway STATUS: deployed REVISION: 1 TEST SUITE: None
The
REVISIONvalue increments theingressrelease by1each time you run this command with the same namespace, repository, and chart names. For example, if you run the command a second time, you find a new revision number (REVISION: 2). TheLAST DEPLOYEDdate reflects the date of that revision.If you receive an
UPGRADE FAILEDresponse, see troubleshooting information about this issue. -
If you want to check the status of the Pod that runs your gateway, execute the following
kubectlcommand:kubectl get pods -n gatewayThe output indicates whether the pod is running successfully in the
gatewaynamespace:NAME READY STATUS RESTARTS AGE ingress-57bc75cb46-dmkdq 1/1 Running 0 35s
-
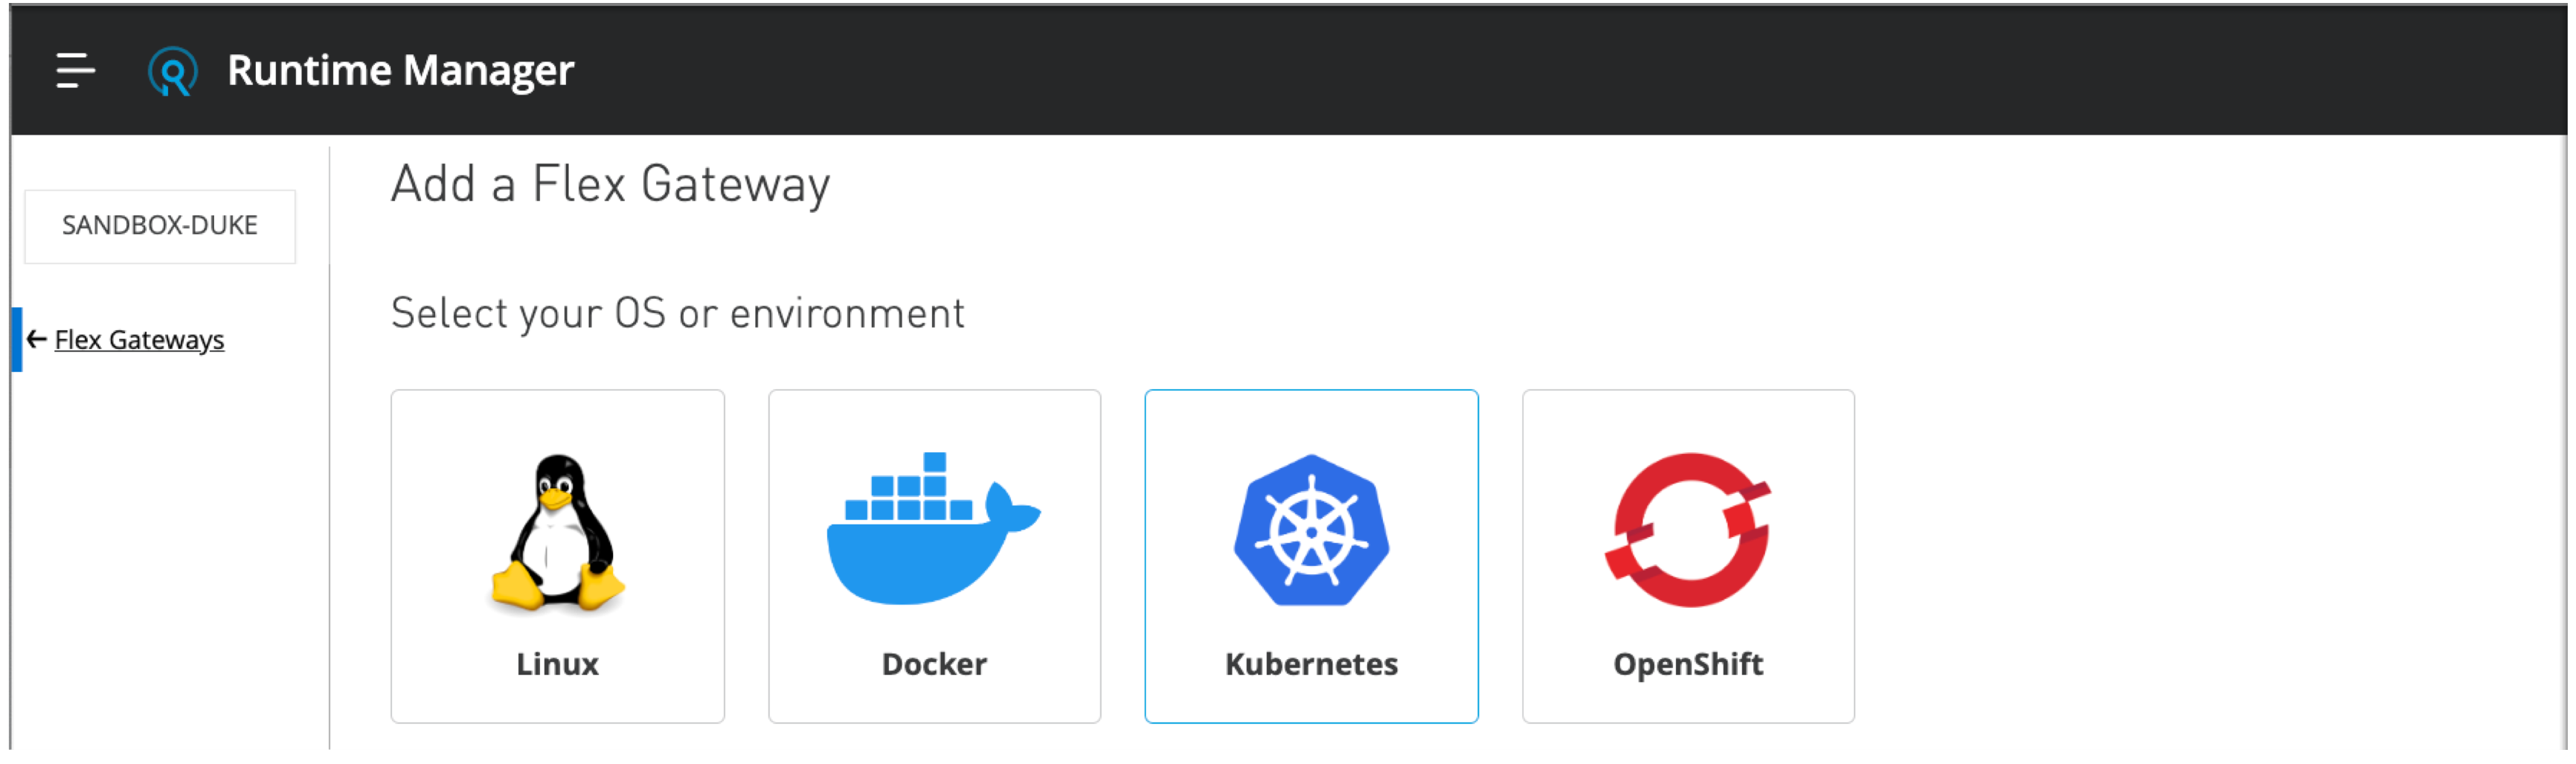
Return to Runtime Manager:
-
Select ← Omni Gateways from the side navigation panel of the Add an Omni Gateway page.
-
Navigate to your registered gateway in the Omni Gateways page:
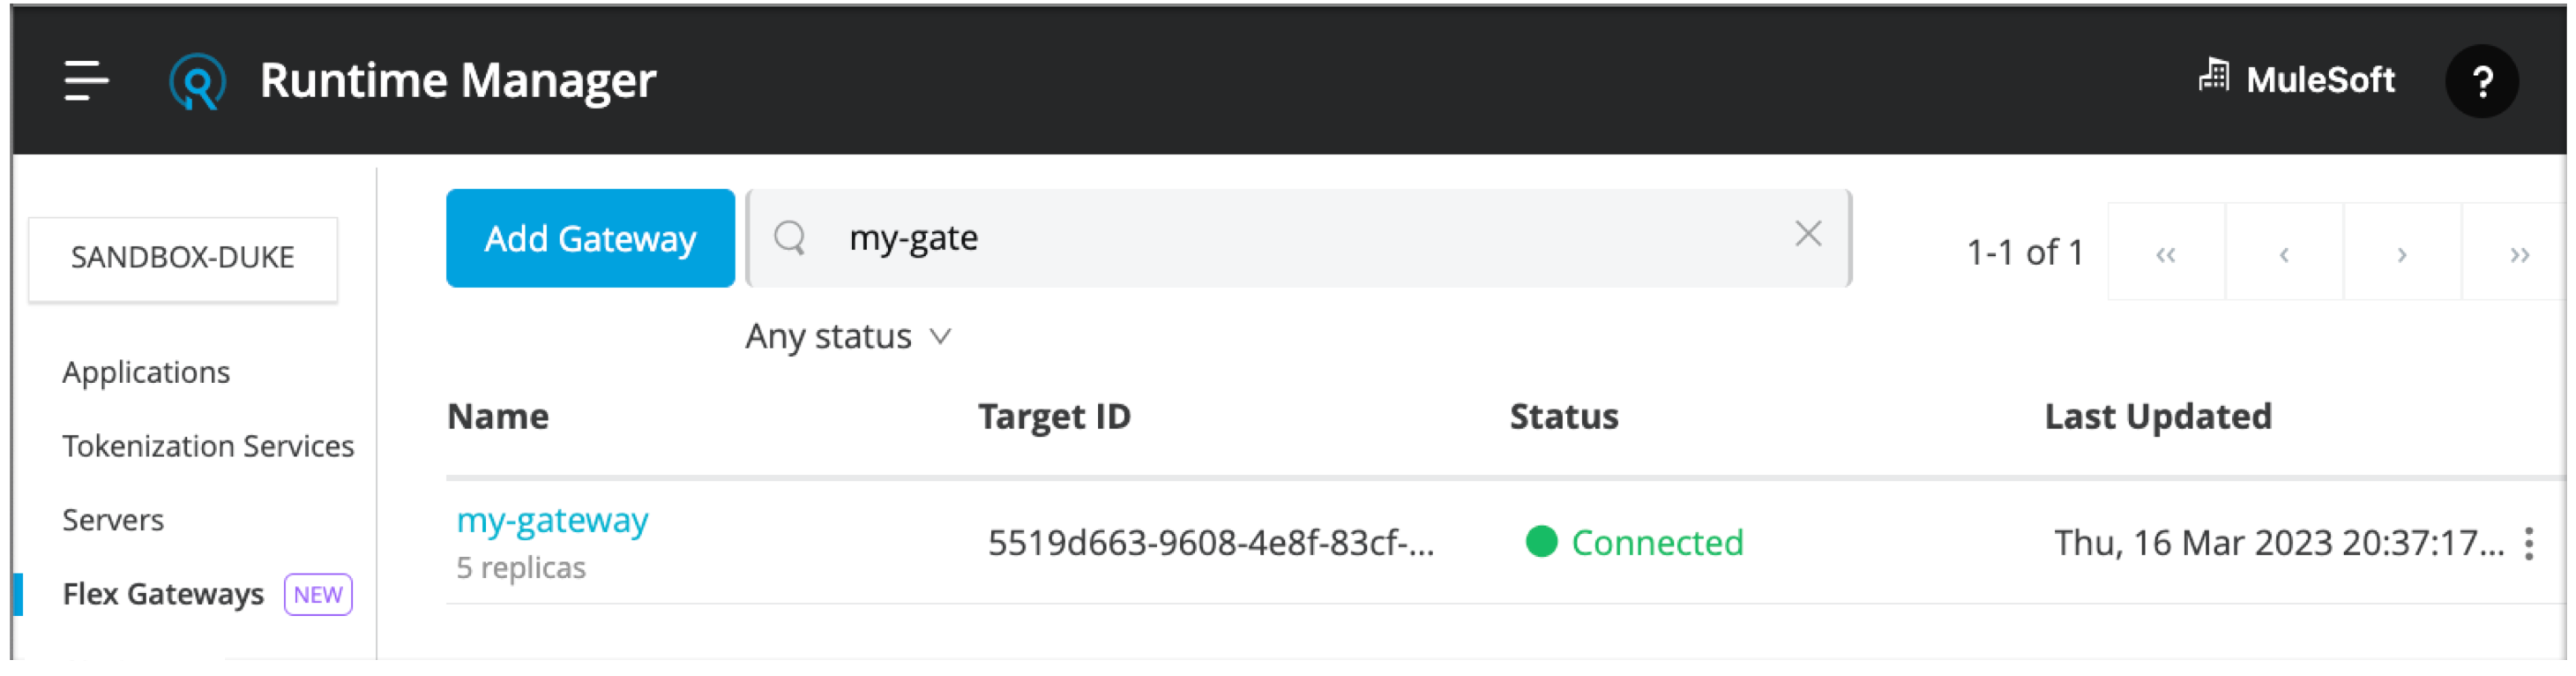
You can use the search field in the page to narrow the list of gateways.
-
Make sure that the status of your gateway is Running.
If the status is Not Running, it’s likely that the cluster configuration is incorrect or a network issue has occurred. Check Troubleshooting for more information.
-
Step 5: Publish and Deploy a Simple API to Omni Gateway
Create and deploy a simple API to your gateway in Anypoint API Manager:
-
In Runtime Manager, click the View APIs menu option for your gateway to navigate to its View APIs page.
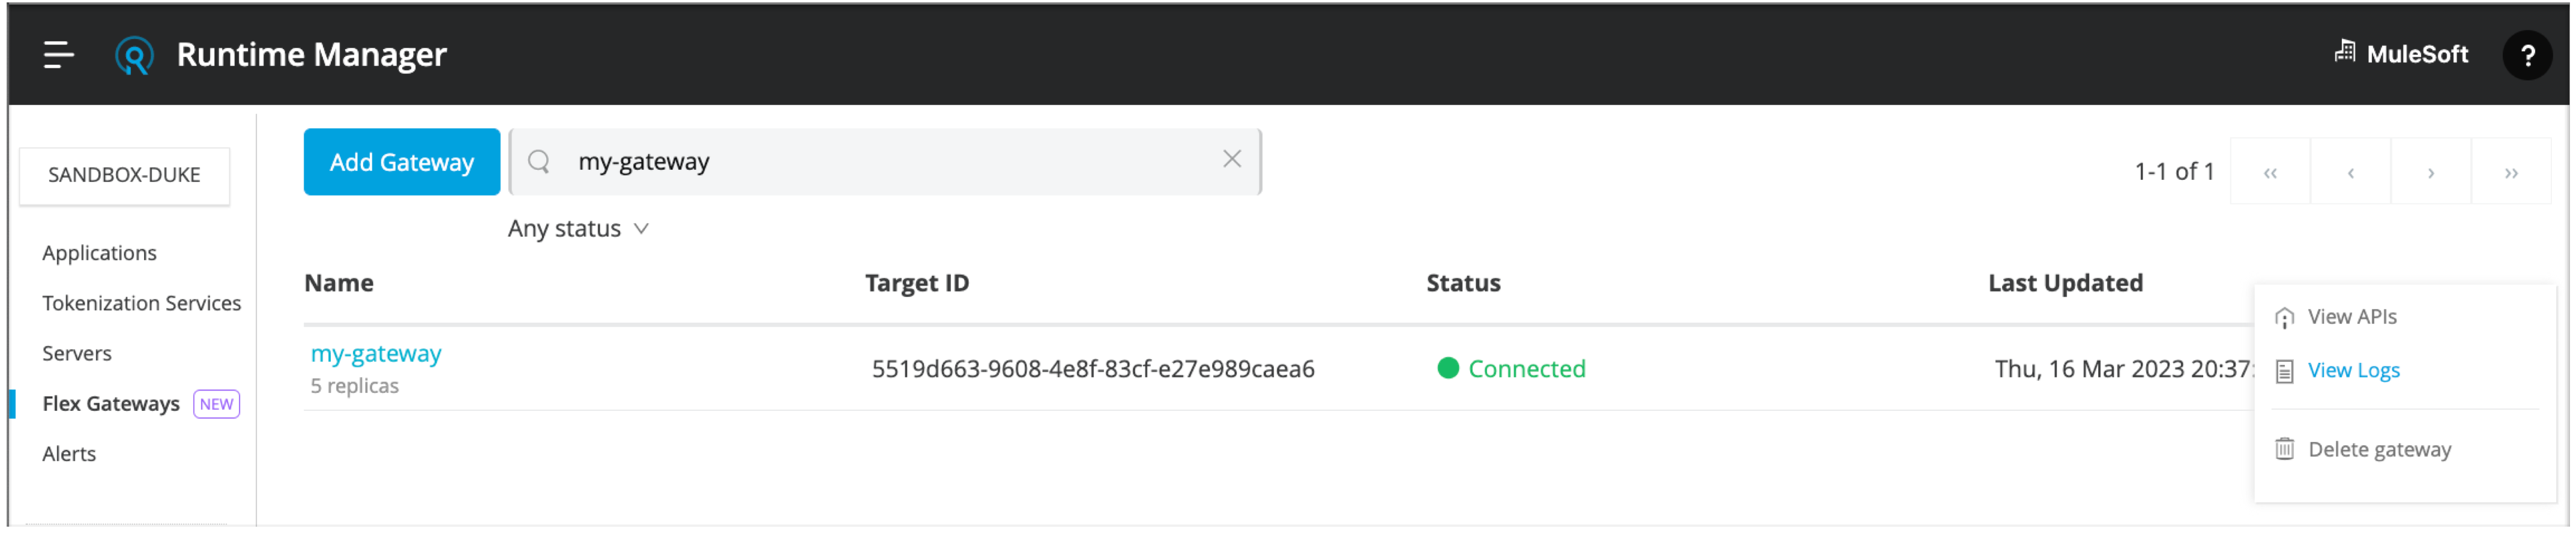
Alternatively, you can navigate to API Manager from the Anypoint Platform menu.
-
From the page that opens, click Add API (and if present, Add new API) to navigate to the APIs / Add API page in API Manager.
-
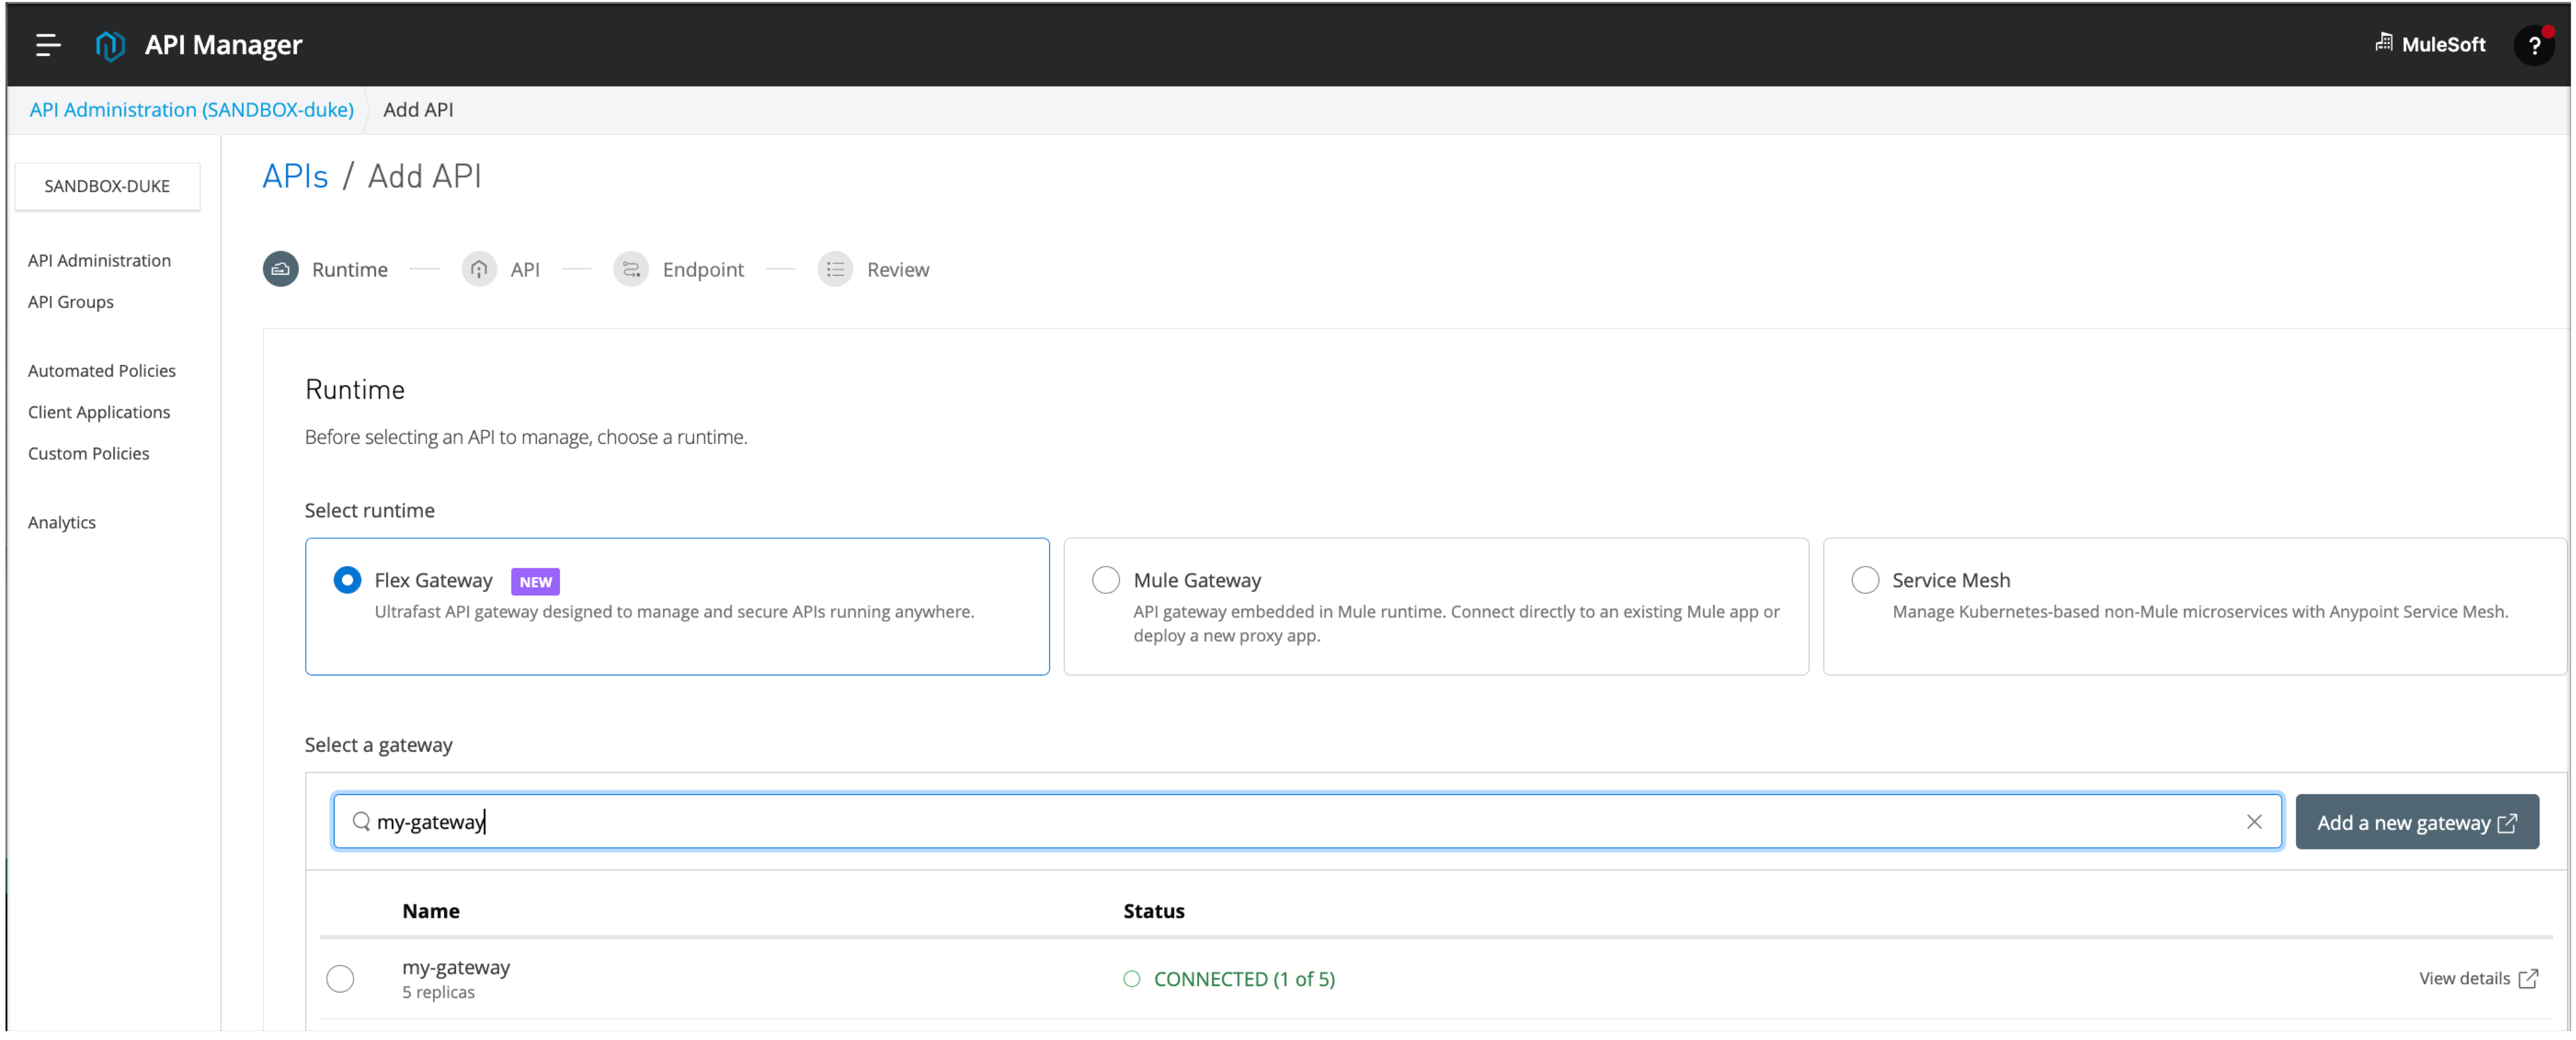
From APIs / Add API, configure an API by working through the API configuration pages, starting with the Runtime configuration:
-
From the Runtime configuration page, select Omni Gateway as your runtime.
-
Find and select your gateway in the Select a gateway area of the page.
Use the search field to locate it, if necessary.
-
Click Next to open the API page.
-
-
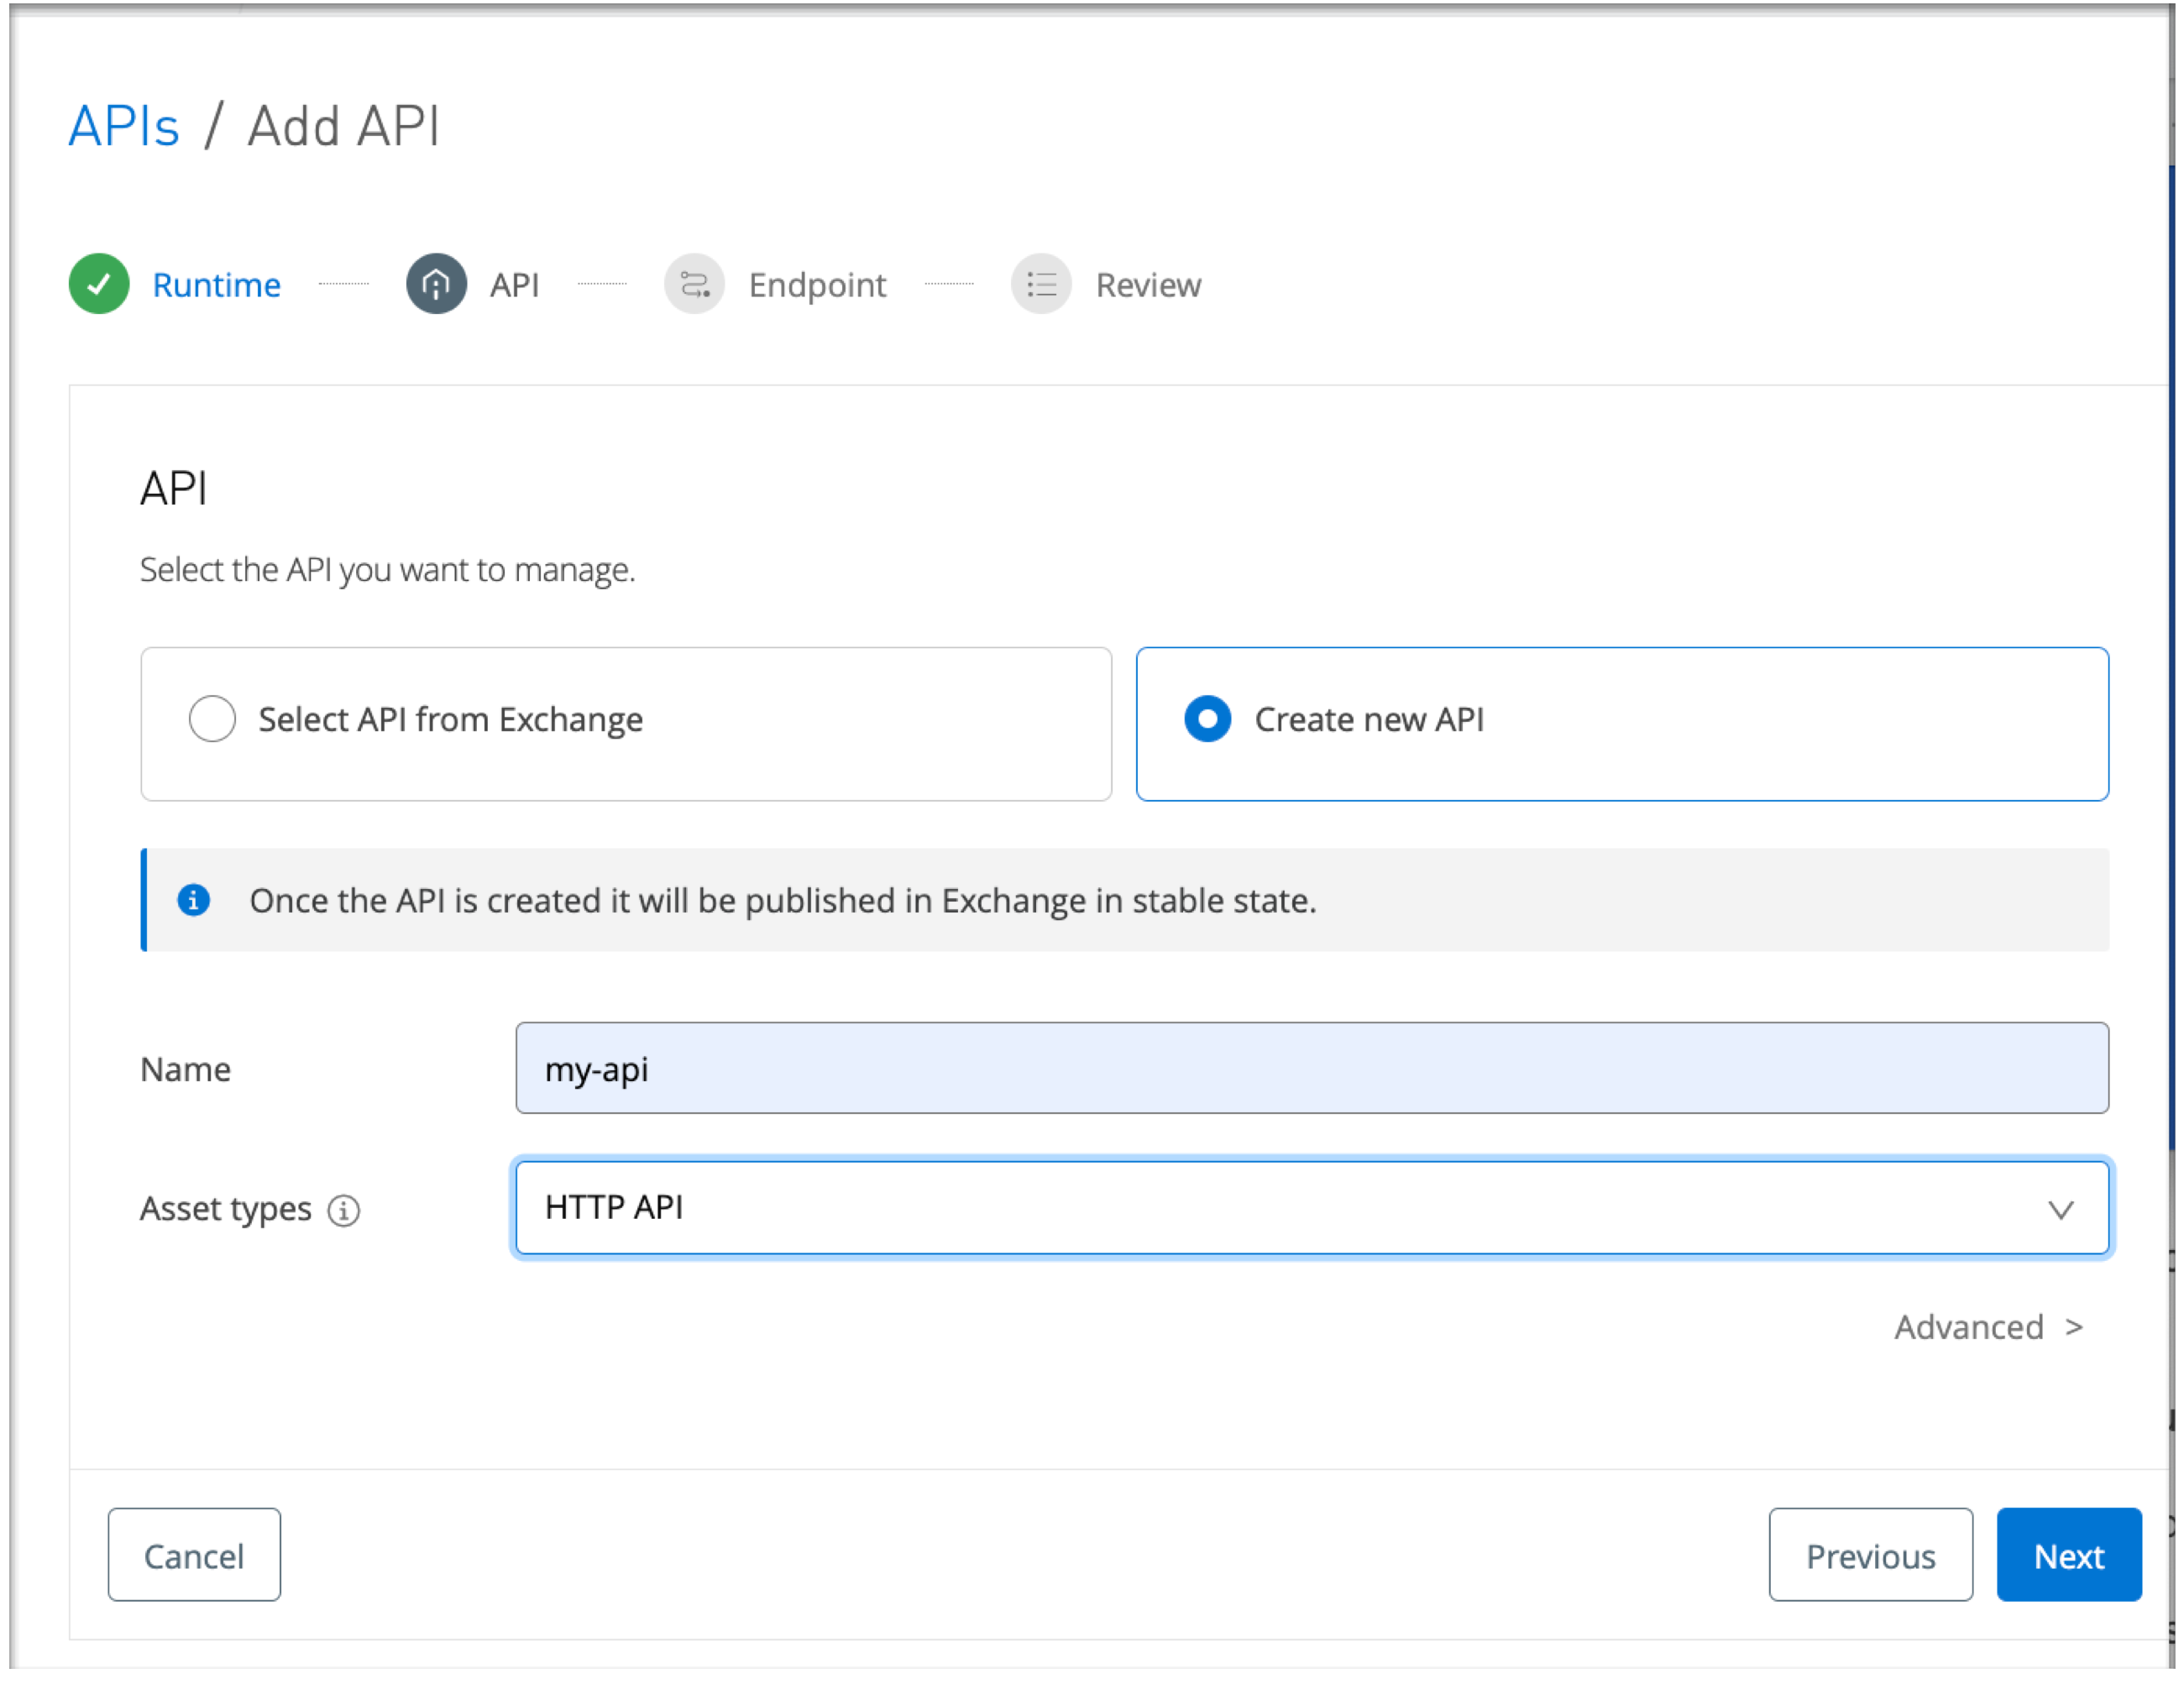
In the API configuration page associated with APIs / Add API, provide an API name and asset type:
-
Click Create new API.
The remaining procedures walk you through steps for creating and testing a new HTTP API in Anypoint Exchange. Notice, however, that it is also possible to select an existing API from Exchange from this page. That process is described in the Add a New API in the API Manager documentation.
-
Provide an API name, such as my-api.
-
Select HTTP API as the asset type.
-
Click Next to open the Endpoint configuration page.
-
-
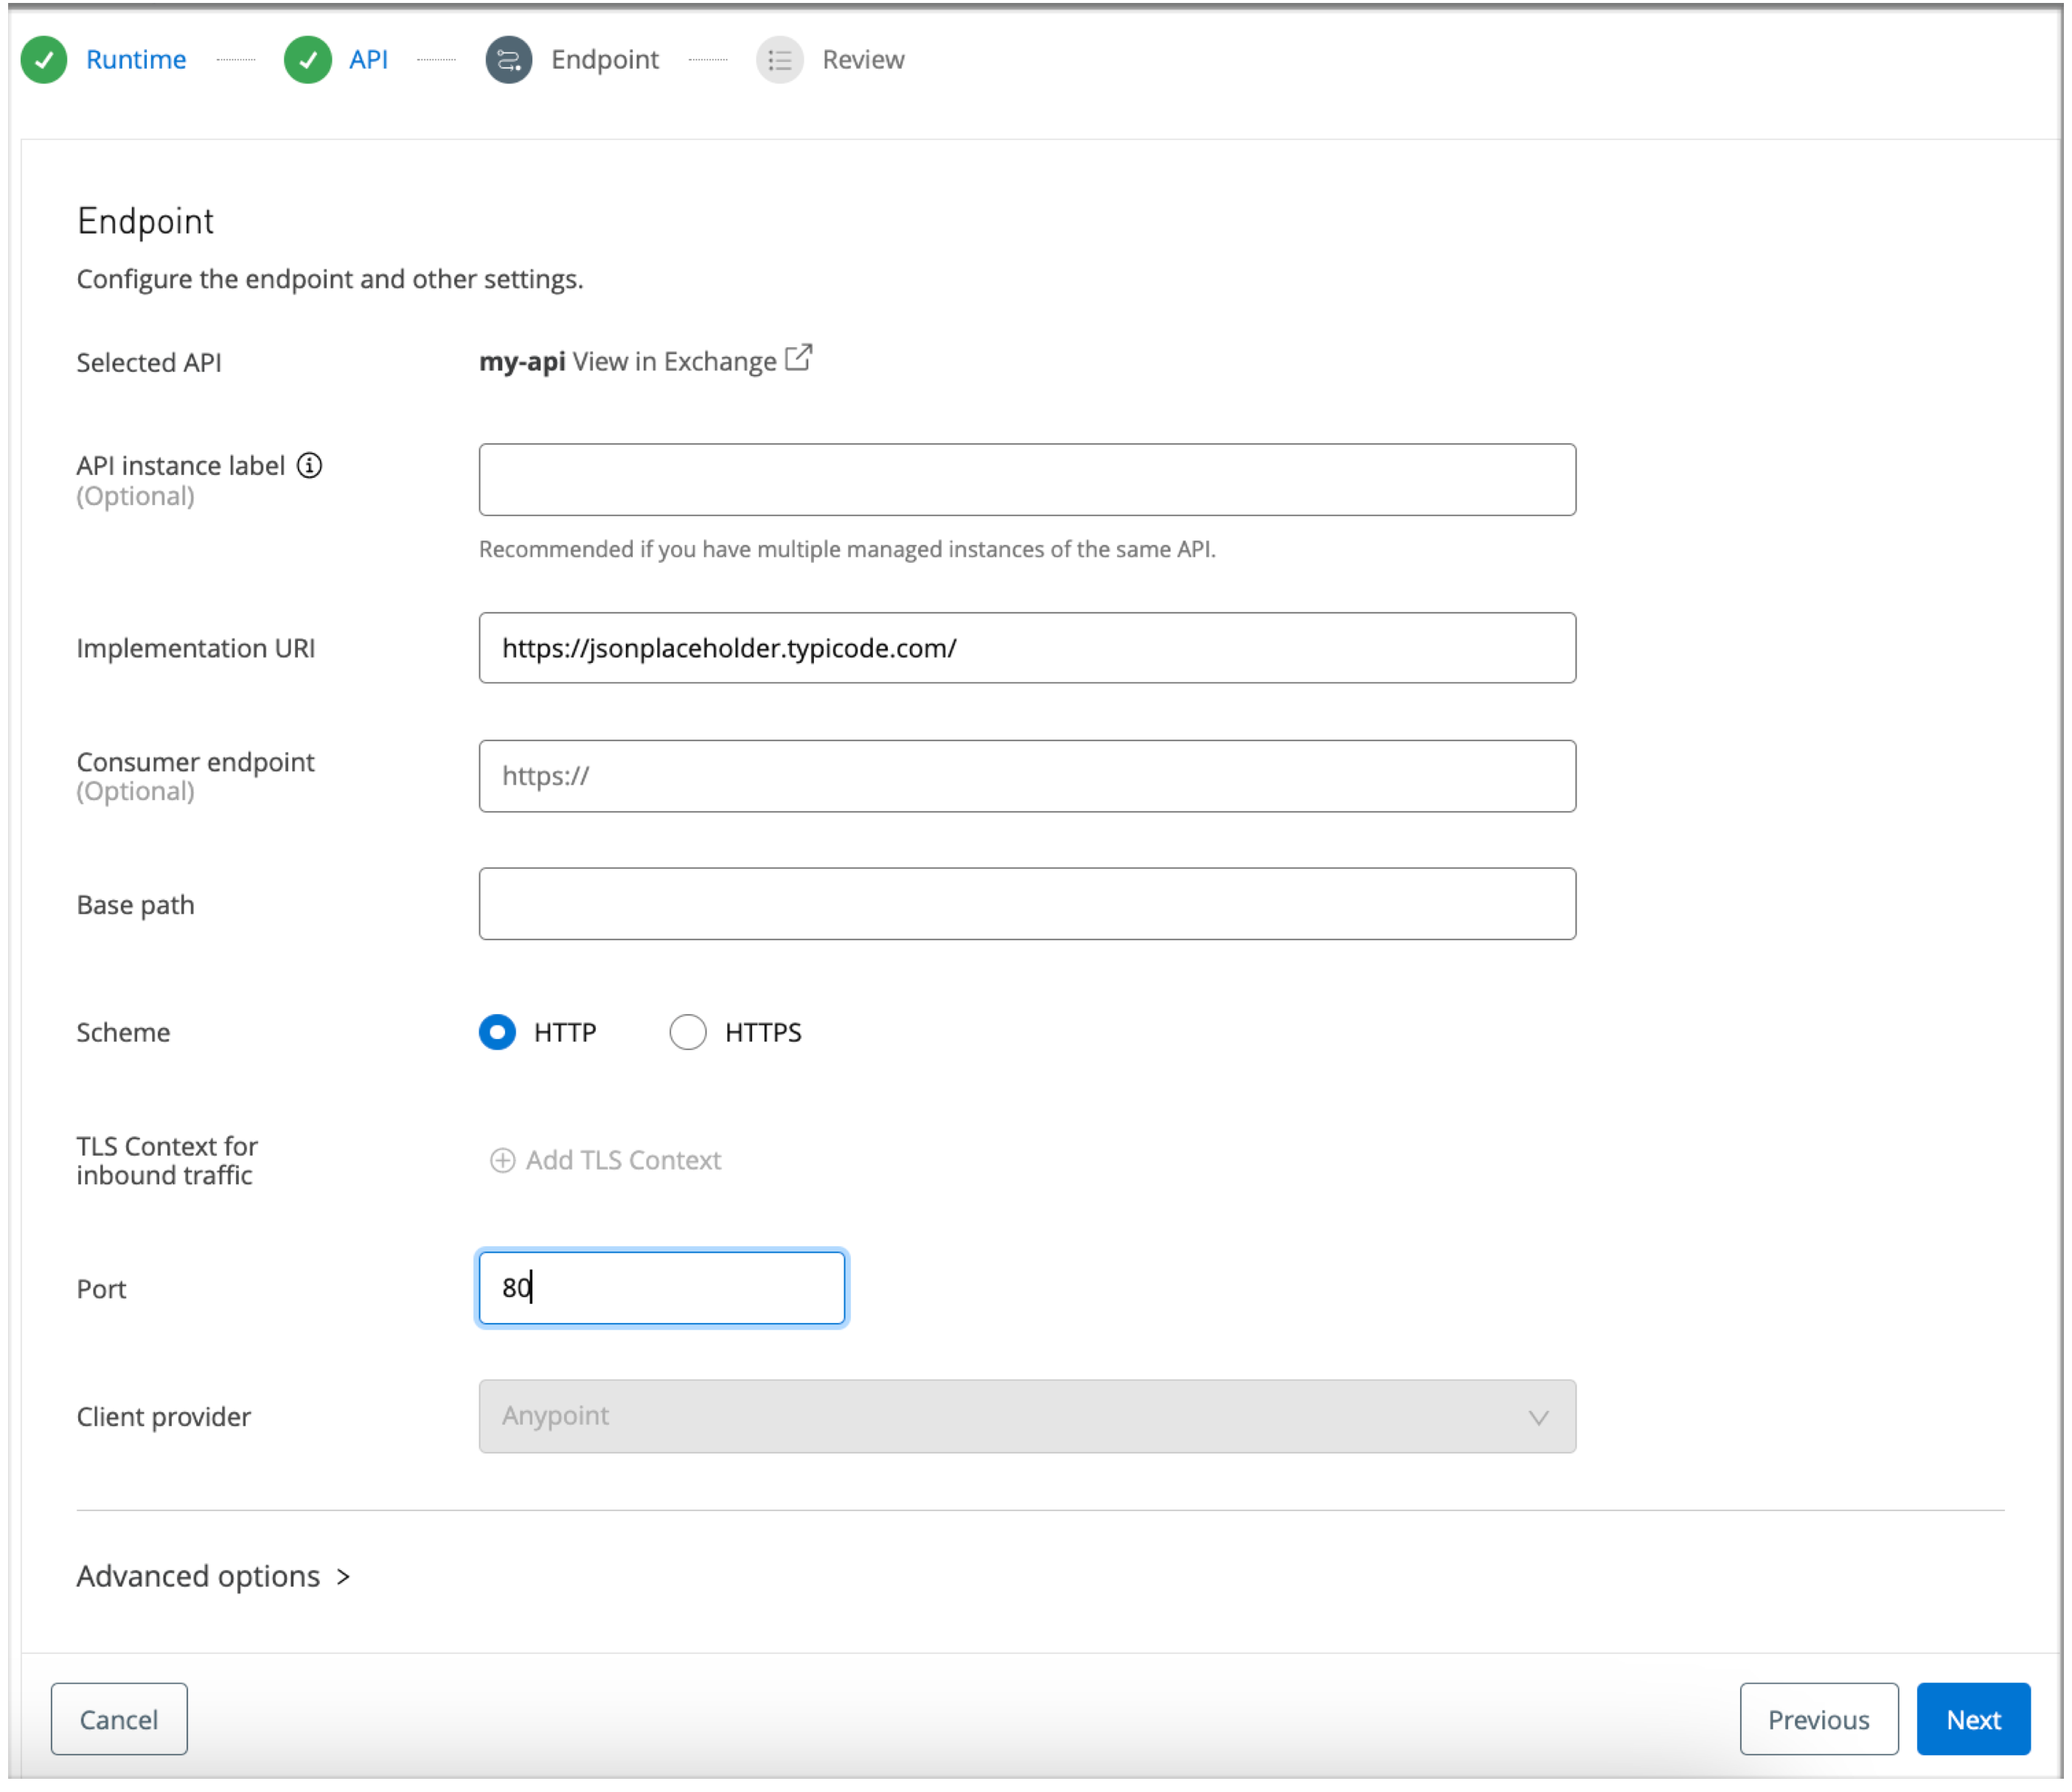
In the Endpoint page associated with APIs / Add API, set up an endpoint for your API:
-
For the Scheme, use the default, HTTP setting.
This guide focuses on a simple HTTP API. For HTTPS configuration details, see Configuring TLS Context for Omni Gateway in Connected Mode.
-
Copy the following URI into the Implementation URI field:
https://jsonplaceholder.typicode.com/ -
Type
80in the Port field.The example in this guide uses HTTP port
80instead of the API Manager default port,8081, because the createdServicemaps incoming port80to target port80on the Pod. See theservice.http.portkey in the Helm chart for Omni Gateway. -
Click Next to open the Review page.
-
-
In the Review page associated with APIs / Add API:
-
Review your API configuration.
-
If necessary, use Edit to revise any configurations.
-
When your configuration is correct, click Save & Deploy.
Inside the gateway, all incoming HTTP requests on port
80are proxied to thejsonplaceholderservice.
-
-
From a terminal window, test the API instance:
-
Get your external IP address and use it to check that your IP redirects to the Implementation URI:
kubectl -n gateway get servicesThe command returns a result that looks similar to this example:
NAME    TYPE         CLUSTER-IP     EXTERNAL-IP       PORT(S)                    AGE
ingress LoadBalancer 10.100.145.109 <123456.aws.com>  80:30524/TCP,443:31710/TCP 7d7h
The
EXTERNAL-IPvalue<123456.aws.com>is an example and not an actual value. -
Run the following
curlcommand, replacing<your_external_ip>with yourEXTERNAL-IPfrom the preceding step:curl -s -o /dev/null -w "%{http_code}\n" --request GET 'http://<your_external_ip>:80/users'The command executes a
GETrequest to the API and prints a success code:200
You can also run a simpler
curlcommand to return an array of JSON objects from the service’s/usersendpoint, for example:$ curl http://<your_external_ip>:80/users
-
Step 6: Secure Your API Using the Basic Authentication Policy
Use API Manager to add a basic authentication policy to your API.
-
In API Manager, select API Instances from the side navigation panel.
-
Find and click the name of the API that you created in Step 5: Publish and Deploy a Simple API to Omni Gateway, such as my-api.
-
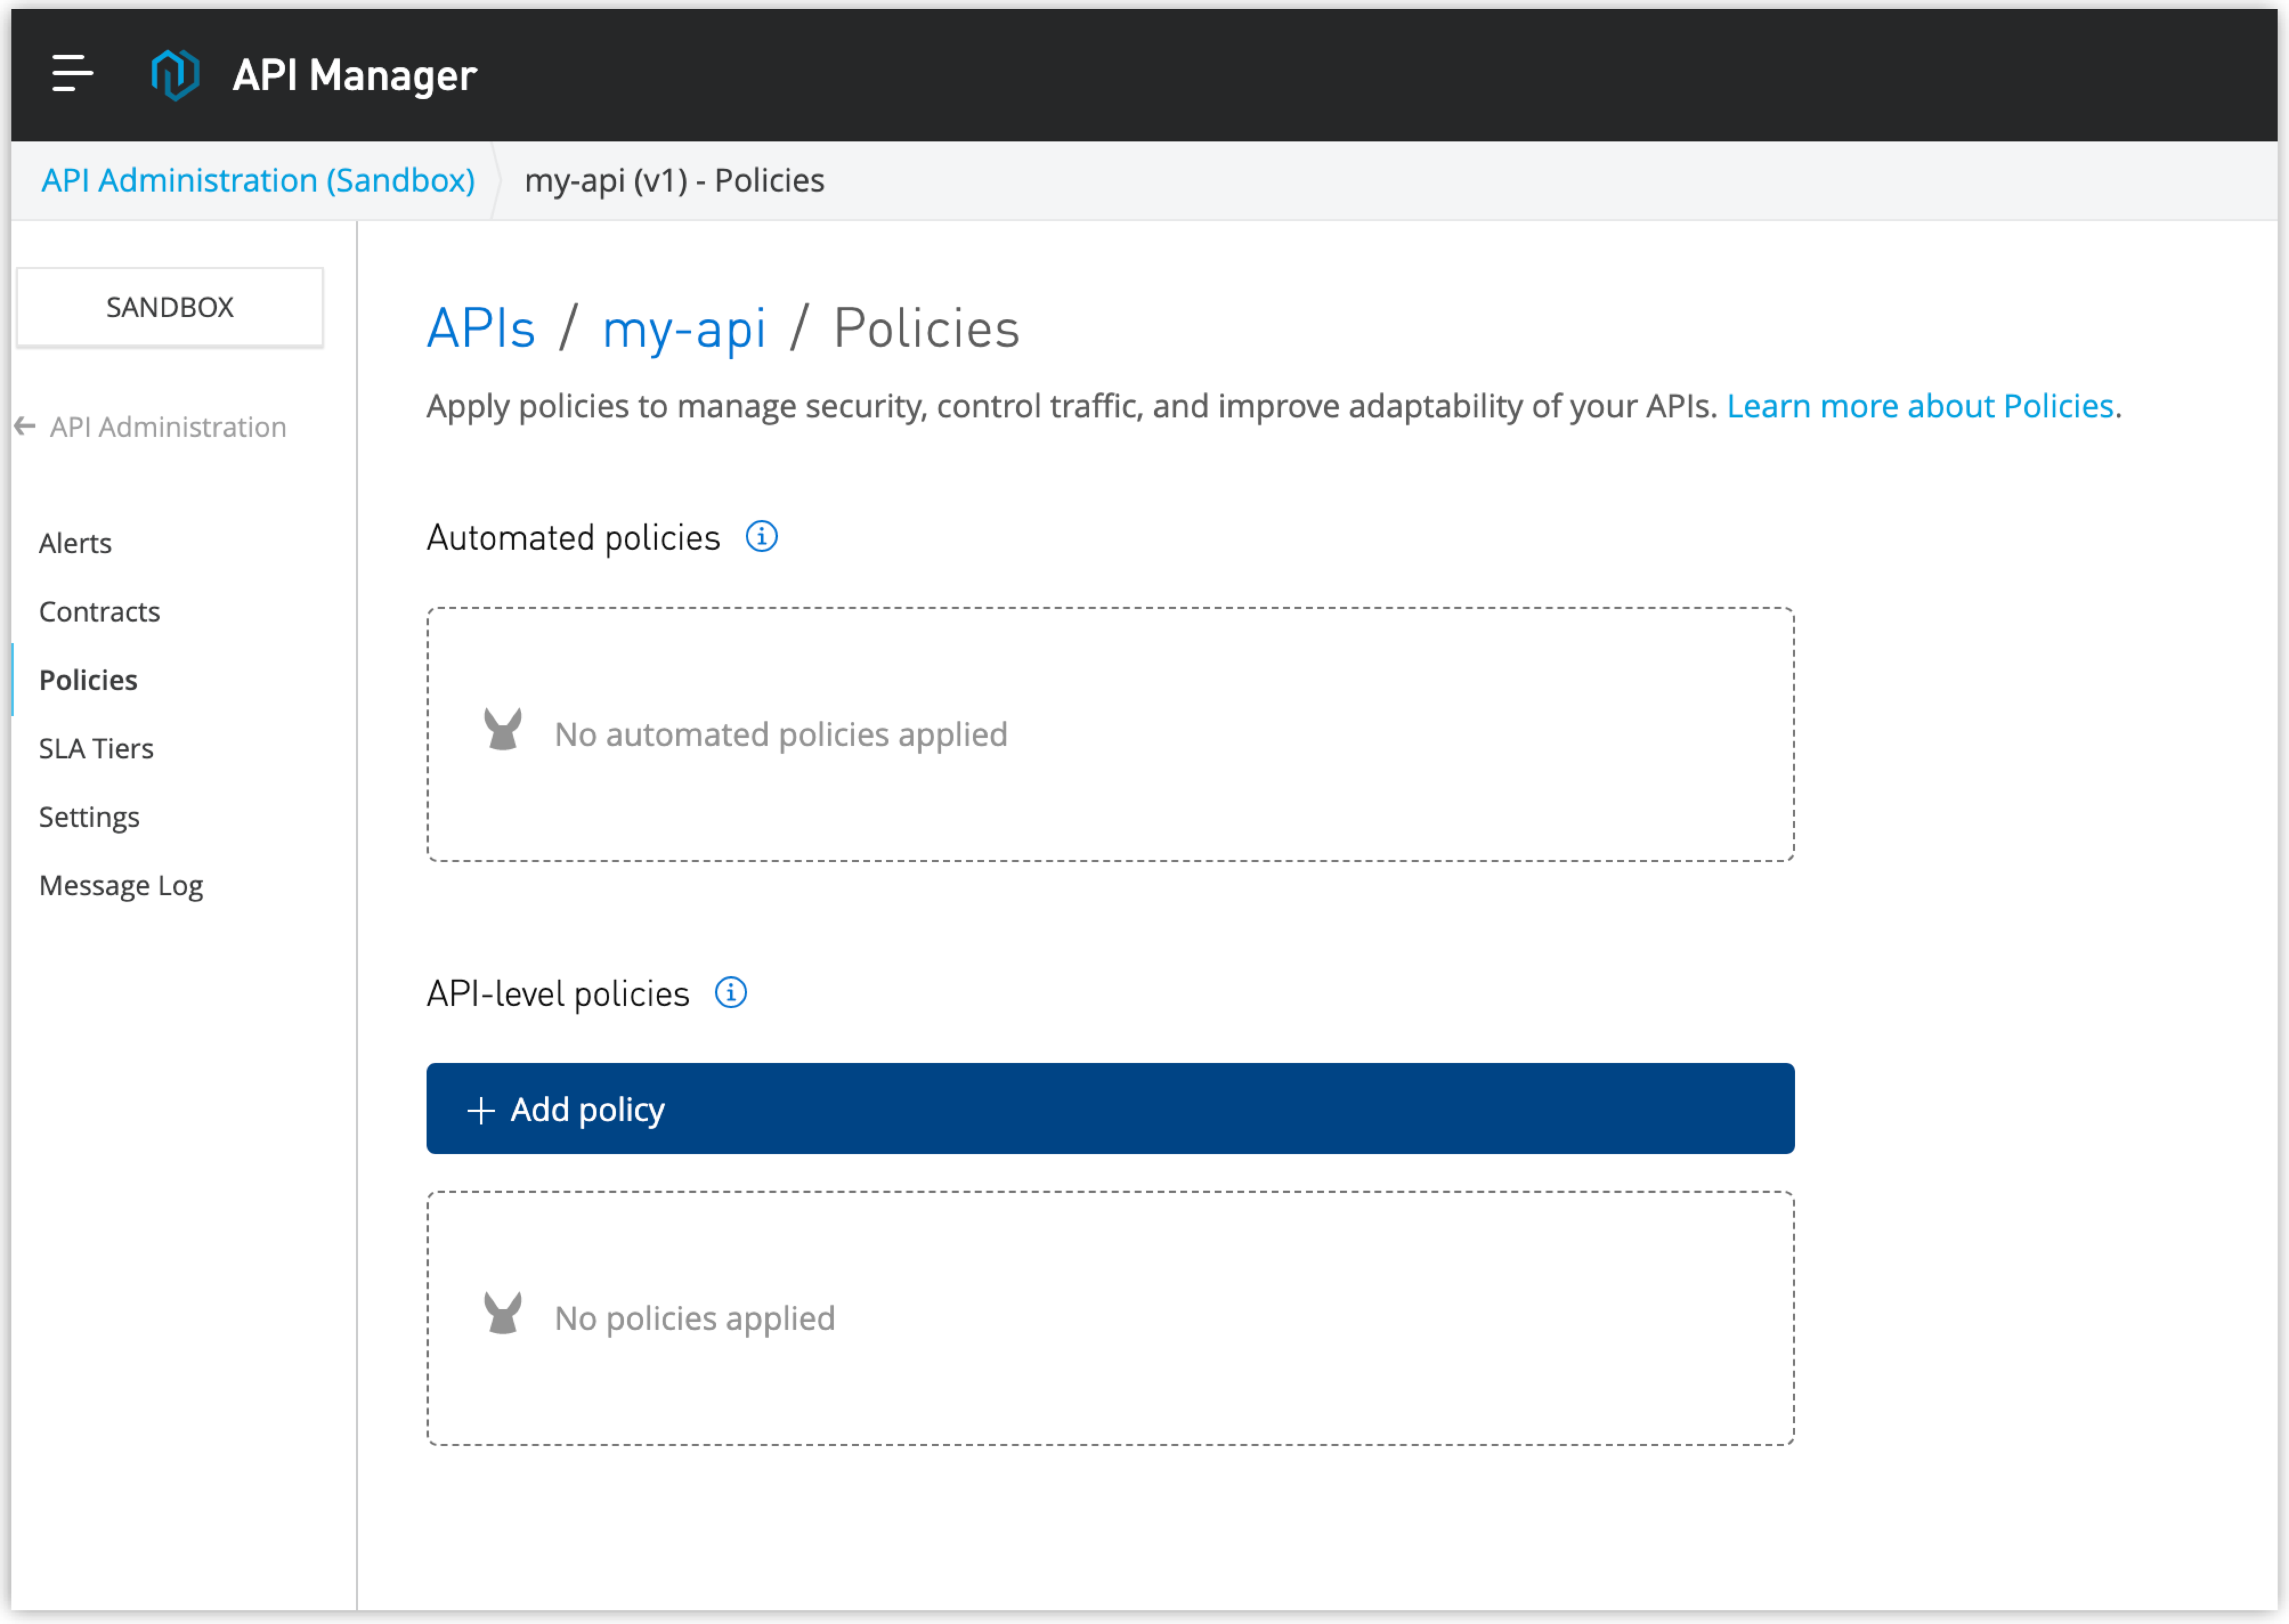
Navigate to the Policies page for your API:
-
Select Policies from the side navigation panel.
-
On the Policies page, click Add policy.
-
-
In the page that opens, find the Security policy called Basic Authentication - Simple policy.
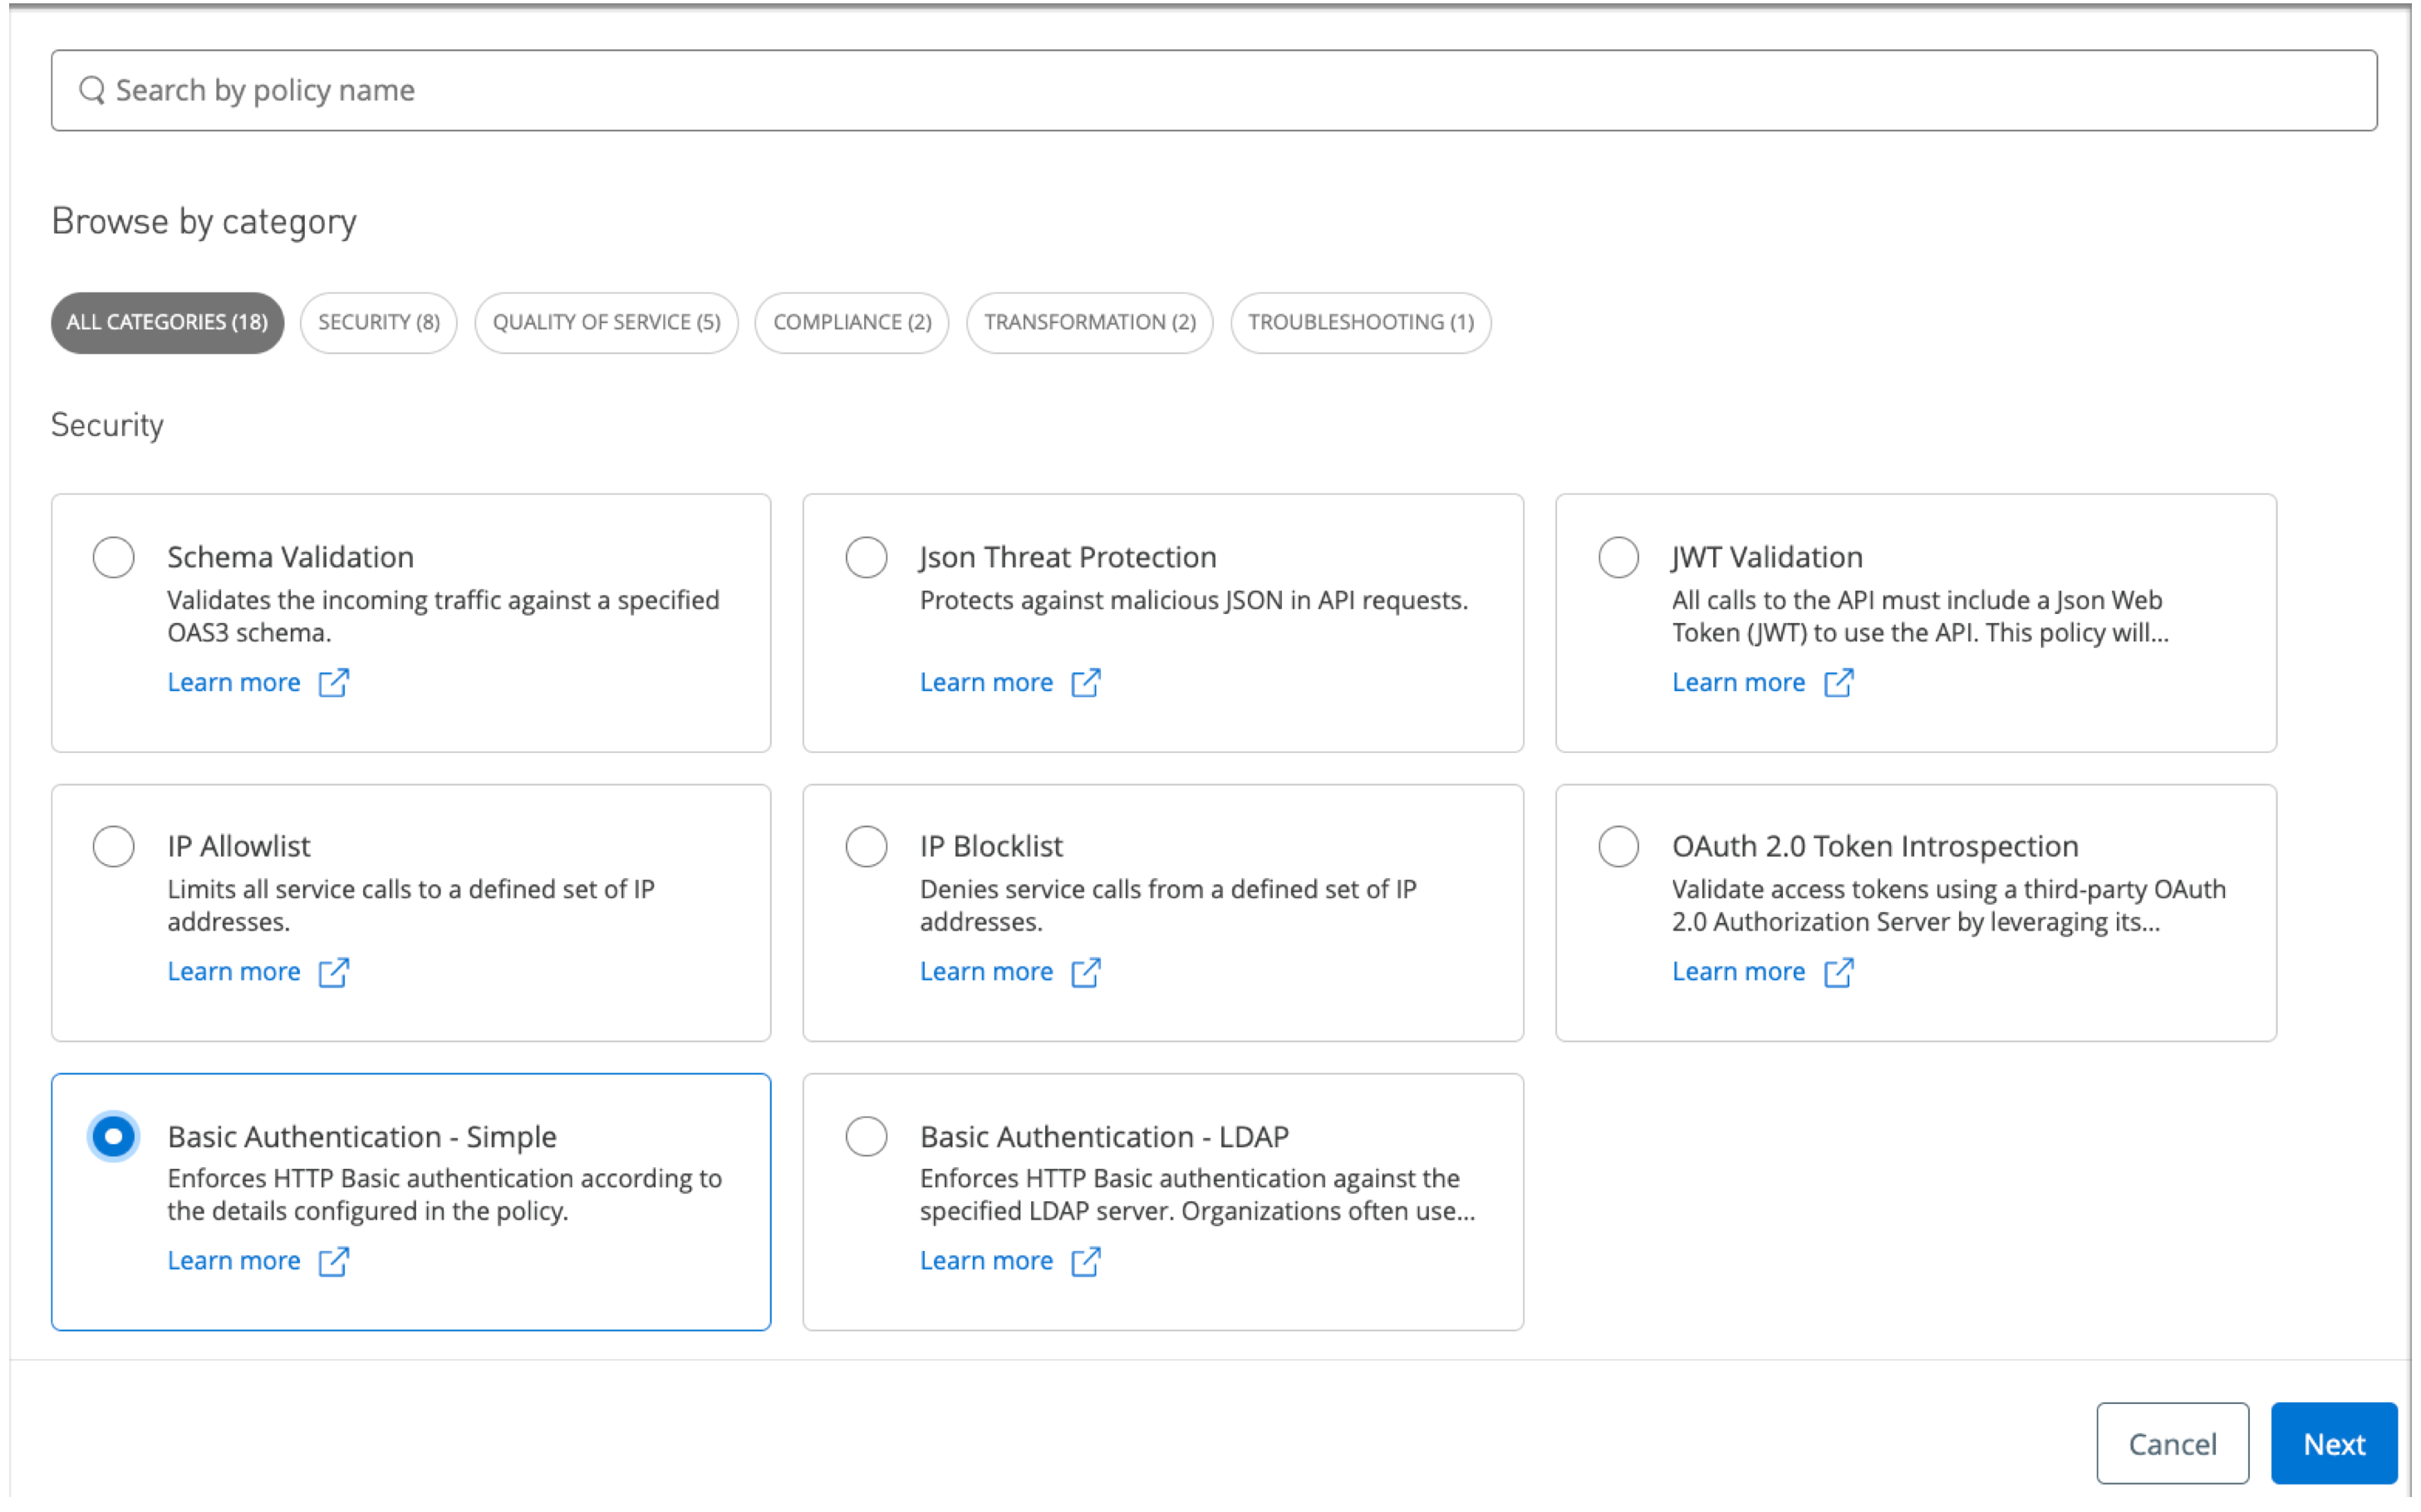
Be careful to avoid selecting the similarly named policy for LDAP.
-
Click Next.
-
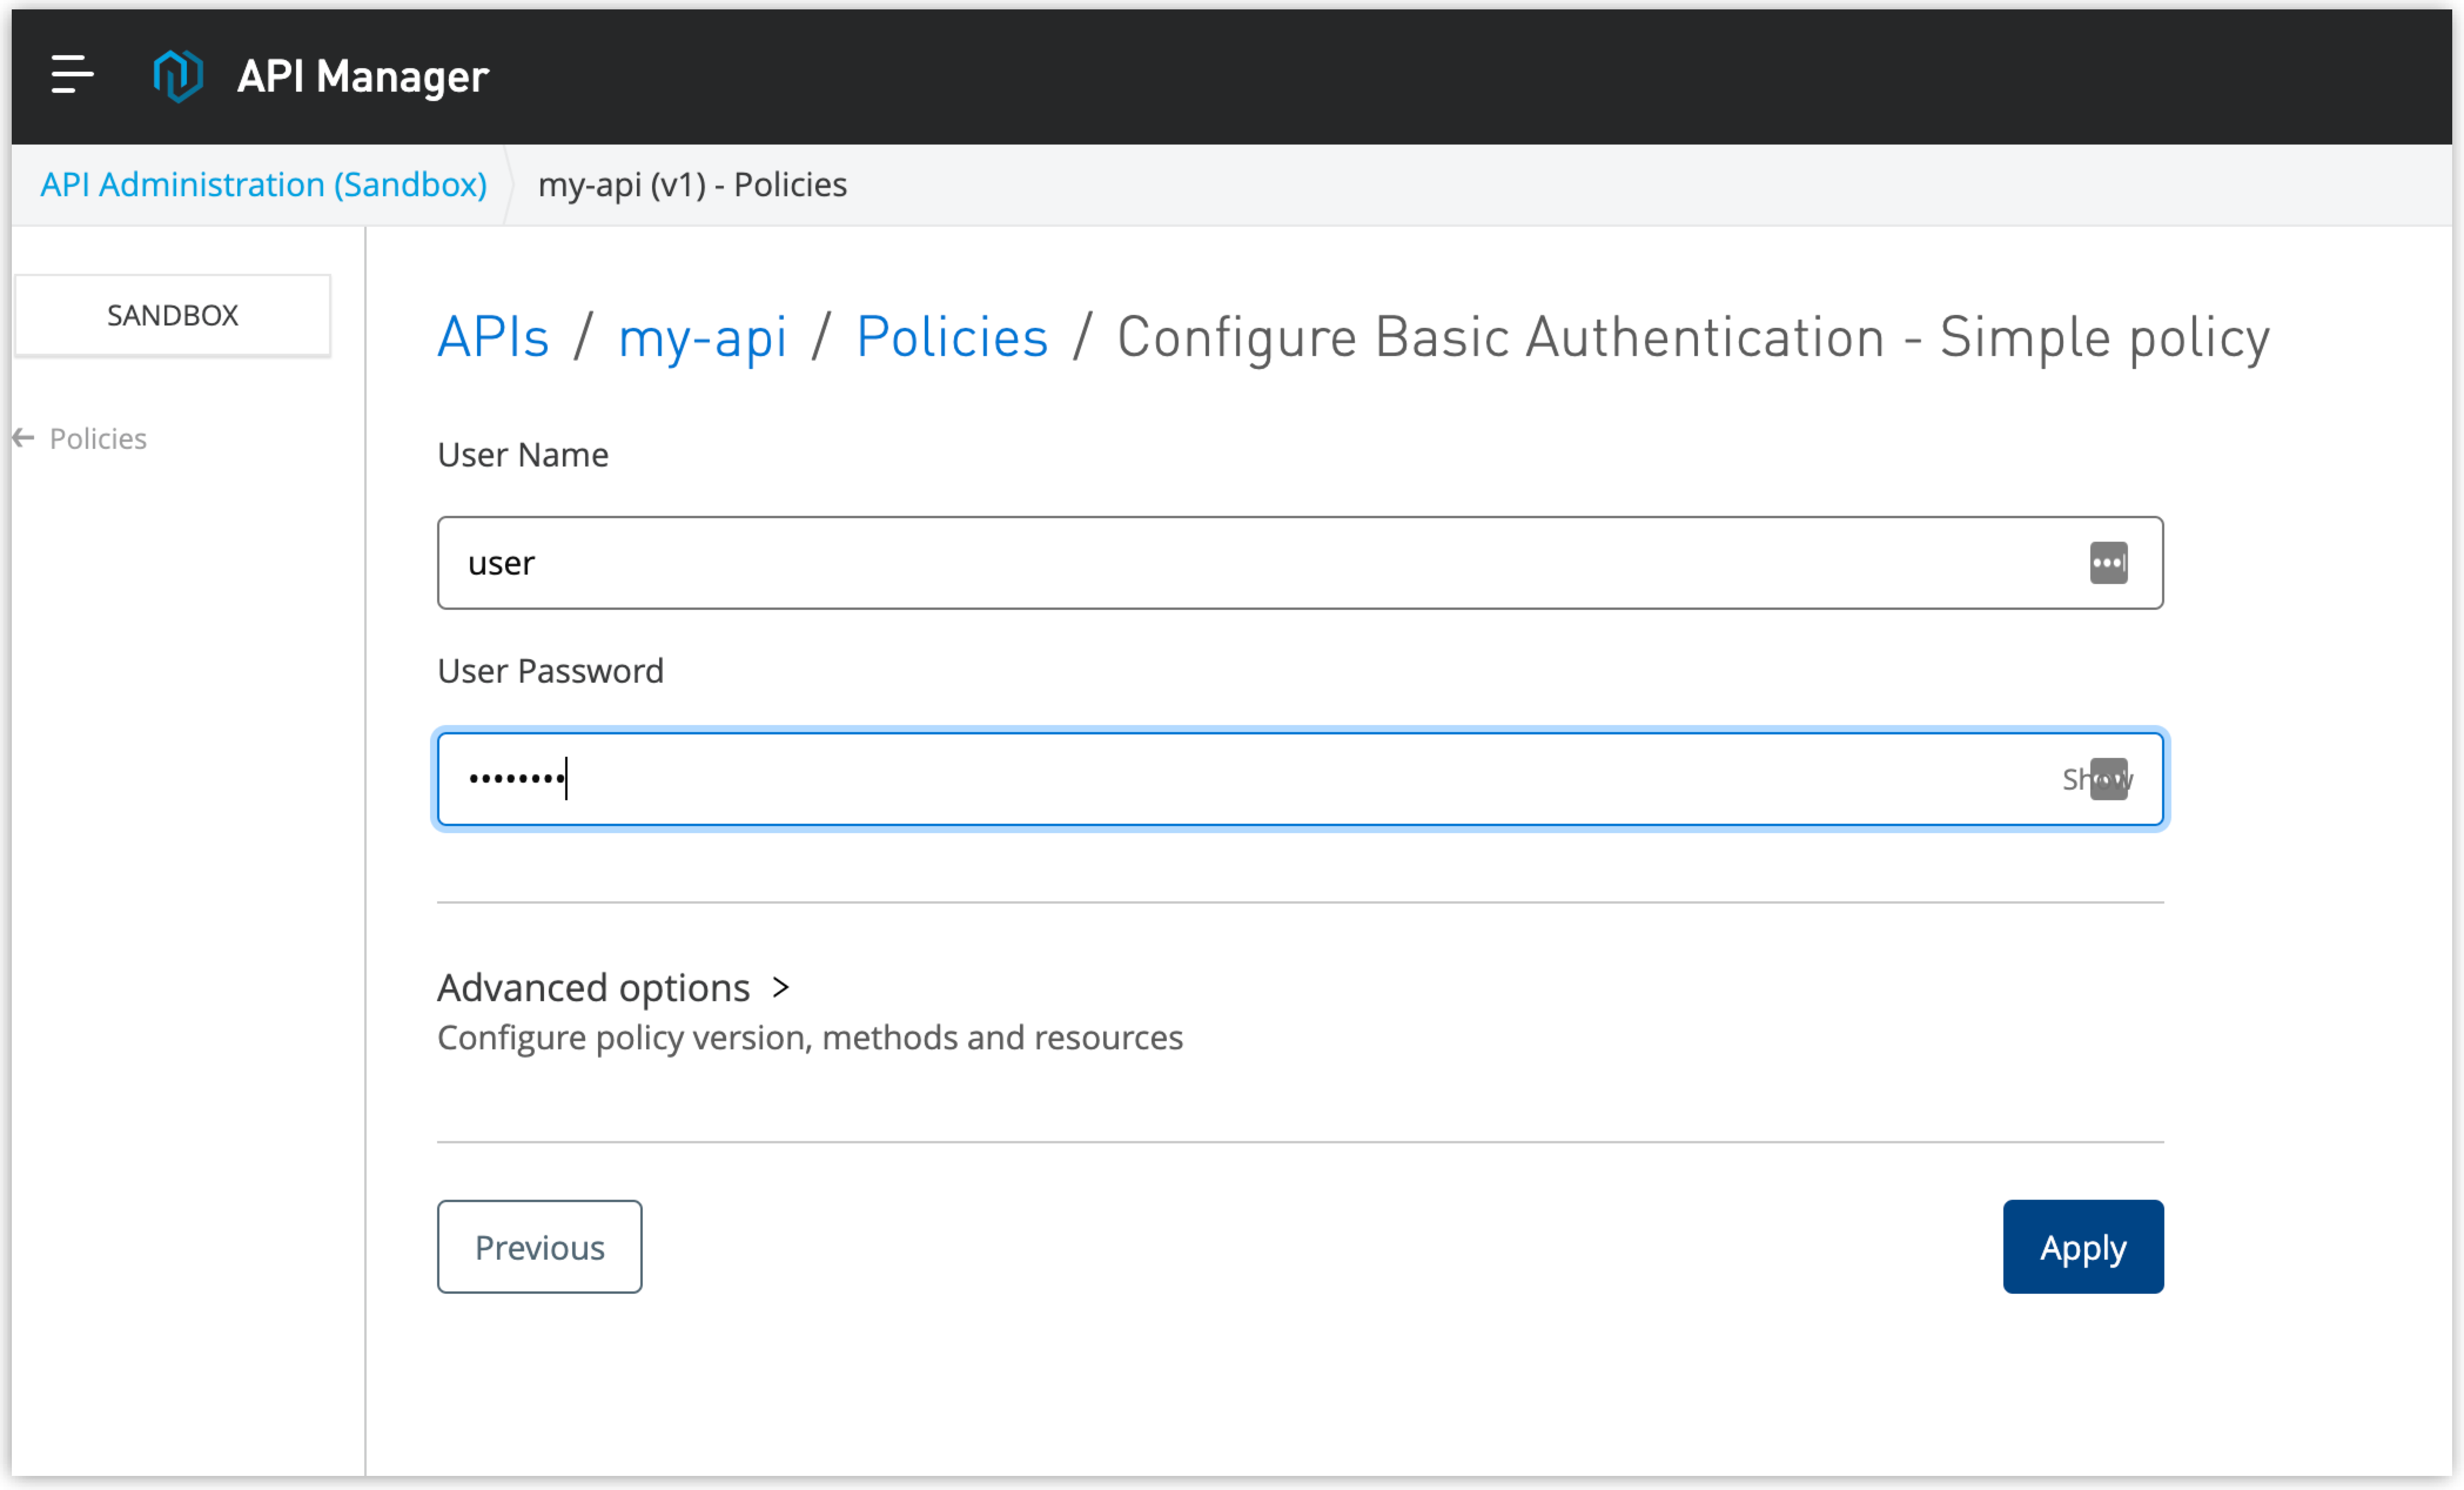
Configure a Basic Authentication policy:
-
For User Name, enter
userinstead of your real user name.If the field is pre-populated with a value, you can keep the value or change it to the suggested value.
-
For User Password, enter
pw.If the field is pre-populated with a value, you can keep the value or change it to the suggested value.
-
Click Apply.
-
-
Test the API instance:
-
Use
kubectlto get your external IP address again so that you can use it in the next step:kubectl -n gateway get services -
Run the following
curla command without authentication parameters, replacing<your_external_ip>with theEXTERNAL-IPreturned by preceding step:curl -s -o /dev/null -w "%{http_code}\n" --request GET 'http://<your_external_ip>:80/users'The command returns a
401because the URI lacks authentication parameters:401
-
Run the following
curla command with authentication parameters, replacing<your_external_ip>with yourEXTERNAL-IPfrom the preceding step:curl -s -o /dev/null -w "%{http_code}\n" --request GET 'http://<your_external_ip>:80/users' -u user:pwThe command prints the resulting
200status code, indicating success:200
The
userandpasswordparameters (user:pw) must match the values you specified when you applied the policy. If you enter incorrect authentication parameters, the following error occurs:401
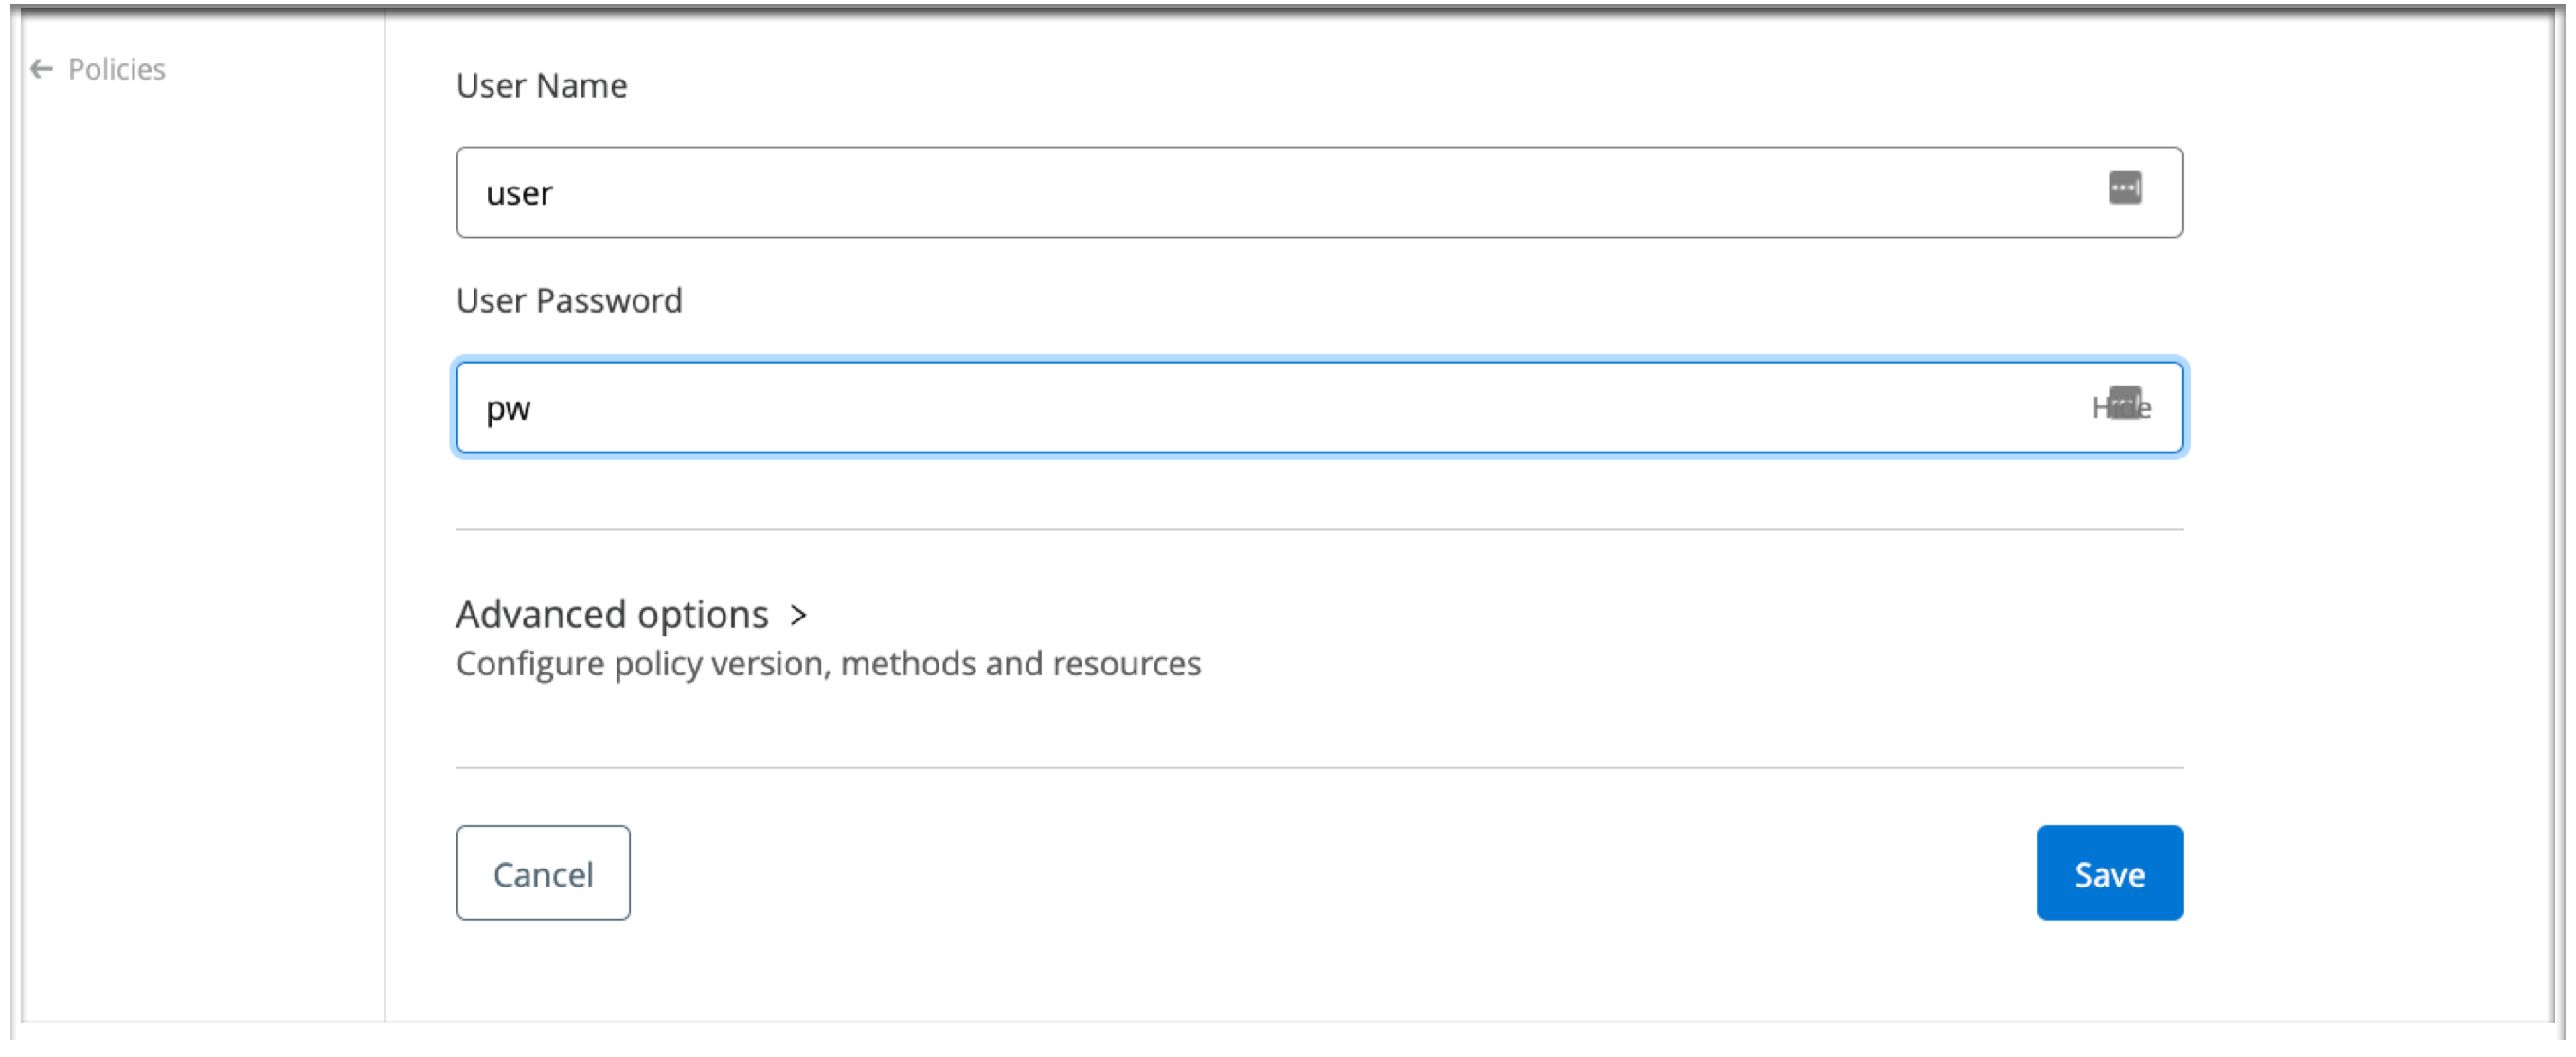
To address the error, run the command with the correct authentication parameters, or return to the policy configuration page for your API in API Gateway, edit the policy configuration, and rerun the
curlcommands.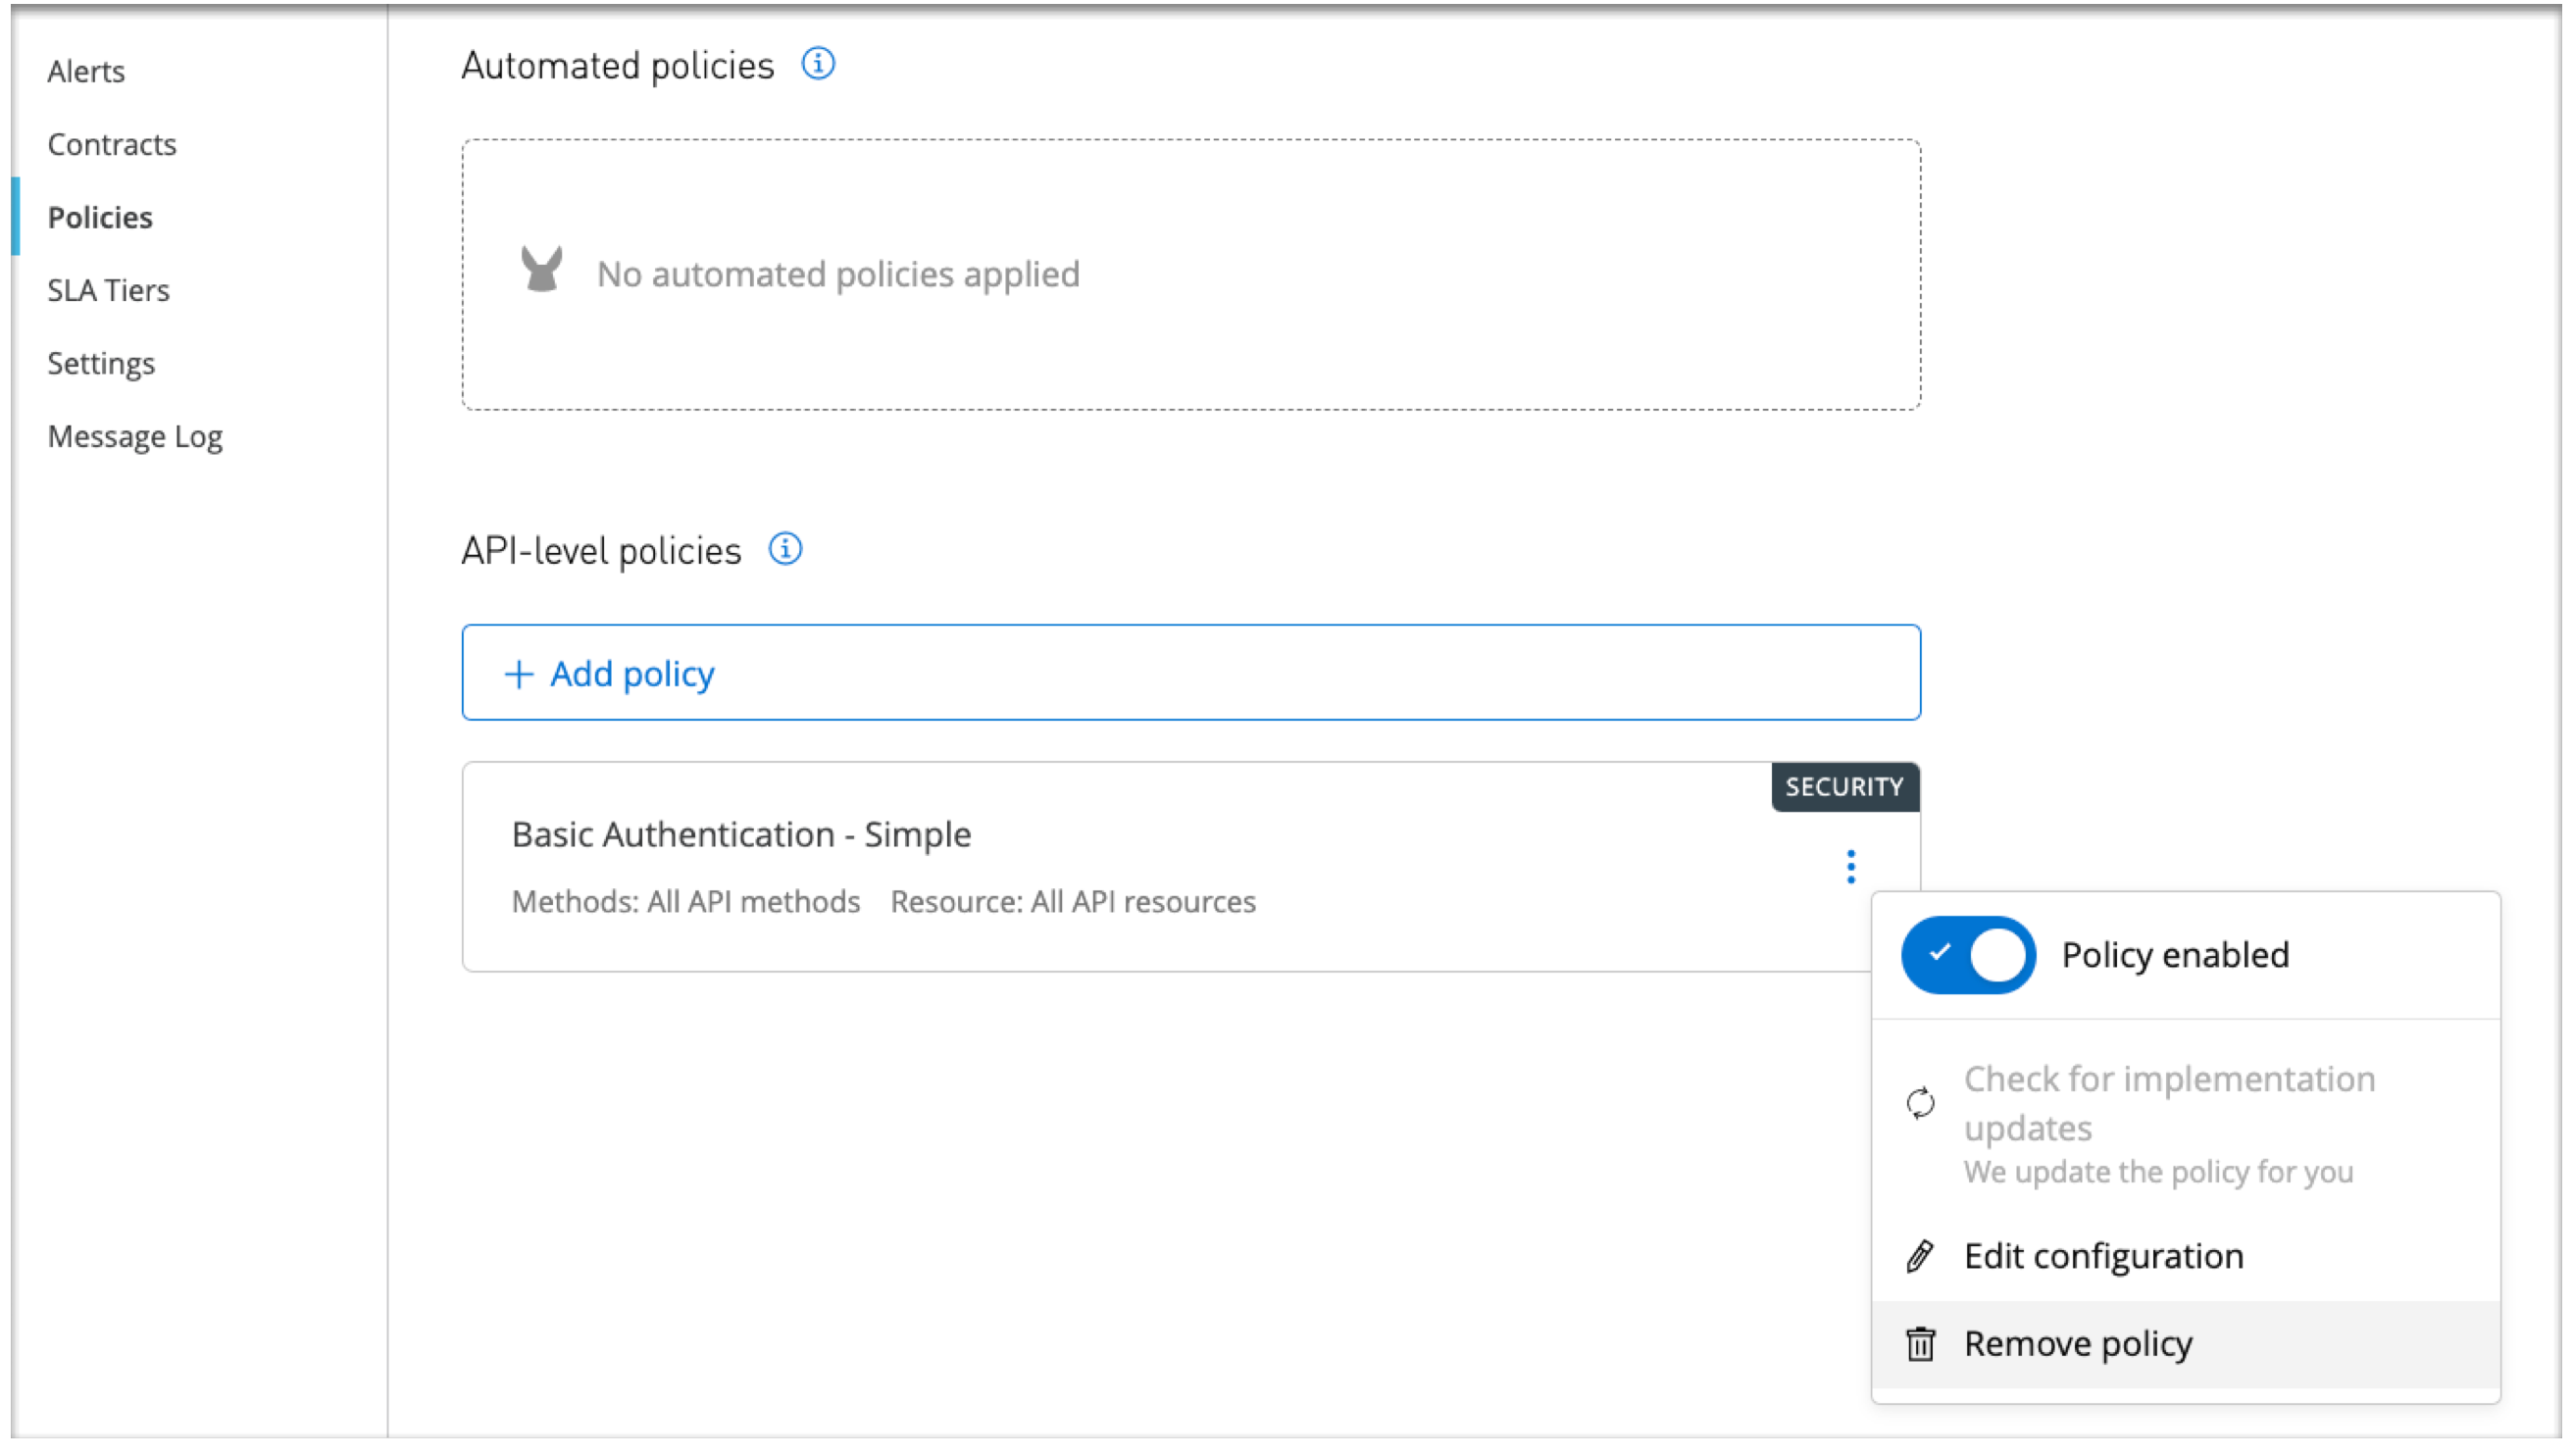
The page for editing the credentials looks similar to this one:
-
Troubleshooting
If you encounter an error when running a command, check for troubleshooting information:
Docker Command Issues
Troubleshoot errors returned by a docker command:
Docker Daemon Error
If Docker is not started, a docker command returns an error message similar to the following ones:
-
Error response from daemon: Bad response from Docker engine
-
ERROR: Cannot connect to the Docker daemon at unix:///var/run/docker.sock.
       Is the docker daemon running?
If you get this error, start Docker.
Reg Facade Error (400 Bad Request)
The following error can occur when you use docker run to register your gateway:
[flexctl][error] reg facade call returned error response:
HTTP/1.1 400 Bad Request
The reason for this error is available within the error message. Common causes include:
-
an active target with the same name already exists in this organization and environmentTo avoid this issue, provide a unique name for your gateway when running the registration command. Note that you cannot reuse the same name even if a previous registration with that name was successful. When this error occurs, the command generates an empty
registration.yaml, which prevents re-registration and produces an error when you try to use the file when deploying the gateway to your cluster. -
no valid registration token was foundTo avoid this issue, generate a new token for the command by refreshing the Add an Omni Gateway page for Kubernetes and rerun the registration command.
Helm Command Issues
Troubleshoot errors returned by a helm command for Kubernetes and OpenShift clusters:
Upgrade Failed: Execution Error
If the registration.yaml file is invalid when you pass it to the Helm command during deployment of Omni Gateway, the following error results:
Error: UPGRADE FAILED: execution error at (flex-gateway/templates/deployment.yaml:4:10):
registerSecretName, registration.content or registration.secretName is required!
When this error occurs, make sure that the registration.yaml file is not empty. If the file is empty, reregister your gateway with a new, unique name to generate a new registration.yaml and rerun the procedures that follow the registration step. See Register Omni Gateway for an example of the registration command.
Upgrade Failed: Timed Out
Some issues can cause the Helm upgrade command to hang for up to 5 minutes (due to the --wait flag in the command) before producing the following timeout error:
Error: UPGRADE FAILED: timed out waiting for the condition
This error typically means that your cluster configuration is incorrect or that your cluster configuration tool does not support this process. One potential cause is the failure to generate a Service resource of the LoadBalancer type. You can troubleshoot further by running the following commands:
-
kubectl -n gateway describe deployment -
kubectl -n gateway describe service
Kubernetes Cluster Unreachable
If your Kubernetes cluster is not running when you attempt to deploy Omni Gateway using helm, the following error might occur:
Error: Kubernetes cluster unreachable:
the server could not find the requested resource
Start the service that runs your cluster.
Check that your Kubernetes cluster host is running your cluster, for example:
kubectl cluster-info-
If the cluster is running, the command returns a result similar to this one:
Kubernetes control plane is running at https://34.30.50.119
GLBCDefaultBackend is running at https://34.30.50.119/api/v1/namespaces/kube-system/services/default-http-backend:http/proxy
KubeDNS is running at https://34.30.50.119/api/v1/namespaces/kube-system/services/kube-dns:dns/proxy
Metrics-server is running at https://34.30.50.119/api/v1/namespaces/kube-system/services/https:metrics-server:/proxy
-
If the cluster is not up, the command can return a result similar to this one:
To further debug and diagnose cluster problems, use 'kubectl cluster-info dump'.
error: the server doesn't have a resource type "services"
See Cluster Requirements for additional information.
Failed to Install CRD
When deploying Omni Gateway to a Kubernetes cluster that enables role-based access control (RBAC), you must have cluster-level permissions to permit installation of custom resource definitions (CRDs) used by Omni Gateway.
In OpenShift, the cluster-admin role provides this level of access.
Without the required access, you receive an error similar to the following one:
Error: failed to install CRD crds/apiinstance.yaml:
customresourcedefinitions.apiextensions.k8s.io is forbidden:
User "user1" cannot create resource "customresourcedefinitions"
in API group "apiextensions.k8s.io" at the cluster scope
See Cluster Requirements for additional information.
Check Your Cluster
Before deploying Omni Gateway to your Kubernetes cluster in Step 4: Deploy and Connect Omni Gateway, ensure that your cluster is ready. Use kubectl to list and select (use) a cluster and to get a list of nodes that the cluster uses. If any steps in this section fail, the deployment process is likely to produce errors.
To prevent potential timeout and connectivity errors when running procedures in this guide, your cluster must meet the Cluster Requirements.
-
Run
kubectl config get-contextsto list the clusters, for example:kubectl config get-contextsThis command is particularly helpful if you have multiple Kubernetes clusters. You can use the command to get the name of the correct cluster. For example, assume that you have a variety of clusters (
my-cluster,my-aks,my-gke,my-eks). The command prints a list of your clusters.The following example shows a list of clusters produced by the command:
CURRENT   NAME          CLUSTER       AUTHINFO    NAMESPACE
          my-cluster    my-cluster                my-cluster1
          my-aks        my-aks                    my-aks
          my-gke        my-gke                    my-gke
          my-eks        my-eks                    my-eks
If your cluster is not listed and you are using a custom cluster context file on your machine to connect to your cluster, you might need to add its path to a
KUBECONFIGenvironment variable that points to that file. By default,kubectlsearches for a file namedconfigin the$HOME/.kubedirectory. That file lists eachcontext, which provides properties such as the cluster name, user, and certificate authority data.You can check by running
echo $KUBECONFIGfrom your terminal window, which prints a environment variable’s value, similar to this example:{KUBECONFIG}:/Users/me/.kube/config:/Users/me/.kube/additional-clusters/my-gke:/Users/me/.kube/additional-clusters/my-aks:/Users/me/.kube/additional-clusters/my-eksAdding the path to any additional cluster context files on your machine enables the
kubectl config get-contextscommand to list the cluster contexts and for you to use them.For more detail, see the Kubernetes documentation about the
kubeconfigfile. -
Provide the name of a cluster into which you plan to deploy your gateway.
The following example uses the cluster
my-eks, identified in the cluster list example:kubectl config use-context my-eks
The command switches to the selected cluster context and prints a message similar to this one:
Switched to context "my-eks".
If you receive an error that begins
error: no context exists with the name, ensure you are using theNAMEvalue of the cluster listed bykubectl config get-contextsand not theCLUSTERvalue. -
Check that your cluster has one or more nodes:
kubectl get nodesThe command returns a output similar to this example:
NAME                STATUS   ROLES    AGE   VERSION
ip-192-168-70-170   Ready    <none>   17h   v1.x.x
ip-192-168-9-230    Ready    <none>   17h   v1.x.x
Make sure that at least one node is in the
Readystatus. -
If your cluster is not ready, correct the cluster configuration.
Alternatively, try the Docker-only guide, Getting Started with Self-Managed Omni Gateway, which does not use a Kubernetes cluster, and skip the next steps.
-
If you have not started the Omni Gateway setup procedures yet, review Cluster Requirements before proceeding to Step 1: Download the Omni Gateway Image.
-
If you have successfully completed all the procedures for downloading and registering your gateway with Docker and adding a repository for your Helm chart, and you are ready to begin the deployment procedure, go to Step 4: Deploy and Connect Omni Gateway.