
Configure the Java Module Using Anypoint Code Builder
Define custom Java code using the Java module to use in your Anypoint Code Builder project. To use Anypoint Code Builder to configure the Java module, create a basic integration project in Anypoint Code Builder, add connectors and other components to your Mule application to process your business logic, and then configure the attributes for the Java Module.
Before You Begin
Before creating an Anypoint Code Builder integration project, you must:
-
Set up and access the Anypoint Code Builder web or desktop IDE.
-
Have credentials to access Anypoint Platform.
-
Ensure that the Extension Pack for Java (from Microsoft) is installed in Visual Studio Code.
Creating a New Integration Project
To create a new integration project:
-
In the activity bar of the IDE, click the
 (Anypoint Code Builder) icon.
 -
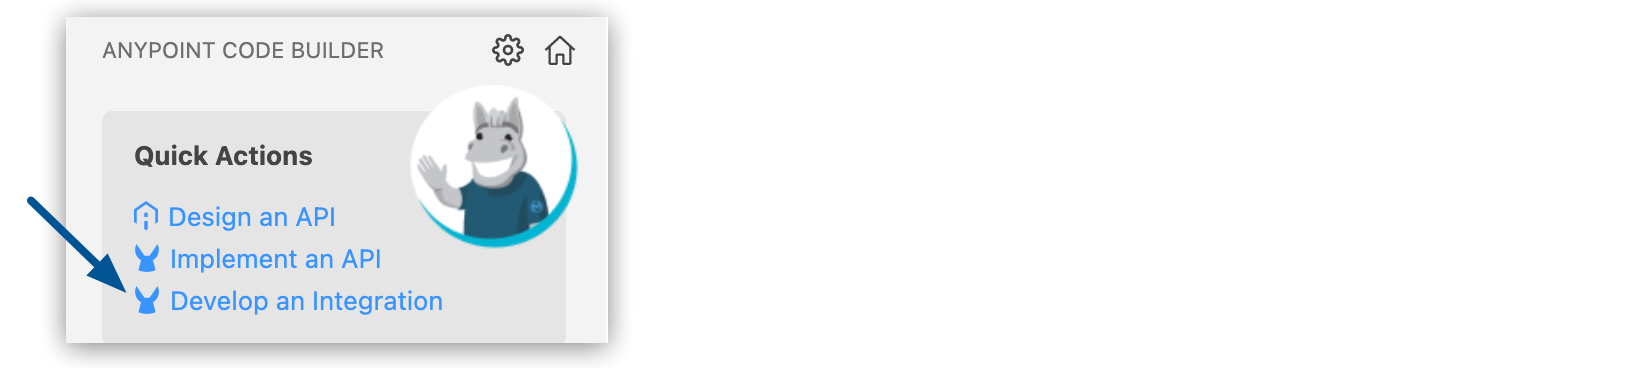
From Quick Actions, click Develop an Integration:
-
Complete the following in the Develop an Integration form:
Attribute Value Project Name
Unique name for your project.
This name is used as the title and name of the integration project file. For example, if the project name is "Salesforce Integration," the project file name is
salesforce-integration.Project Location
Your home directory or another directory you create. Click Browse to select a different directory for the integration project.
Don’t create the project within another project directory.
-
Select the type of project to create by selecting either the Empty Project or Template or Example card.
-
Select the Mule runtime and Java Version for your app.
-
Click Create Project.
When you create a new integration project, Anypoint Code Builder creates the src/main/java and /src/test/java folders in the project. For existing projects, you can manually create these folders.
Adding Components to Your Project
Add components to your integration project to build a flow:
-
In the Explorer view, open the XML file for your project, such as
my-project-name.xml. -
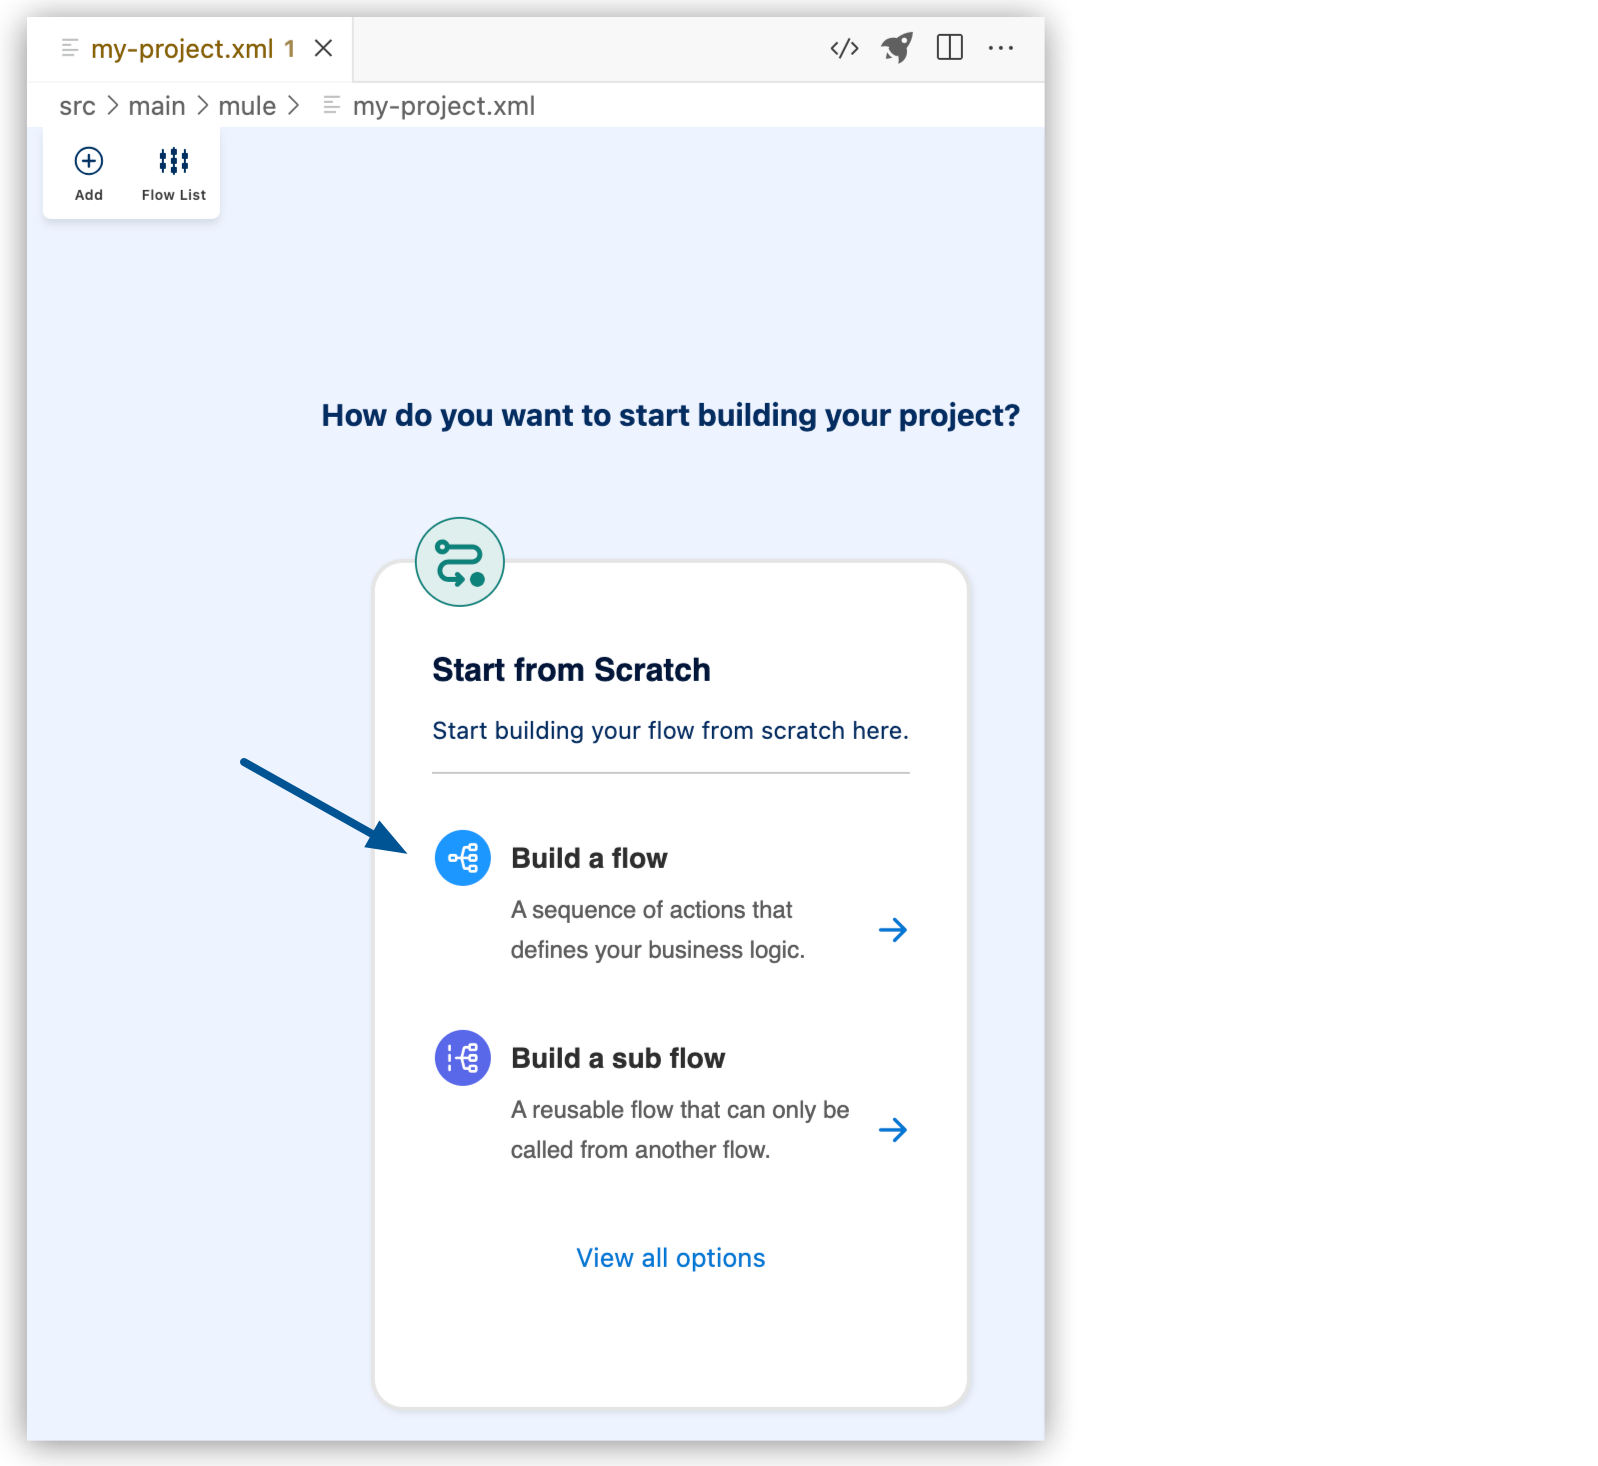
Select Build a Flow from the start card to create an empty flow:
-
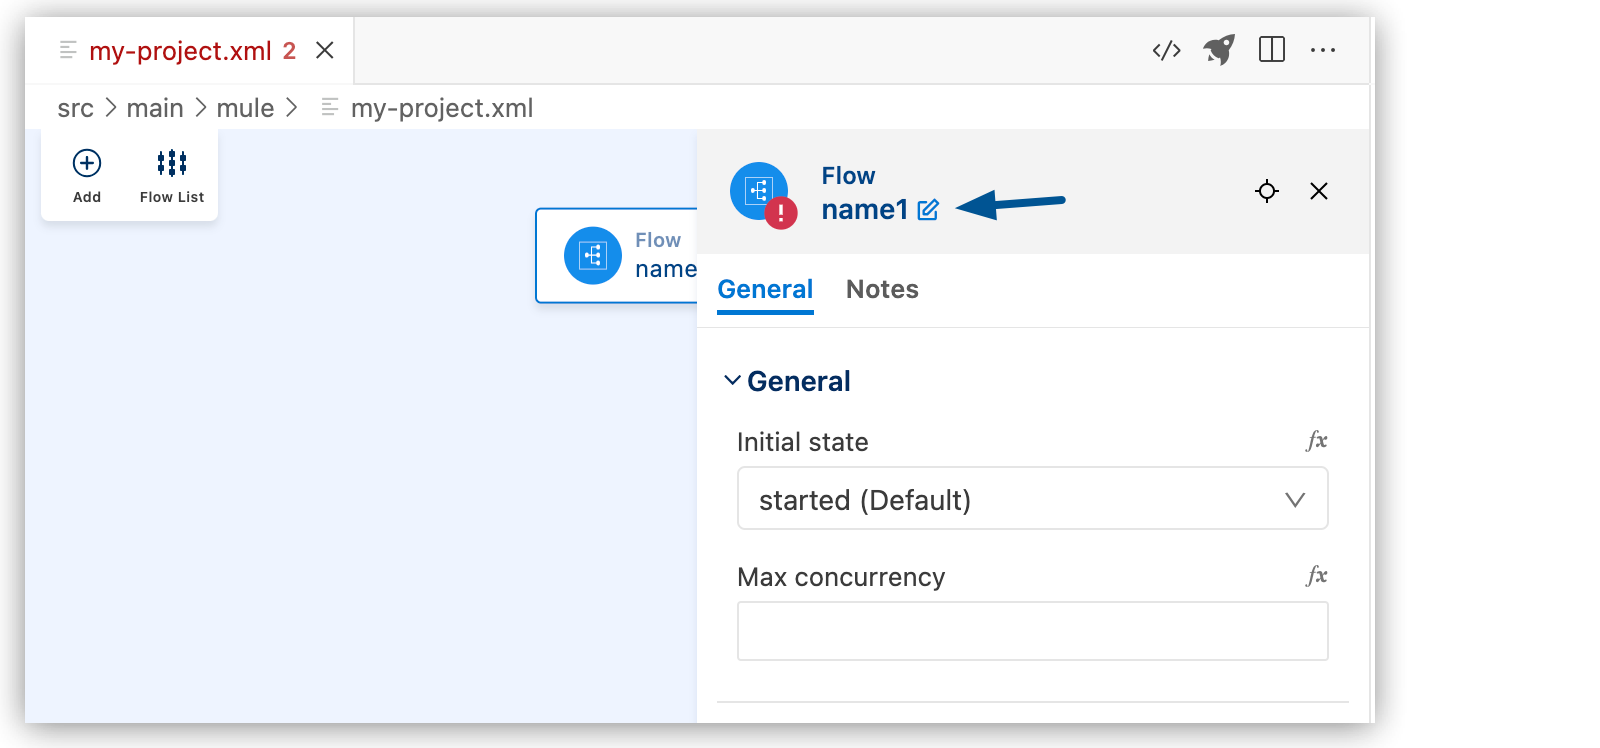
Change the name of the flow:
-
Click Flow.
-
Click the edit icon.
-
Enter the flow name, and click the checkmark.
-
In the canvas UI, click the
 (Add component) icon.
 -
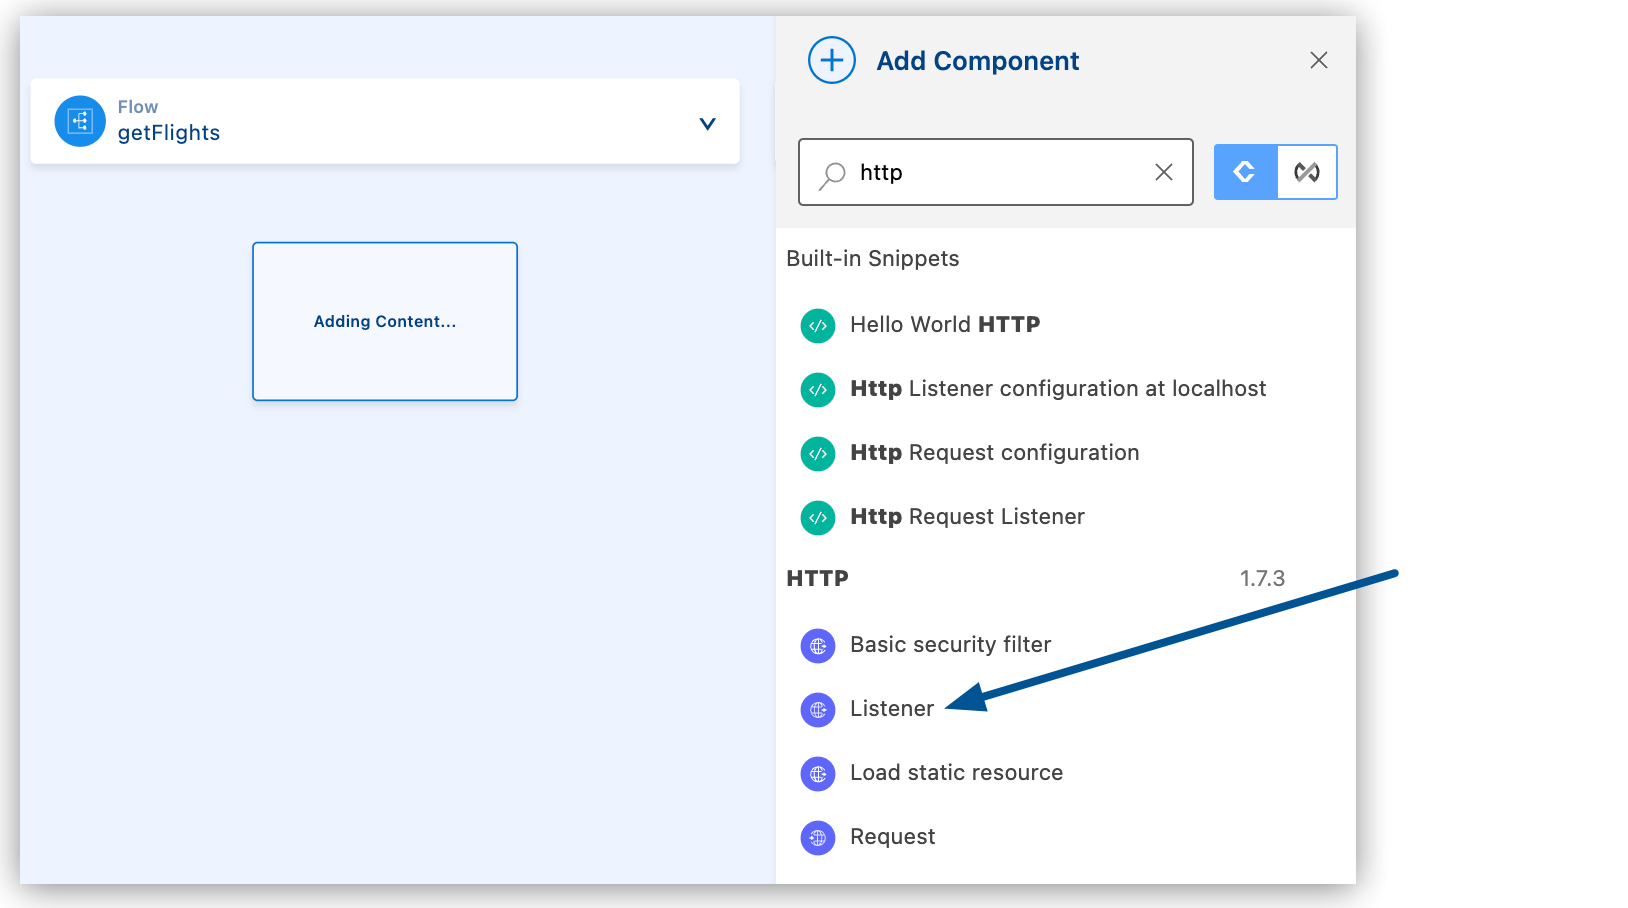
In the Add Component panel, search for and select your component from the results. The following example shows the Listener component from the HTTP search results:
The configuration XML file now includes the XML for the HTTP Listener into the
<flow/>element, for example:<flow name="getFlights" > <http:listener path="" config-ref="" doc:name="Listener" doc:id="ojzfry" /> </flow>
-
Configuring the Component Attributes
After you add components to your integration project, configure the attributes in the component UI, or configure the attributes directly in the XML code editor.
Connector XML tags start with a namespace followed by an operation, following the syntax namespace:operation, such as <db:select/> for a Select operation in Anypoint Connector for Database (Database Connector).
You can use autocomplete from an expression (fx) field for a component to select DataWeave functions from the Core module and other values accepted in this field.
Configure a Trigger for the Flow
A trigger (source) starts the flow when specified conditions are met. If a connector has its own associated sources, you can use a connector-specific trigger to initiate the flow. Each connector trigger has a unique configuration.
You can configure the following sources for this connector:
-
HTTP > Listener
Initiates a flow each time it receives a request on the configured host and port
-
Scheduler
Initiates a flow when a time-based condition is met
Configuring the New Operation
Create a new class instance by using the New operation of the Java module. The identifier of a constructor includes the class and constructor names, and the constructor has a full description of its signature, including the types of each parameter.
For example, if you invoke the constructor Me(String name, int age), which belongs to the org.bar.Me class, then the identifier of the method is Me(String,int).
To configure the attributes for New in the Anypoint Code Builder UI:
-
Click the New component on the canvas.
-
On the General tab:
-
In Class, select the Java class that contains the method to use.
You can search for all the available Java classes for your project, including classes you create and native Java classes.
-
In Constructor, search and select the constructor to use.
If this field is blank, click the refresh icon to populate it.
-
-
Select the Advanced tab to configure the following attributes:
UI Field Description Required Target variable
Name of the variable to assign the class instance to.
No
Target value
Expression that evaluates the operation’s output. The expression outcome is stored in the target variable.
No
Error Mappings
Custom error types that you map to Mule error types. The mappings can help you further differentiate and group errors in your app. Configure this attribute in the XML editor. See Mule Errors.
No
-
Select the Input/Output tab to filter and view input and output variables stored in DataWeave.
After you add your class instance, configure the Invoke operation.
Configuring the Invoke Operation
Invoke methods with the provided arguments using a specified class instance. The identifier of the method to invoke includes the class and method names.
To configure the attributes for Invoke in the Anypoint Code Builder UI:
-
Click the Invoke component on the canvas.
-
On the General tab:
-
Select the class Instance for invoking the method.
This value is the target variable assigned to the New operation.
-
In Class, select the Java class that contains the method to use.
You can search for all the available Java classes for your project, including classes you create and native Java classes.
-
In Method, search and select the method to use.
Only the static methods from the class are displayed.
If this field is blank, click the refresh icon to populate it.
-
-
Select the Advanced tab to configure the following attributes:
UI Field Description Required Output MIME type
MIME type of the payload this component outputs.
No
Parameters
Parameters appended to the value of the Output MIME type attribute as key-value pairs for a reader property. Multiple key-value pairs are allowed.
No
Output encoding
Encoding of the payload that this component outputs.
No
Target variable
Name of the variable that stores the operation’s output.
No
Target value
Expression that evaluates the operation’s output. The expression outcome is stored in the target variable.
No
Error Mappings
Custom error types that you map to Mule error types. The mappings can help you further differentiate and group errors in your app. Configure this attribute in the XML editor. See Mule Errors.
No
-
Select the Input/Output tab to filter and view input and output variables stored in DataWeave.
Configuring the Invoke Static Operation
Invoke static methods with the arguments you provide.
To configure the attributes for Invoke Static in the Anypoint Code Builder UI:
-
Click the Invoke Static component on the canvas.
-
On the General tab:
-
In Class, select the Java class that contains the method to use.
You can search for all the available Java classes for your project, including classes you create and native Java classes.
-
In Method, search and select the method to use.
Only the static methods from the class are displayed.
If this field is blank, click the refresh icon to populate it.
-
-
Select the Advanced tab to configure the following attributes:
UI Field Description Required Output MIME type
MIME type of the payload this component outputs.
No
Parameters
Parameters appended to the value of the Output MIME type attribute as key-value pairs for a reader property. Multiple key-value pairs are allowed.
No
Output encoding
Encoding of the payload that this component outputs.
No
Target variable
Name of the variable that stores the operation’s output.
No
Target value
Expression that evaluates the operation’s output. The expression outcome is stored in the target variable.
No
Error Mappings
Custom error types that you map to Mule error types. The mappings can help you further differentiate and group errors in your app. Configure this attribute in the XML editor. See Mule Errors.
No
-
Select the Input/Output tab to filter and view input and output variables stored in DataWeave.
Configuring the Validate Type Operation
Validate that the class instance is an instance of (instanceof) the expected class using the Validate Type operation.
To configure the attributes for Validate Type in the Anypoint Code Builder UI:
-
Click the Validate type component on the canvas.
-
On the General tab:
-
Select the Class the instance belongs to.
-
Enter the name of the class Instance to validate.
-
Select Accept subtypes to accept subtypes of a class.
Deselect this option if the class instance must be of the same class.
-
Example
Creating a Java Class
Create Java classes containing methods to use in your application flows. The classes you create in your project are not available to other projects in your Anypoint Code Builder workspace.
-
In your Anypoint Code Builder project, create a new Java package called
com.meundersrc/main/java. -
Create a new Java class called
TaxCalculator.java, and add the implementation, for example:package com.me; public class TaxCalculator { private Double percentBaseTax = 7.0; public Double calculateTax(Double price, Integer percentAdditionalTax) { return price * (this.percentBaseTax + percentAdditionalTax) / 100; } public Boolean isTaxFree(Double price) { if (price < 10) { return true; } return false; } }
In this example code, there are two methods:
-
calculateTax, which receives thepriceandpercentAdditionalTaxparameters. -
isTaxFree, which receives thepriceparameter.
Configure an HTTP Trigger
-
Click the Listener component on the canvas UI.
-
Optionally, click the edit icon to change the name of the Listener component.
-
Select the configuration file for the connector, or add the HTTP configuration to the XML outside of the flow, for example:
<mule xmlns="http://www.mulesoft.org/schema/mule/core" xmlns:doc="http://www.mulesoft.org/schema/mule/documentation" xmlns:xsi="http://www.w3.org/2001/XMLSchema-instance" xmlns:http="http://www.mulesoft.org/schema/mule/http" xmlns:java="http://www.mulesoft.org/schema/mule/java" xsi:schemaLocation="http://www.mulesoft.org/schema/mule/core http://www.mulesoft.org/schema/mule/core/current/mule.xsd http://www.mulesoft.org/schema/mule/http http://www.mulesoft.org/schema/mule/http/current/mule-http.xsd http://www.mulesoft.org/schema/mule/java http://www.mulesoft.org/schema/mule/java/current/mule-java.xsd"> <http:listener-config name="HTTP_listener_config"> <http:listener-connection host="0.0.0.0" port="8081" /> </http:listener-config> <flow name="name1"> <http:listener path="/calculatePath" config-ref="HTTP_listener_config" doc:name="Listener" doc:id="511e4743-a5ed-4e74-8174-ead32ff575ea" allowedMethods="POST" /> </flow> </mule> -
On the General tab, enter
/calculateTaxin the Path field. -
On the Advanced tab, set the Allowed methods to
POST.
Create a New Class Instance
You must create a new class instance because the method used in this example is non-static :
-
Click the New component on the canvas.
-
On the General tab:
-
Select the Class that contains the method to use, in this case,
com.me.TaxCalculator. -
Select the Method to use:
TaxCalculator().If this field is blank, click the refresh icon to populate it.
-
-
On the Advanced tab, assign the new class instance to a target variable called
taxCalculator.Your code now looks similar to this:
<?xml version="1.0" encoding="UTF-8"?>
<mule xmlns="http://www.mulesoft.org/schema/mule/core" xmlns:doc="http://www.mulesoft.org/schema/mule/documentation" xmlns:xsi="http://www.w3.org/2001/XMLSchema-instance" xmlns:java="http://www.mulesoft.org/schema/mule/java" xmlns:http="http://www.mulesoft.org/schema/mule/http" xmlns:ee="http://www.mulesoft.org/schema/mule/ee/core" xsi:schemaLocation="http://www.mulesoft.org/schema/mule/core http://www.mulesoft.org/schema/mule/core/current/mule.xsd
  http://www.mulesoft.org/schema/mule/java http://www.mulesoft.org/schema/mule/java/current/mule-java.xsd
  http://www.mulesoft.org/schema/mule/http http://www.mulesoft.org/schema/mule/http/current/mule-http.xsd
  http://www.mulesoft.org/schema/mule/ee/core http://www.mulesoft.org/schema/mule/ee/core/current/mule-ee.xsd">

  <http:listener-config name="HTTP_Listener_config">
    <http:listener-connection host="0.0.0.0" port="8081" />
  </http:listener-config>

  <flow name="java1">
    <http:listener doc:name="Listener" config-ref="HTTP_Listener_config" path="/calculateTax" allowedMethods="POST"/>
    <java:new class="com.me.TaxCalculator" constructor="TaxCalculator()" target="taxCalculator" />
  </flow>
</mule>
Add an Invoke Operation
To call your method, add an Invoke operation:
-
Click the Invoke component on the canvas.
-
On the General tab:
-
Enter
#[vars.taxCalculator]as the class Instance for invoking the method. -
Select the Class that contains the method to use, in this case,
com.me.TaxCalculator. -
Select the Method to use:
calculateTax(java.lang.Double,java.lang.Integer).The methods shown are the standard non-static Java methods and the methods you created.
-
-
On the Advanced tab, assign the Invoke operation to a target variable called
taxResult. -
In the XML editor, add the Java arguments as a DataWeave expression:
<java:args>#[{
        arg0: payload:price,
        arg1: payload:percentAdditionalTax
      }]</java:args>
Your XML code looks similar to this now:
<?xml version="1.0" encoding="UTF-8"?>
<mule xmlns="http://www.mulesoft.org/schema/mule/core" xmlns:doc="http://www.mulesoft.org/schema/mule/documentation" xmlns:xsi="http://www.w3.org/2001/XMLSchema-instance" xmlns:java="http://www.mulesoft.org/schema/mule/java" xmlns:http="http://www.mulesoft.org/schema/mule/http" xmlns:ee="http://www.mulesoft.org/schema/mule/ee/core" xsi:schemaLocation="http://www.mulesoft.org/schema/mule/core http://www.mulesoft.org/schema/mule/core/current/mule.xsd
  http://www.mulesoft.org/schema/mule/java http://www.mulesoft.org/schema/mule/java/current/mule-java.xsd
  http://www.mulesoft.org/schema/mule/http http://www.mulesoft.org/schema/mule/http/current/mule-http.xsd
  http://www.mulesoft.org/schema/mule/ee/core http://www.mulesoft.org/schema/mule/ee/core/current/mule-ee.xsd">

  <http:listener-config name="HTTP_Listener_config">
    <http:listener-connection host="0.0.0.0" port="8081" />
  </http:listener-config>

  <flow name="java1">
    <http:listener doc:name="Listener" config-ref="HTTP_Listener_config" path="/calculateTax" allowedMethods="POST"/>
    <java:new class="com.me.TaxCalculator" constructor="TaxCalculator()" target="taxCalculator" />

    <java:invoke instance="#[vars.taxCalculator]" class="com.me.TaxCalculator" method="calculateTax(Double, Integer)" target="taxResult">
      <java:args>#[{
        arg0: payload.price,
        arg1: payload.percentAdditionalTax
      }]</java:args>
    </java:invoke>
  </flow>
</mule>
Add the Set Payload Transformer
To update the payload of the message, use the Set Payload (set-payload) component. The payload can be a literal string or a DataWeave expression.
-
In the canvas UI, click the
(Add component) icon. -
In the Add Component panel, search for
Set Payloadand select it. -
Click the Set Payload component.
-
On the General tab enter
#[vars.taxResult as String]for the Value. -
For Encoding, select ISO 10646/Unicode(UTF8).
-
For Mime type, select text/plain.
Your XML code looks similar to this now:
<?xml version="1.0" encoding="UTF-8"?>
<mule xmlns="http://www.mulesoft.org/schema/mule/core" xmlns:doc="http://www.mulesoft.org/schema/mule/documentation" xmlns:xsi="http://www.w3.org/2001/XMLSchema-instance" xmlns:java="http://www.mulesoft.org/schema/mule/java" xmlns:http="http://www.mulesoft.org/schema/mule/http" xmlns:ee="http://www.mulesoft.org/schema/mule/ee/core" xsi:schemaLocation="http://www.mulesoft.org/schema/mule/core http://www.mulesoft.org/schema/mule/core/current/mule.xsd
  http://www.mulesoft.org/schema/mule/java http://www.mulesoft.org/schema/mule/java/current/mule-java.xsd
  http://www.mulesoft.org/schema/mule/http http://www.mulesoft.org/schema/mule/http/current/mule-http.xsd
  http://www.mulesoft.org/schema/mule/ee/core http://www.mulesoft.org/schema/mule/ee/core/current/mule-ee.xsd">

  <http:listener-config name="HTTP_Listener_config">
    <http:listener-connection host="0.0.0.0" port="8081" />
  </http:listener-config>

  <flow name="java1">
    <http:listener doc:name="Listener" config-ref="HTTP_Listener_config" path="/calculateTax" allowedMethods="POST"/>
    <java:new class="com.me.TaxCalculator" constructor="TaxCalculator()" target="taxCalculator" />

    <java:invoke instance="#[vars.taxCalculator]" class="com.me.TaxCalculator" method="calculateTax(Double, Integer)" target="taxResult">
      <java:args>#[{
        arg0: payload.price,
        arg1: payload.percentAdditionalTax
      }]</java:args>
    </java:invoke>

    <set-payload value="#[vars.taxResult as String]" doc:name="Set payload" doc:id="kyujdh" mimeType="text/plain" encoding="UTF-8"/>
  </flow>
</mule>
Run Your Application in Debug Mode
After setting up your debug conditions, run a debug session and evaluate your Mule application at each breakpoint:
-
Open the Run and Debug panel.
Show me how
-
Click the
 (Run and Debug) icon in the activity bar.
 -
Use the keyboard shortcuts:
-
Mac: Cmd+Shift+d
-
Windows: Ctrl+Shift+d
-
-
Select View > Run.
-
-
Click the
 (Start Debugging (F5)) icon for Debug Mule Application.
Alternatively, if the Start Debugging (F5) icon is not present:
-
Click Run and Debug.
-
If a Select debugger dropdown menu appears, select Mule Xml Debugger to initiate the debugging session:

When the application deploys successfully, you see a
DEPLOYEDlog message in the output panel:********************************************************************** * - - + DOMAIN + - - * - - + STATUS + - - * ********************************************************************** * default * DEPLOYED * **********************************************************************
-
| Selecting Run > Start without Debugging produces an error. |
Anypoint Code Builder packages your application and deploys the application to the embedded Mule runtime engine. A terminal opens so you can view the status:
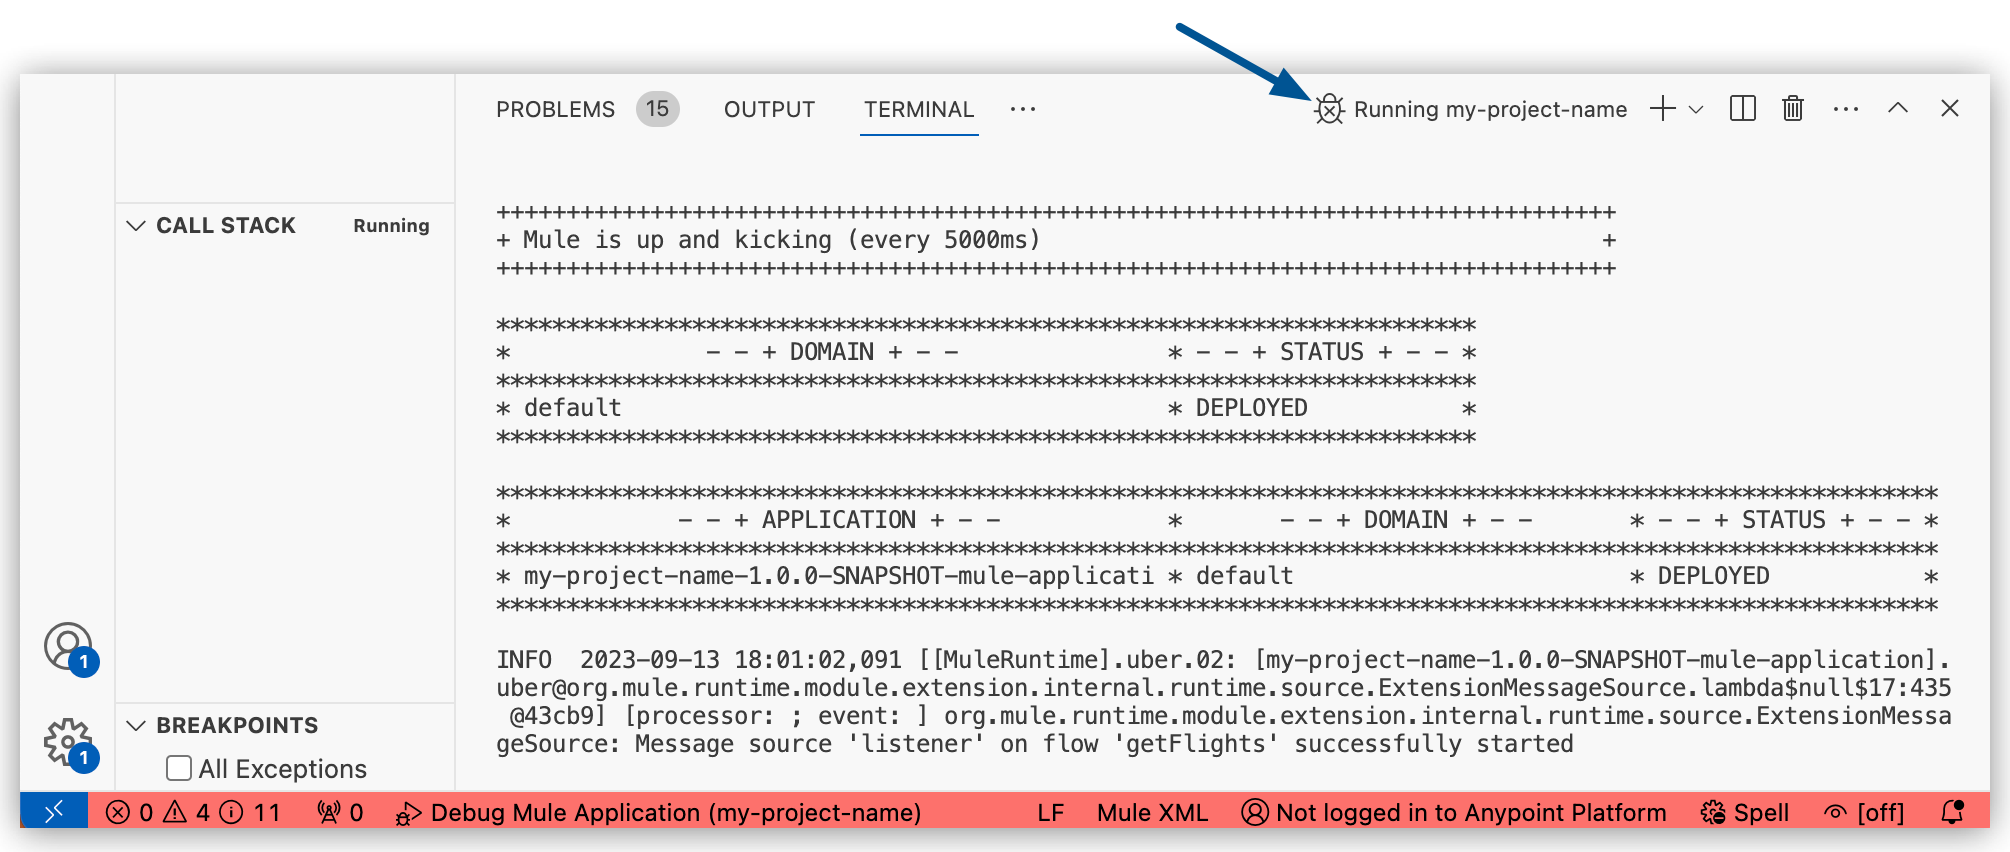
The terminal displays a message and the status bar turns red to indicate that the application is running.
Use buttons on the debug toolbar to control debugging of Mule applications.