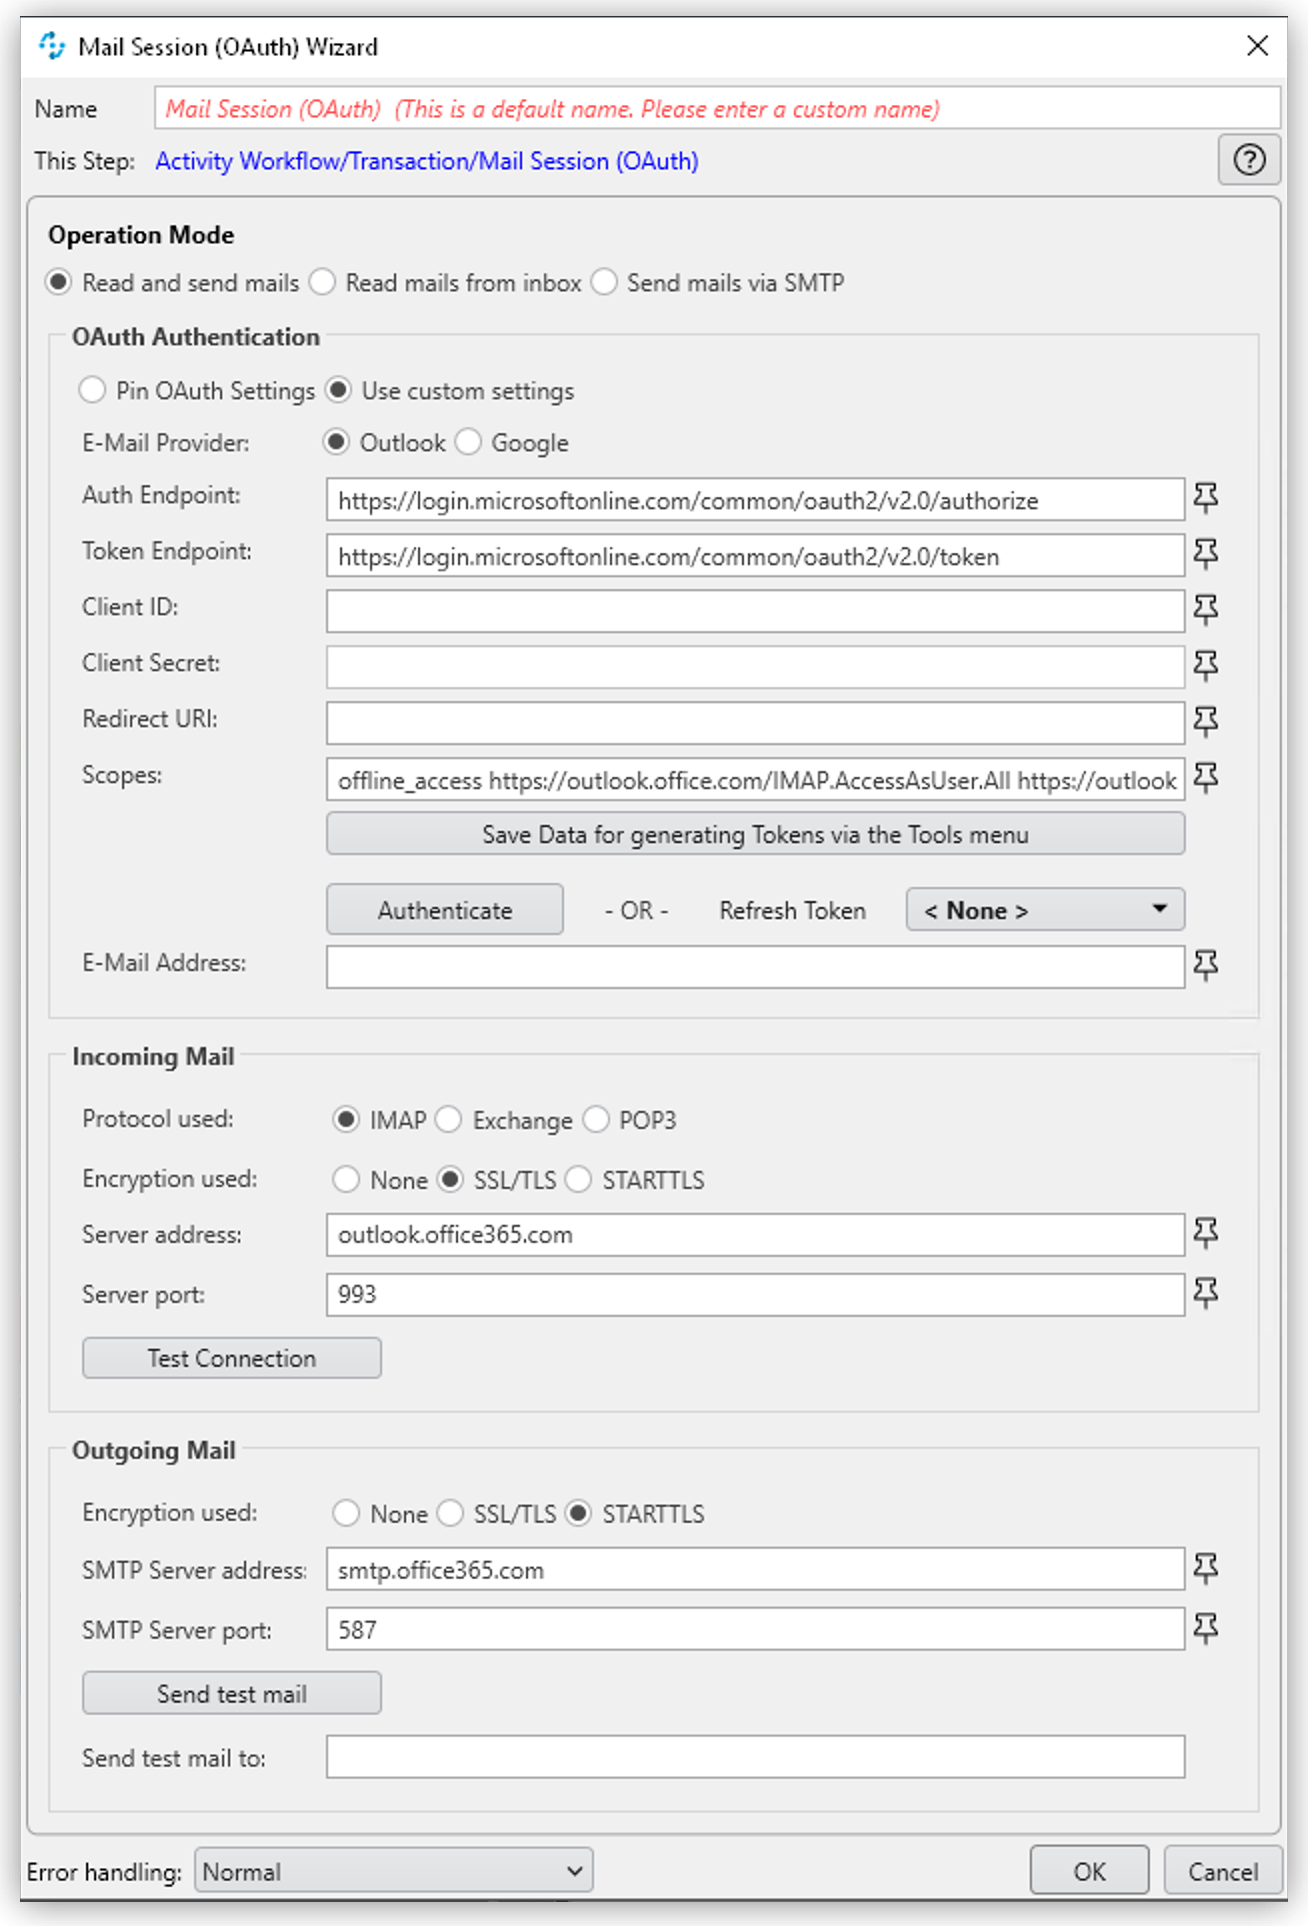
Mail Session (OAuth)
The Mail Session (OAuth) action step is an inclusive element for email operations that enables you to establish a connection to an email server using MS Outlook or Gmail and then perform email operations such as Read Mail, Send Mail, and Set Mail (to change email) by using the corresponding action steps.
Before You Begin
Depending on the mail provider you use, ensure you have the following:
-
Outlook
-
An Azure account
-
SMTP AUTH enabled for your Microsoft organization or the specific mailbox when connecting with an Azure environment via SMTP
For configuration instructions, see: Enable or disable authenticated client SMTP submission (SMTP AUTH) in Exchange Online
-
-
Gmail
-
A Google account
-
Properties
-
OAuth Authentication Settings
-
Pin OAuth Settings
Option to specify OAuth credentials created with the Credentials for OAuth action step.
-
Use custom settings
Option to specify custom OAuth credentials for this action step.
-
E-Mail Provider
Mail provider, either Outlook or Google.
-
Auth Endpoint
URL for the OAuth authentication endpoint. Defaults to the following values, depending on the selected provider:
-
Outlook:
https://login.microsoftonline.com/common/oauth2/v2.0/authorize -
Google:
https://accounts.google.com/o/oauth2/v2/auth
-
-
Token Endpoint
URL for the OAuth Refresh Token process. Defaults to the following values, depending on the selected provider:
-
Outlook:
https://login.microsoftonline.com/common/oauth2/v2.0/token -
Google:
https://www.googleapis.com/oauth2/v4/token
-
-
Client ID
Client ID of your mail application.
To authenticate with the OAuth host, you must define an Azure or Gmail application in your space. This application has an ID, that is unique in the entire OAuth host space and it enables users to explicitly grant or revoke access for this application to their accounts.
For more information on how to create an Azure application for Outlook, visit Quickstart: Register an application with the Microsoft identity platform.
-
Client Secret
Client Secret of your mail application.
Allows RPA Builder to prove to the OAuth host that it received permission to access user accounts. Without this permission, authentication is not possible.
-
Redirect URI
URI that the OAuth host redirects to after the user completes the authentication attempt. This redirect URI must be registered with the Azure or Gmail application. If the entered redirect URI matches one of the registered URIs, the OAuth host allows the authentication.
-
Scopes
Defines which permissions the user grants to the Azure or Gmail application. By default, RPA Builder requests the following permissions depending on the selected provider:
-
Outlook
-
offline_access(Required) Enables access via a refresh token, which you can use to repeatedly log in to the email services without requiring user interaction each time.
-
https://outlook.office.com/IMAP.AccessAsUser.All(Required when using IMAP) Enables reading and moving emails from the Outlook IMAP server.
-
https://outlook.office.com/POP.AccessAsUser.All(Required when using POP3) Enables reading emails from the Outlook POP3 server.
-
https://outlook.office.com/SMTP.Send(Required when using SMTP) Enables sending emails from the Outlook SMTP server.
-
openid emailEnables RPA Builder to automatically detect the email account used to log in to the Azure application. If this scope is omitted, you must provide an email in the wizard.
-
-
Google
-
https://mail.google.com/Enables RPA Builder to read, compose, send, and permanently delete emails from your Gmail account.
-
-
-
Save data to generate Tokens via the Tools menu
Saves the current data for further use when generating an OAuth refresh token.
-
Email address
The email address populates automatically if RPA Builder detects it from the authentication attempt. If the openid email scope is omitted, you must provide an email address manually.
-
-
Incoming Mail Operation Settings
-
Protocol used
(Mail Protocol) The communication protocol to use: IMAP, Exchange, or POP3
-
Encryption used
(Encryption) The encryption protocol to use: None, SSL/TLS, or STARTTLS
-
Server address
(String) The server address entered in the wizard
For Azure environments using the Exchange protocol, the default server address is
https://outlook.office365.com/EWS/Exchange.asmx. -
Server Port
(Integer) The selected port
-
-
Outgoing Mail Operation Setting
-
Encryption used
(Encryption) The encryption protocol to use: None, SSL/TLS, or STARTTLS
-
SMTP Server address
(String) The URL of the selected SMTP email server
-
SMTP Server Port
(Integer) The selected port
-
Send test mail to
(String) The email address where to send the test email
-
Inbound Variables
-
SMTP Server address
-
Server address
-
SMTP Server Port
-
Server Port
-
OAuth Credentials
-
Auth Endpoint
-
Token Endpoint
-
OAuth Client ID
-
Client Secret
-
Redirect URI
-
Scopes
-
E-Mail Address
-
Refresh Token
Wizard
You can configure the following settings using the wizard:
-
Operation Mode
-
OAuth Authentication
-
Incoming Mail
-
Outgoing Mail
Operation Mode
In Operation Mode, you determine what happens and which area activates in the Mail Session. The following modes are available:
-
Read and send mails
Enables you to configure the incoming and outgoing mail areas so that you can read and send emails.
-
Read mails from inbox
Enables editing for the Incoming Mail section so that you can only read emails.
If you select the Read mails from inbox mode, you can’t use the Send Mail action step.
-
Send mails via SMTP
Enables editing for the Outgoing Mail section so that you can only send emails.
If you select the Send mails via SMTP mode, you can’t use the Read Mail action step in the Mail Session.
OAuth Authentication
Create a set of tokens that don’t rely on a user password to authenticate with the email server. After you create the refresh token, you can use it to repeatedly log in to the services without asking for the user’s password again.
Follow these steps to authenticate with your credentials:
-
Complete the OAuth Authentication configuration by specifying the required properties.
Refer to OAuth Authentication Settings for a description of each property.
-
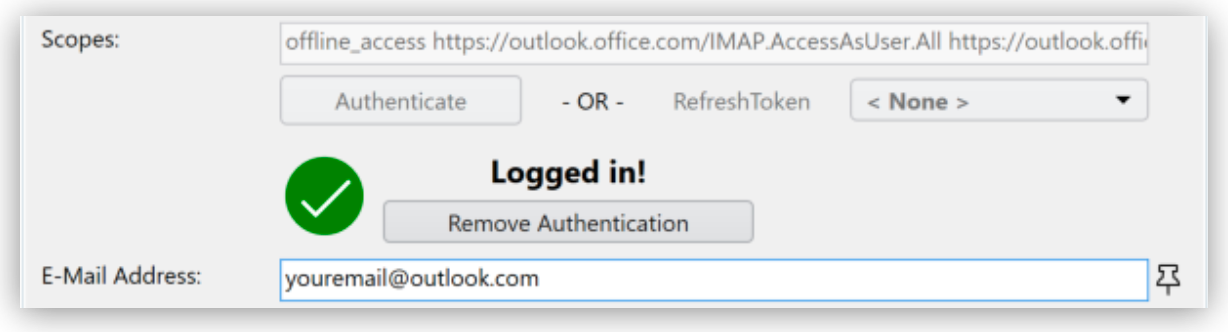
Click Authenticate.
This step starts the authentication process with the OAuth host, which opens the login page in your default browser.
To enable using different accounts to log in, Mail Session (OAuth) clears credentials stored in browser cookies when you click Authenticate.
-
In the OAuth host’s login page, complete the login process.
-
Close the browser.
After completing the last step, the wizard shows that you are authenticated:
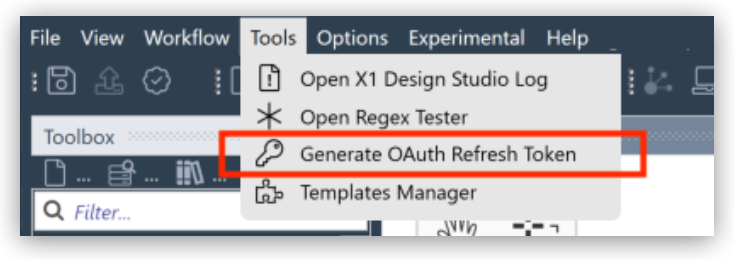
Generating an OAuth Refresh Token
Instead of authenticating via the Mail Session (OAuth) wizard, you can pin the refresh token if you obtain it externally. In this case, you still need to populate or pin the remaining fields.
To generate and configure a refresh token:
-
In the Tools menu, select Generate OAuth Refresh Token.
-
Complete the OAuth Token Creator form that appears.

If you already configured the Credentials for OAuth action step details and clicked the Save data to generate Tokens via the Tools menu button, the data automatically populates with the last data you entered in the wizard.
-
Click Authenticate.
-
Click Copy Token to Clipboard.
-
Paste the token in an alphanumeric activity parameter.
-
Pin the variable to the field Refresh Token in the Credentials for OAuth wizard.
You can also pin the other values from the OAuth Token Creator.
By using an activity parameter, you don’t need to upload a new version of your Workflow to RPA Manager if your token expires or your user gets logged out of your email provider. In this case, regenerate the refresh token for the same user with the OAuth Token Creator and update the assigned activity parameter on RPA Manager.