
Defining Agent Networks
After you create your agent network project, configure your network by editing agent-network.yaml, the .agent files in the /brokers directory, and exchange.json. As you edit, use the read-only visual canvas alongside the code editor to verify the structure of your network and to navigate quickly between graph nodes and the code that defines them.
Before You Begin
Review the prerequisites and make sure that you’ve created an agent network project. See Create Agent Networks.
|
For a complete, working example you can use as a starting point for your own agent network project, see Example: Building an IT Investigation Broker. The example walks through a fully configured |
Define an Agent Network Using MuleSoft Vibes
Details
Use natural language prompts in MuleSoft Vibes to configure your agent network specification. For more information, see Creating API Specs with MuleSoft Vibes.
-
In the Anypoint Code Builder activity bar, click the agent icon
 .
. -
Give the agent information about your agent network, including the brokers, agents, MCP servers, and LLMs you want to connect. MuleSoft Vibes updates
agent-network.yaml,exchange.json, and the appropriate.agentfiles in the/brokersdirectory.
To get started, try one of these suggested prompts:
-
Help me build an agent network configuration for my Employee Onboarding project.
-
Revise my Employee Onboarding agent network project. Use OpenAI for the LLM.
-
Add a new broker for employee offboarding to my HR agent network.
-
Add a new skill to my Offboarding broker.
Define Your Network in Anypoint Code Builder
Details
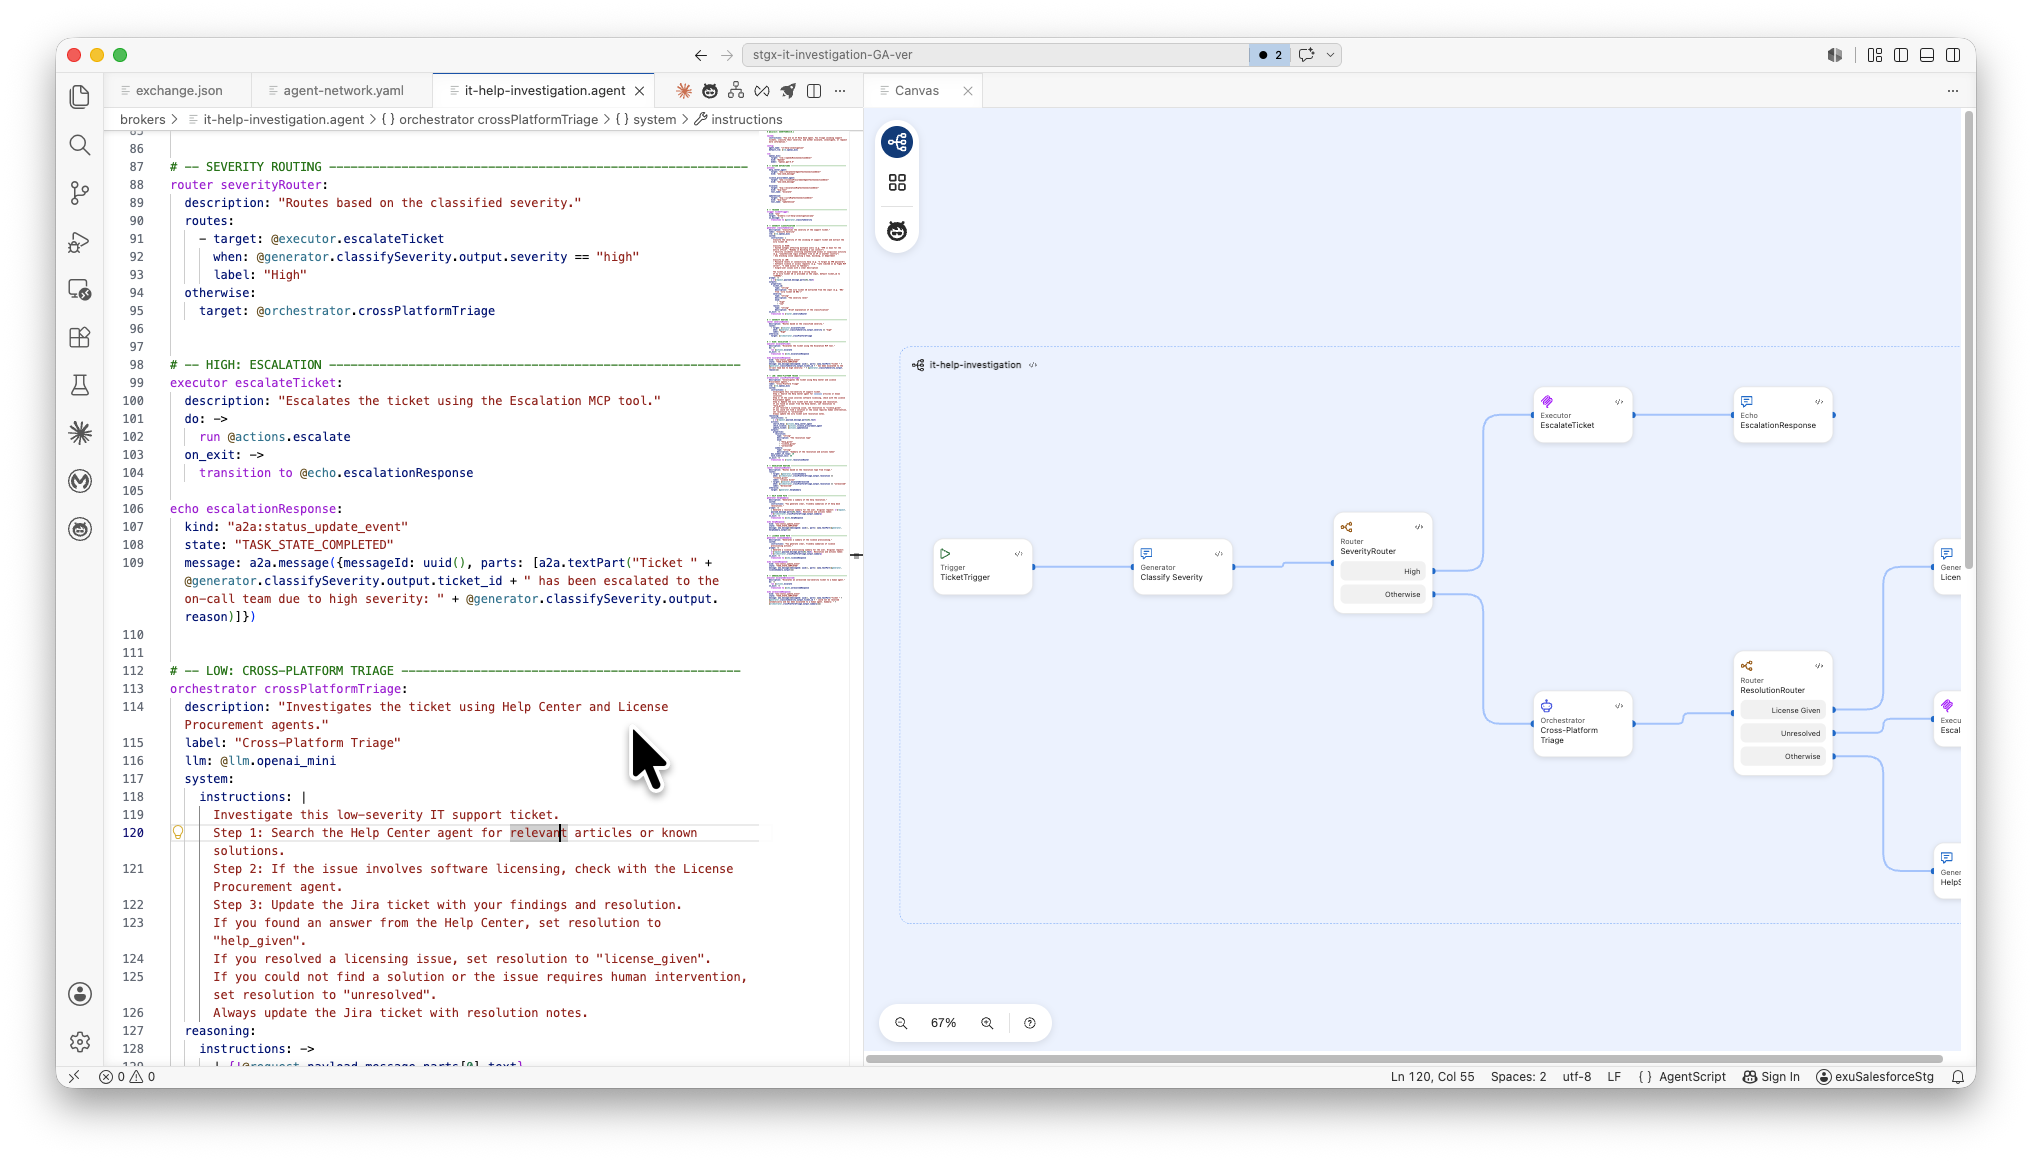
Use the code view editor and the visual canvas together to define your agent network. The canvas is read-only and syncs automatically as you make changes to the code. Make all changes in the project files and use the canvas to navigate, verify the shape of your network, and jump back to the lines you need to edit.
Using the visual canvas is optional. If you prefer a code-only workflow, edit agent-network.yaml, the .agent files under /brokers, and exchange.json directly without ever opening the canvas. Auto-completion menus in Anypoint Code Builder work the same way in both workflows. For more information, see Use Auto-Completion Menus.
|
Open Your Project
Open your agent network project in Anypoint Code Builder and display the canvas alongside the code editor.
-
In Anypoint Code Builder, open your agent network project. By default,
agent-network.yamlopens in the editor. -
In the editor action bar, click Show canvas.
The canvas opens to the right of the code editor, giving you a side-by-side layout.
The canvas renders all graphs in the project from left to right. Each broker appears as its own graph with a header that includes the broker name.
Edit Your Project
With the canvas open beside the code editor, edit your project files. The visual canvas updates with your changes as you save your work.
-
Edit
agent-network.yamlto declare assets in the registry section and to define connections and policies in the context section. -
In the Explorer, navigate to the
/brokersdirectory and open the.agentfile for the broker you want to edit (for example,broker1.agent). Edit the.agentfile to define the broker, its nodes (trigger, subagent, orchestrator, generator, executor, echo, router), and the transitions between them.To understand the schema and expected values for each file, see Agent Network Project File Reference.
-
Update
exchange.jsonto manage Anypoint Exchange dependencies by using the Add Exchange Assets action rather than editing it by hand. See Add Exchange Assets to Your Agent Network Project.
Navigate Between Canvas and Code View
Use the navigation shortcuts on the canvas to jump straight to the lines you need to edit.
-
To edit a node’s configuration, click the Open in code view icon on the node.
Anypoint Code Builder opens the corresponding
.agentfile in the code editor and highlights the line that defines the node. -
To open the full Agent Script for a broker, click the Open in code view button in that broker’s graph header.
-
To zoom into a specific graph, click the graph name in the Project Palette.
-
To switch the canvas to the Project Assets view, use the toggle at the top of the Project Palette.
Adjust the Canvas View
Adjust nodes on the canvas view while you edit your project.
-
Use the zoom controls and the organize/reset to default view button on the canvas footer to adjust the view.
-
Resize each broker’s graph independently as needed.
Manage Project Assets
The Project Assets view lists every asset (agent, LLM, MCP server, or policy) you declared in the registry section of agent-network.yaml. Use this view to manage those assets or add new dependencies from Anypoint Exchange.
-
In the Project Palette, select Project Assets.
The Project Assets view displays two sections:
-
Created in Project
Lists assets you defined locally in this project. These assets get published to Anypoint Exchange when you publish the project. Each card shows the asset type icon, the asset name, and the version.
-
Imported from Exchange
Lists Exchange assets you added as dependencies via
exchange.json. Each card shows the asset type icon, the asset name, and the version.
-
-
Use the search and filter controls at the top of the Project Assets view to find assets across both sections.
-
To open a locally defined asset’s definition in
agent-network.yaml, click the asset card. -
To open an imported asset’s page in Anypoint Exchange, click the asset card.
Add Exchange Assets to Your Agent Network Project
If you have existing Exchange assets to use in your agent network, add them to the project’s dependencies through the Add Exchange Assets action. This action updates exchange.json and adds the asset to the Imported from Exchange section of the Project Assets.
Add Assets Using MuleSoft Vibes
Details
Use natural language prompts in MuleSoft Vibes to add Exchange assets to your project.
-
In the Anypoint Code Builder activity bar, click the agent icon
. -
Tell the agent that you want to add Exchange assets to your project. MuleSoft Vibes does the rest.
To get started, try one of these suggested prompts:
-
Add tools for background check processing in my Employee Onboarding project.
-
Add a Talent Pool MCP server to my Employee Onboarding agent network project.
Add Assets from the Project Assets
Details
Use the Project Assets view to search Anypoint Exchange and add assets directly from the canvas.
-
In the Project Palette, open the Project Assets view.
-
Click Add Exchange Assets.
The Add Exchange Assets to Project UI opens with the Exchange search and listing experience.
-
Search for the asset you want to add, select it, and choose the version to import.
-
Click Add to Project.
The asset is added to the
dependenciesattribute inexchange.jsonand appears in the Imported from Exchange section of the Project Assets. -
Edit
agent-network.yamlto add a connection entry in thecontext.connectionssection that references the new asset, and edit the relevant.agentfiles in/brokersto use the connection in node configurations.If you added a dependency that doesn’t belong to the same business group as your agent network, specify the
namespaceproperty at the same level asnameinagent-network.yaml. Provide thegroupId(business group ID) for the business group that the dependency belongs to. ThegroupIdvalue is the same as thegroupIdvalue of the corresponding dependency inexchange.json. If you don’t provide a namespace value, the samegroupIdas the agent network project is used.
Add Assets from the Command Palette
Details
You can also start the Add Exchange Assets flow without opening the canvas:
-
In your Anypoint Code Builder project, choose one of the following:
-
In Explorer, right-click a project file and select Add Exchange Assets to Agent Network Project.
-
In the Command Palette, run this command: MuleSoft: Add Agent Network Assets to Agent Network Project.
-
-
In Add Exchange Assets to Project, search for and select the asset.
-
Click Add to Project.
After you add dependencies, their asset names are available as values in auto-completion menus in the code editor. For example, after you add test-agent to exchange.json, the value test-agent is available in auto-completion menus in agent-network.yaml when you reference an agent.
Use an LLM Proxy in Your Agent Network
You can use an Omni Gateway LLM Proxy as the LLM connection for your agent broker. The LLM Proxy must use the OpenAI or Gemini format. For supported models, see Large Language Models.
Create and Activate the LLM Model Proxy
Create an LLM Model Proxy in Omni Gateway and verify that it is active in Anypoint Exchange before adding it to your agent network.
-
Create an LLM Model Proxy in Omni Gateway. The proxy format must be OpenAI or Gemini.
-
Request access to the LLM Model Proxy asset in Anypoint Exchange and verify that the proxy status is Active.
-
Note the client ID and client secret, as you need these to authenticate with the proxy when you deploy your agent network.
Add the LLM Proxy to Your Agent Network
Add the LLM Proxy Exchange asset to your project and configure the connection in agent-network.yaml and your broker’s .agent file.
-
Add the LLM Proxy Exchange asset to your agent network project by using one of the following methods:
-
In the Explorer, open
exchange.jsonand copy theassetIdfor the LLM Proxy dependency. -
Open
agent-network.yamland add a connection entry in thecontext.connectionssection:-
Set
kindtollm. -
Set
ref.nameto theassetIdvalue you copied fromexchange.json. -
Set
urlto the consumer endpoint URL for the LLM Proxy. You can find this URL on the LLM Proxy page in the Anypoint Platform UI.You don’t need to add the LLM Proxy to the
registrysection ofagent-network.yaml.
-
-
In the
/brokersdirectory, open the.agentfile for the broker that uses this LLM and set thetargetof the LLM node to the connection name you defined inagent-network.yaml.
Provide Authentication Credentials at Deployment
When you deploy your agent network, provide an apiKey to authenticate with the LLM Proxy. LLM Proxy authenticates with a client_id and client_secret. Provide the value in this format:
<client_id>:<client_secret>
Troubleshoot Version Mismatches
If you reuse an existing LLM Proxy Exchange asset in your agent network, ensure that the apiVersion in the exchange.json dependency matches the version group name in your LLM Proxy asset. To verify, open the Exchange asset page for your LLM Proxy and confirm that the version group name matches the apiVersion value in exchange.json.