RPA Setup Guide
This guide provides instructions for implementing the Unlock AMS Through Automation for Insurance Brokers use case, which is part of the MuleSoft Accelerator for Financial Services.
The use case leverages MuleSoft’s Robotic Process Automation (RPA) solution to retrieve customer data from your Agency Management System (AMS) and automatically load the data into Salesforce Financial Services Cloud (FSC). To implement this use case, you must set up RPA on the device that runs the automation process and configure the solution to your specific AMS.
Before You Begin
-
Ensure that the Anypoint Platform account to use has the RPA Automations Manager and RPA Bots Manager permissions.
-
Install the latest version of MuleSoft RPA Builder and RPA Bot from the RPA Manager home page.
-
Ensure that you have access to your AMS and its database metadata. Configure the custom fields in the [FINS AMS Salesforce Sync Handler - Implementation Template], ensuring that the custom field names match the column names on the CSV file.
-
Ensure that you have access to the Salesforce Financial Services Cloud organization to which your AMS data will be loaded.
-
Download the
AMS_to_FSC.crpafile to the same device on which RPA Builder is installed.
Workflow Overview
-
Create two projects in RPA Manager:
-
The first project contains the process for getting all relevant datasets and looping over them in your AMS. For each dataset, the second project is called.
-
The second project contains the process for getting the data from one AMS dataset and adding it to a CSV file, which is imported at a later step to FSC.
-
-
Import and adapt the CRPA file in the second project in RPA Builder.
-
Publish the second project to Anypoint Exchange in RPA Manager.
-
Build the process for the first project from scratch in RPA Builder.
-
Deploy a scheduled configuration for the first project.
Create a Project in RPA Manager
To create a new project in RPA Manager, see Create an Automation Project. If a new category is needed when creating a project, see Create a Category.
Once you create the project, move it directly to the Build phase without making any changes.
Import the CRPA File to RPA Builder
-
Log in to RPA Builder on the device on which the process runs.
-
On the Repository tab in the Explorer pane in RPA Builder, click the name of the process you created.
-
Click File on the Menu Bar, and then click Import Project.
-
Select the CRPA file you downloaded from Exchange. The project opens in the model pane and includes three activities, which you must adapt to your AMS.
Adapt the CRPA File to Your AMS
-
Double-click each activity on the model pane to open the workflow.
-
Compare the displayed process with your process and adapt the action steps accordingly. See Example of Adapting the CRPA File for a detailed example.
-
Save and upload the project to RPA Manager.
Transfer the Second Project to the Test Phase and Test It
Now that you have adapted the file to your AMS, transfer the project to the Test phase and test it.
Transfer the Second Project to the Production Phase
After successfully testing the project, transfer the project to the Production phase and publish the project to Anypoint Exchange as an invokable run configuration. For help with this process, refer to:
Implement and Deploy the First Project
Now that you have published the second project as an invokable run configuration, you can call it from within another process by using the REST Call Action Step.
The second process should take a list of lookup codes provided via a file, use the File Controlled Loop Action Step to iterate over all codes, and use the codes within the request body of the REST call.
Deploy the project and schedule it as needed.
Example of Adapting the CRPA File
| The example in this guide uses real-world data to show you how to adapt a CRPA file to a specific AMS. |
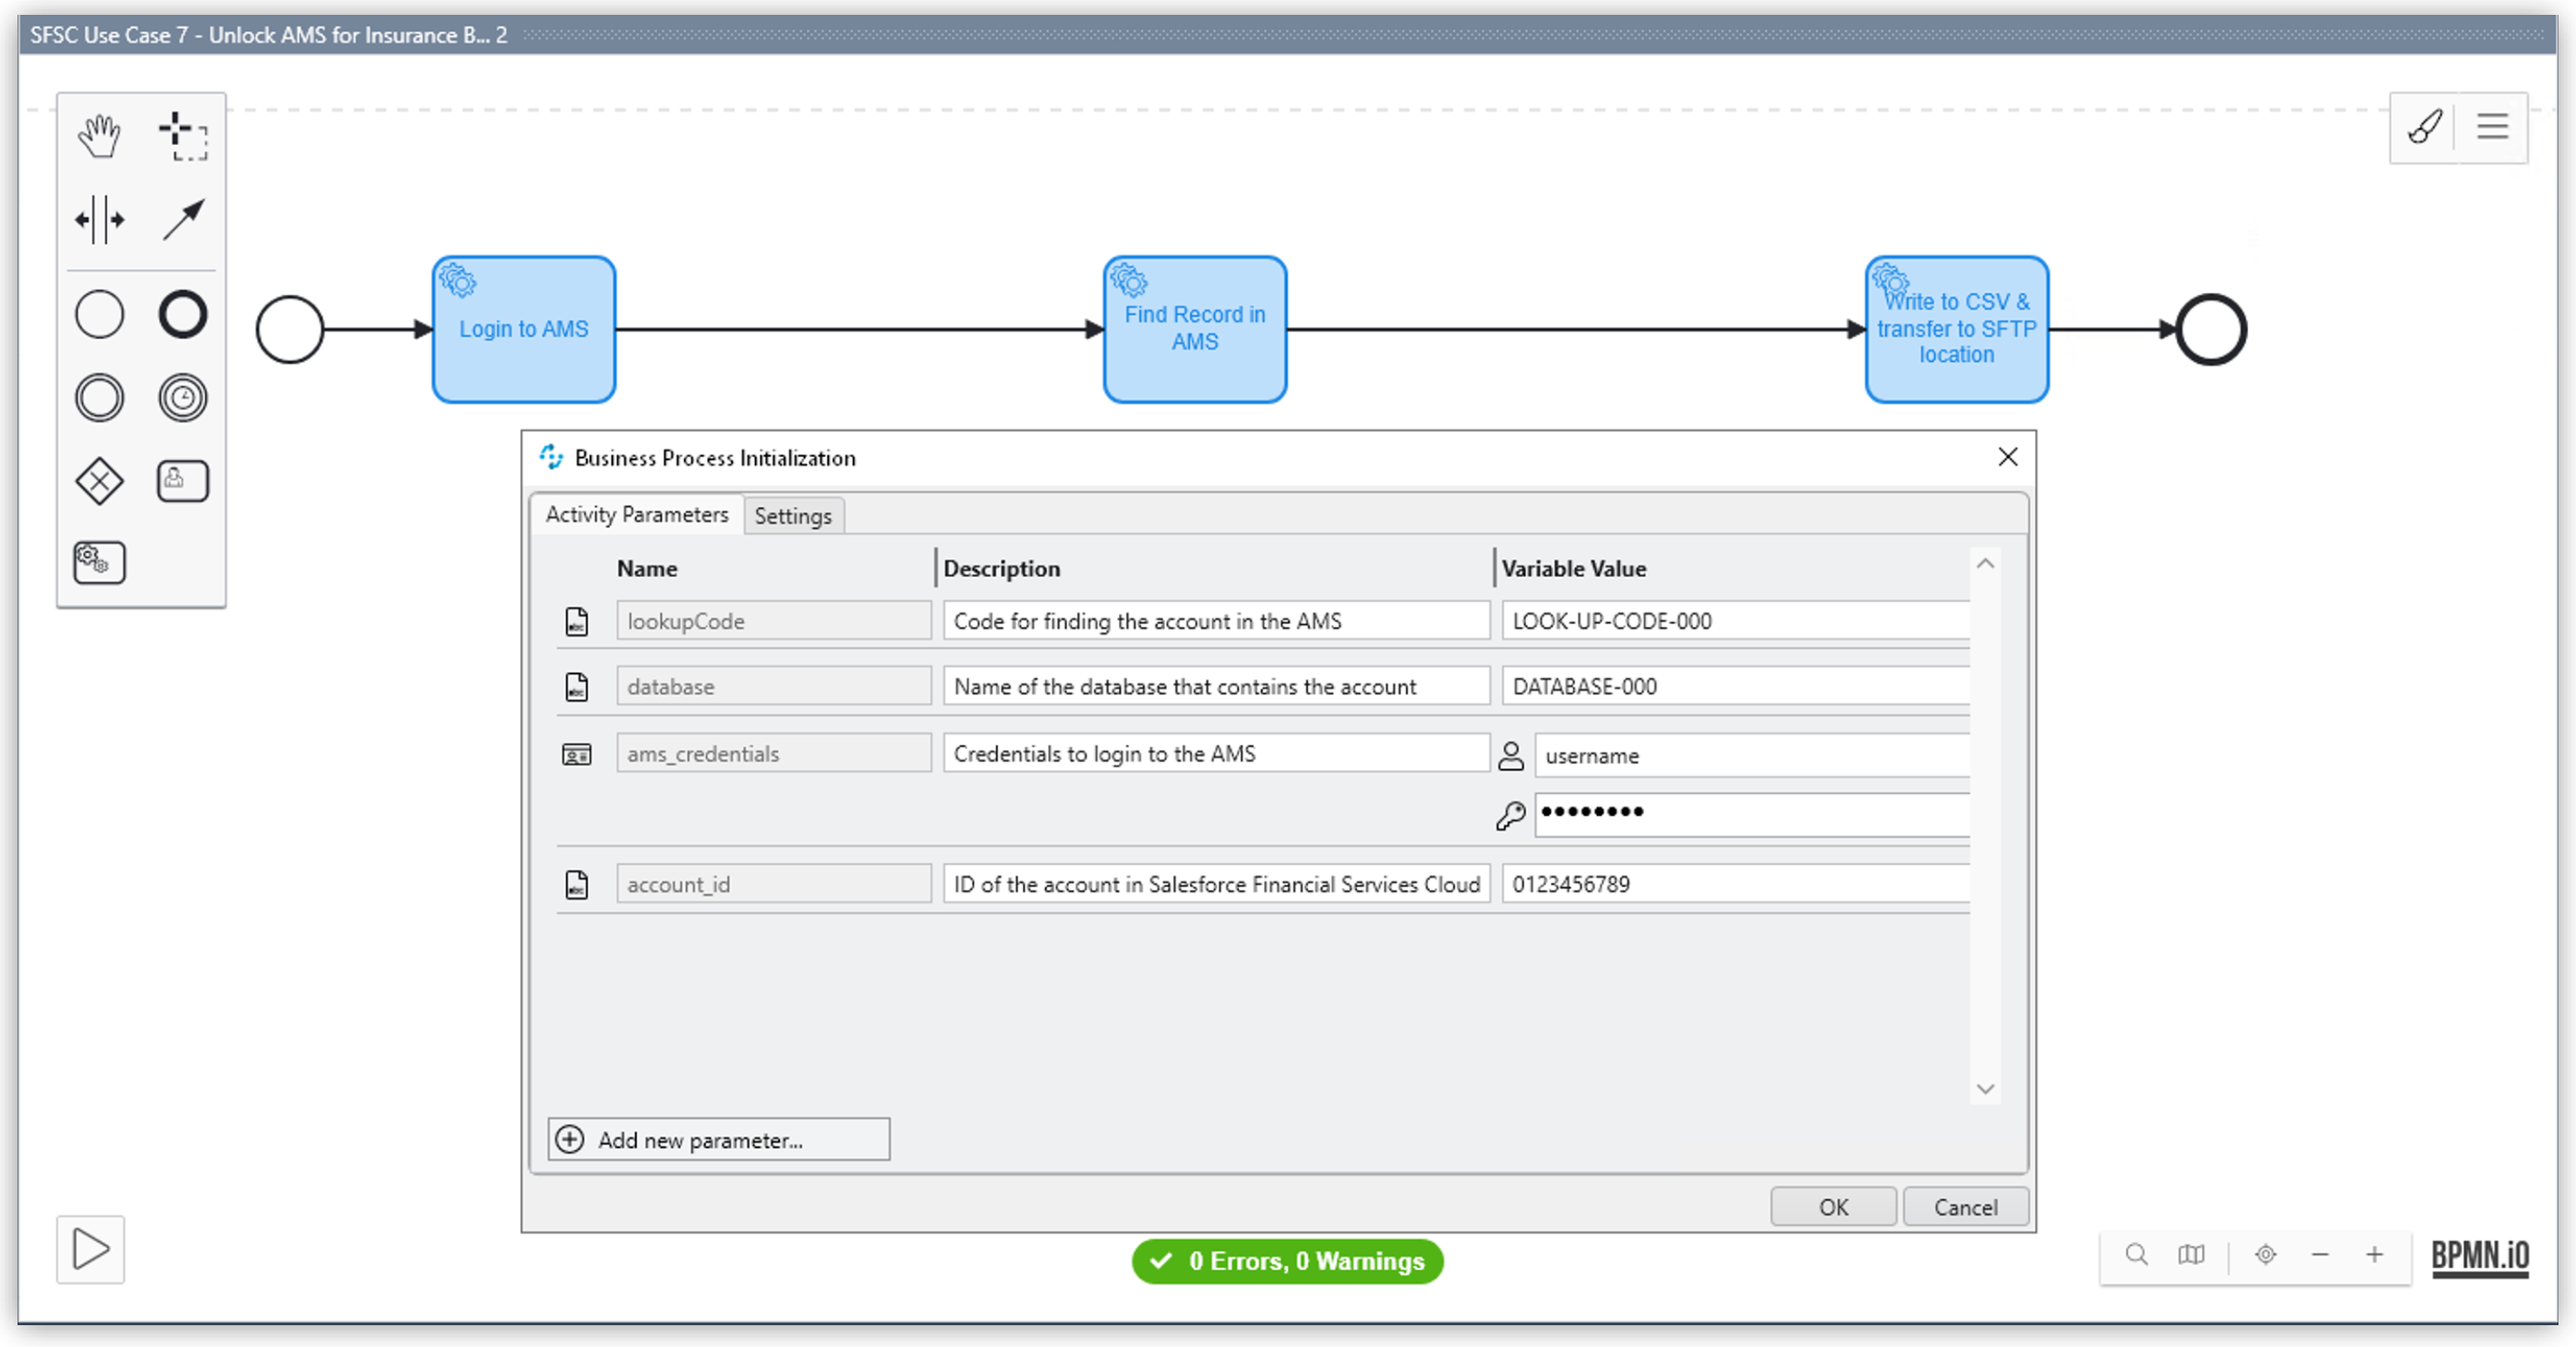
All values for the Activity Parameters used in RPA Builder are test values that you must overwrite with your own values when creating the run configuration for the process in RPA Manager.
Process Model
The process model contains the following activities:
-
Log in to the AMS using credentials and a database name.
-
Open a record in the AMS database using a lookup code.
-
Copy data from various fields on the record pages to a CSV file.
Add activities by clicking on an element on the model panel and choosing an element from the context menu. For example, the following image shows how to branch off to a second AMS if you are using more than one AMS and not finding the data you need in the first AMS:
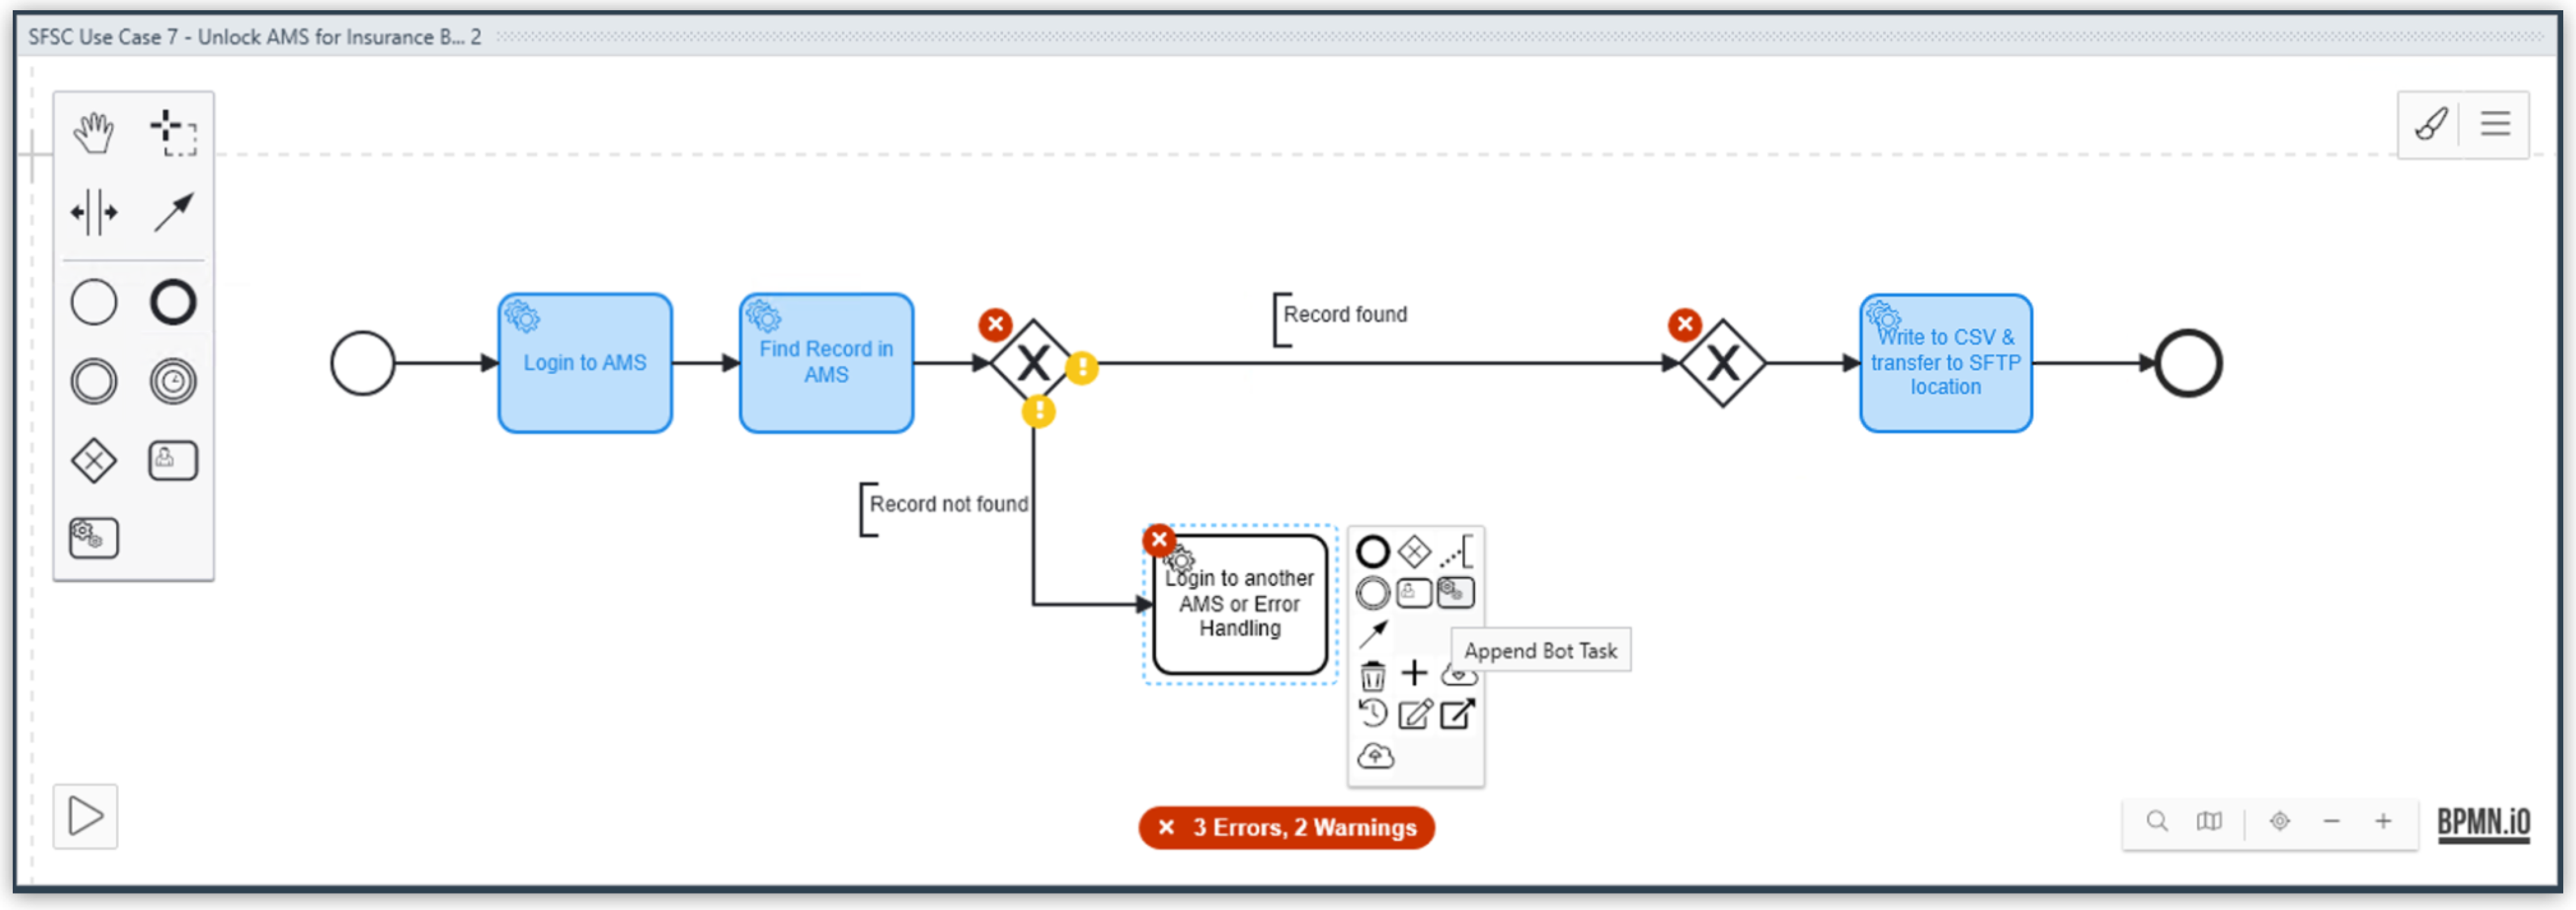
The linter automatically checks the model for completeness and displays error and warning messages to indicate what to change.
Click on an activity to open the editing workflow.
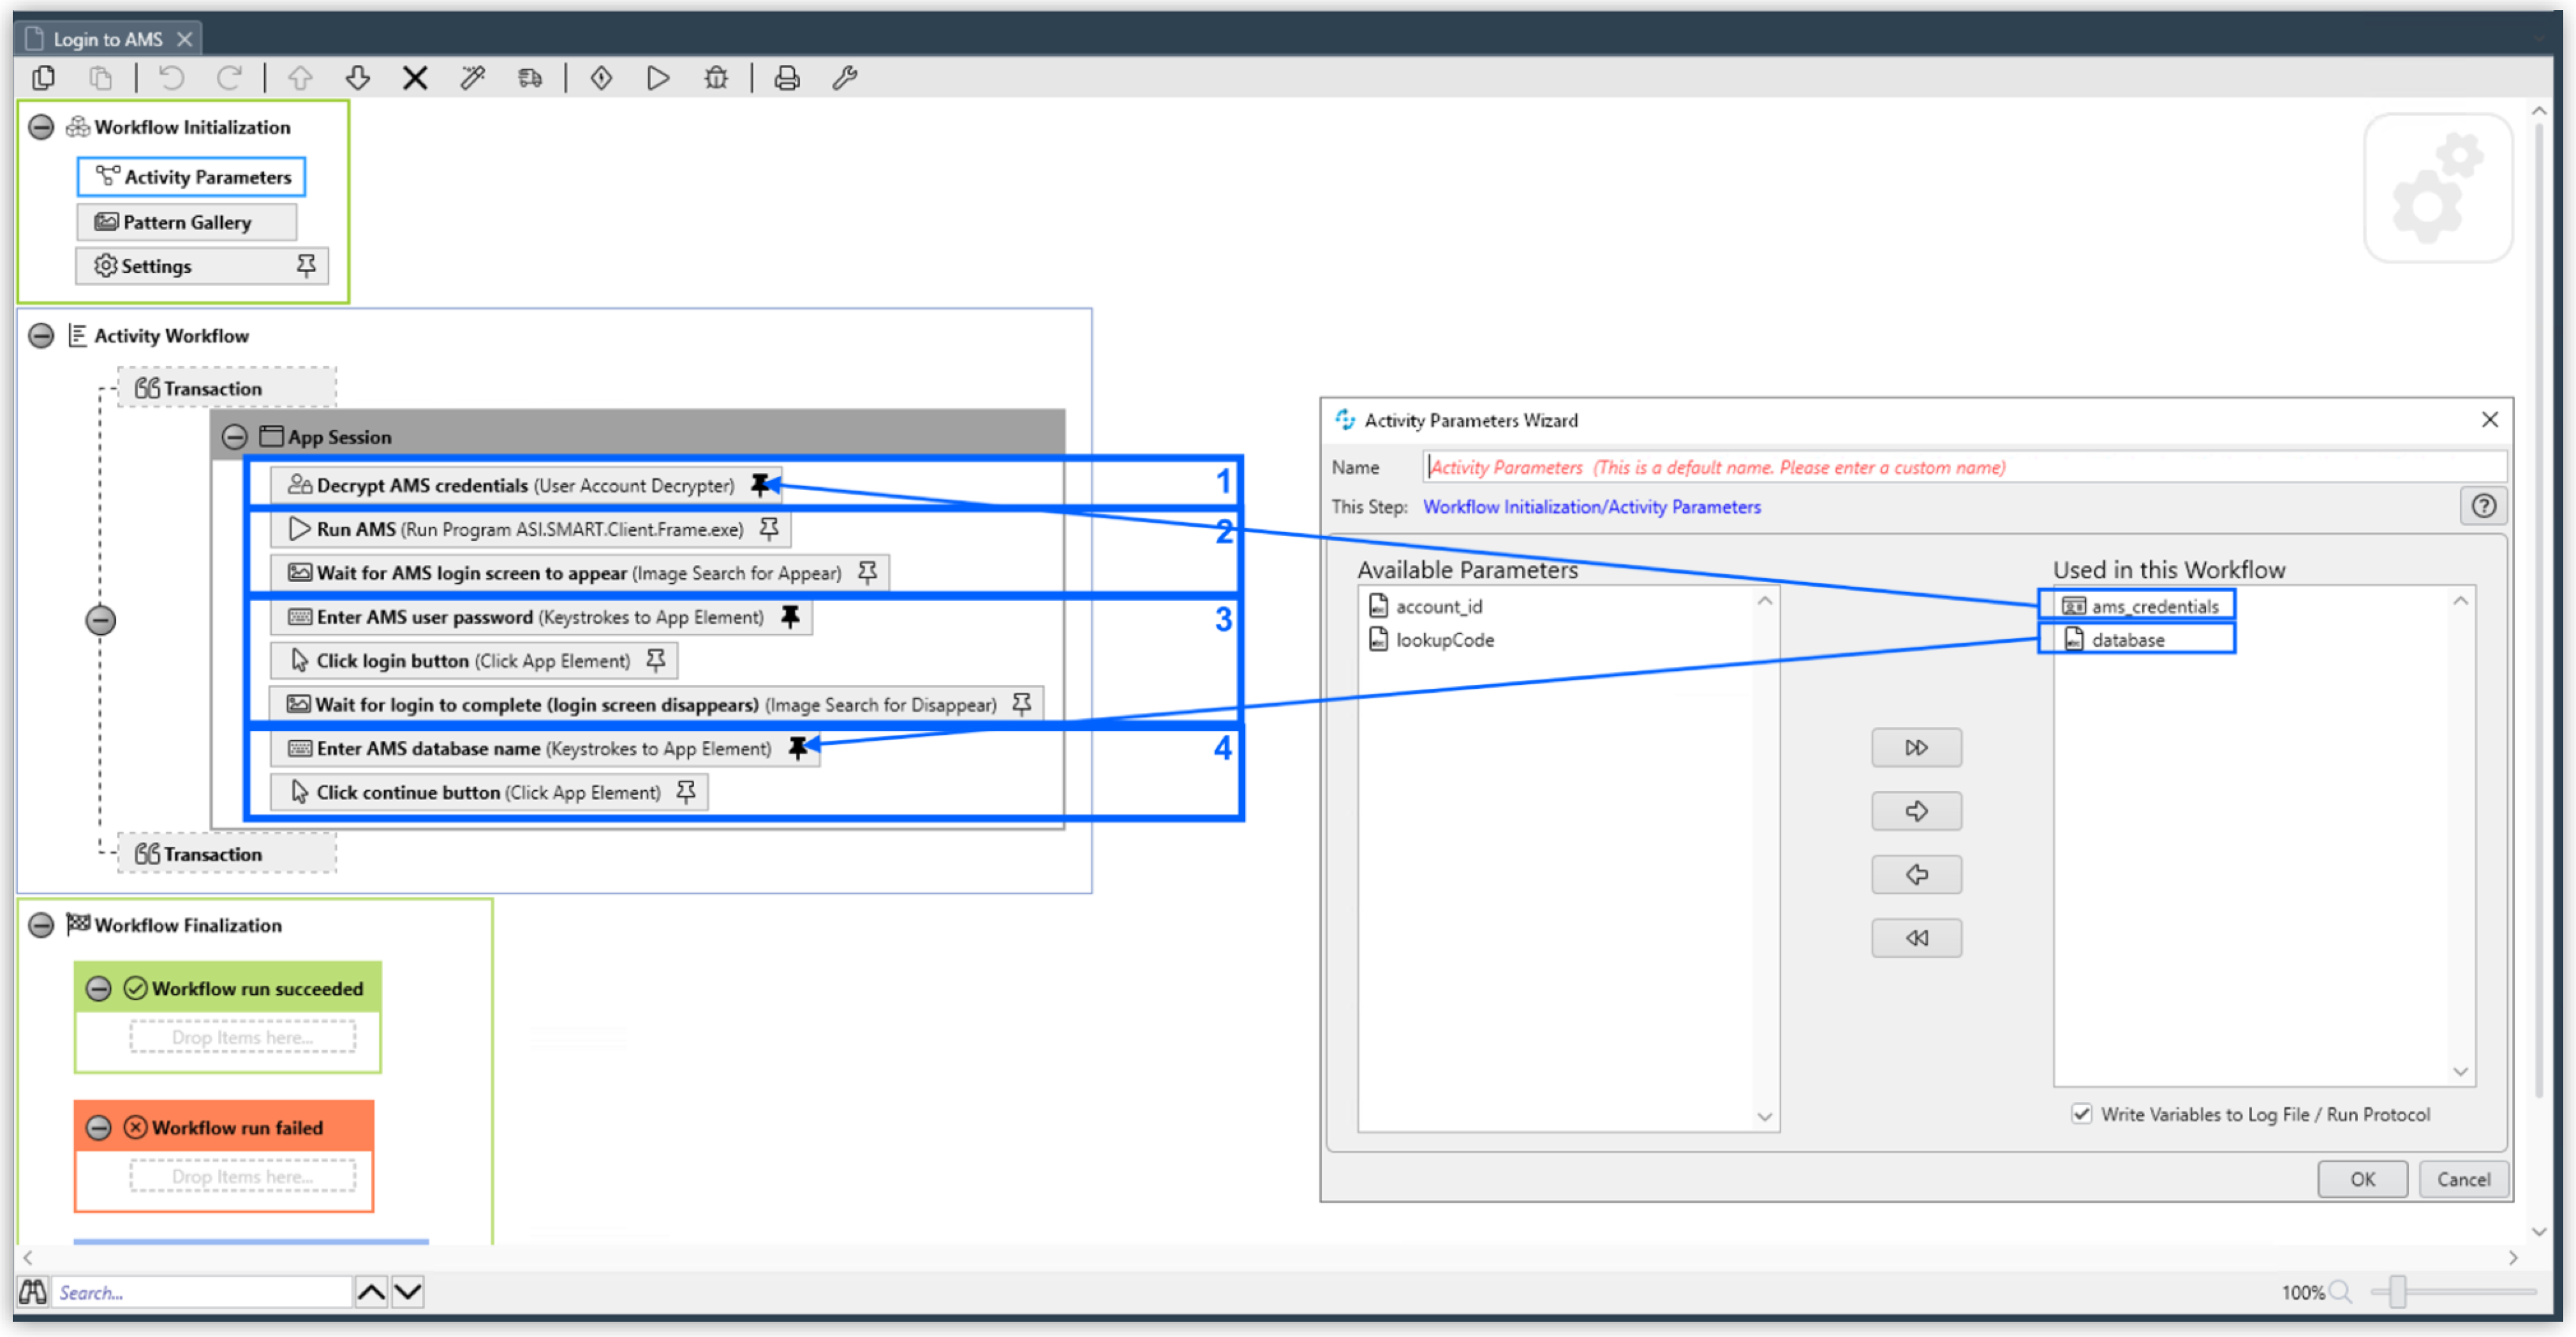
Activity 1: Log In to the AMS
Overview of the Activity Workflow
-
Decrypt the AMS login credentials that go in through an Activity Parameter.
-
Run the AMS.
-
Log in to the AMS by using the decrypted credentials.
-
Select the database by using another in-going Activity Parameter.
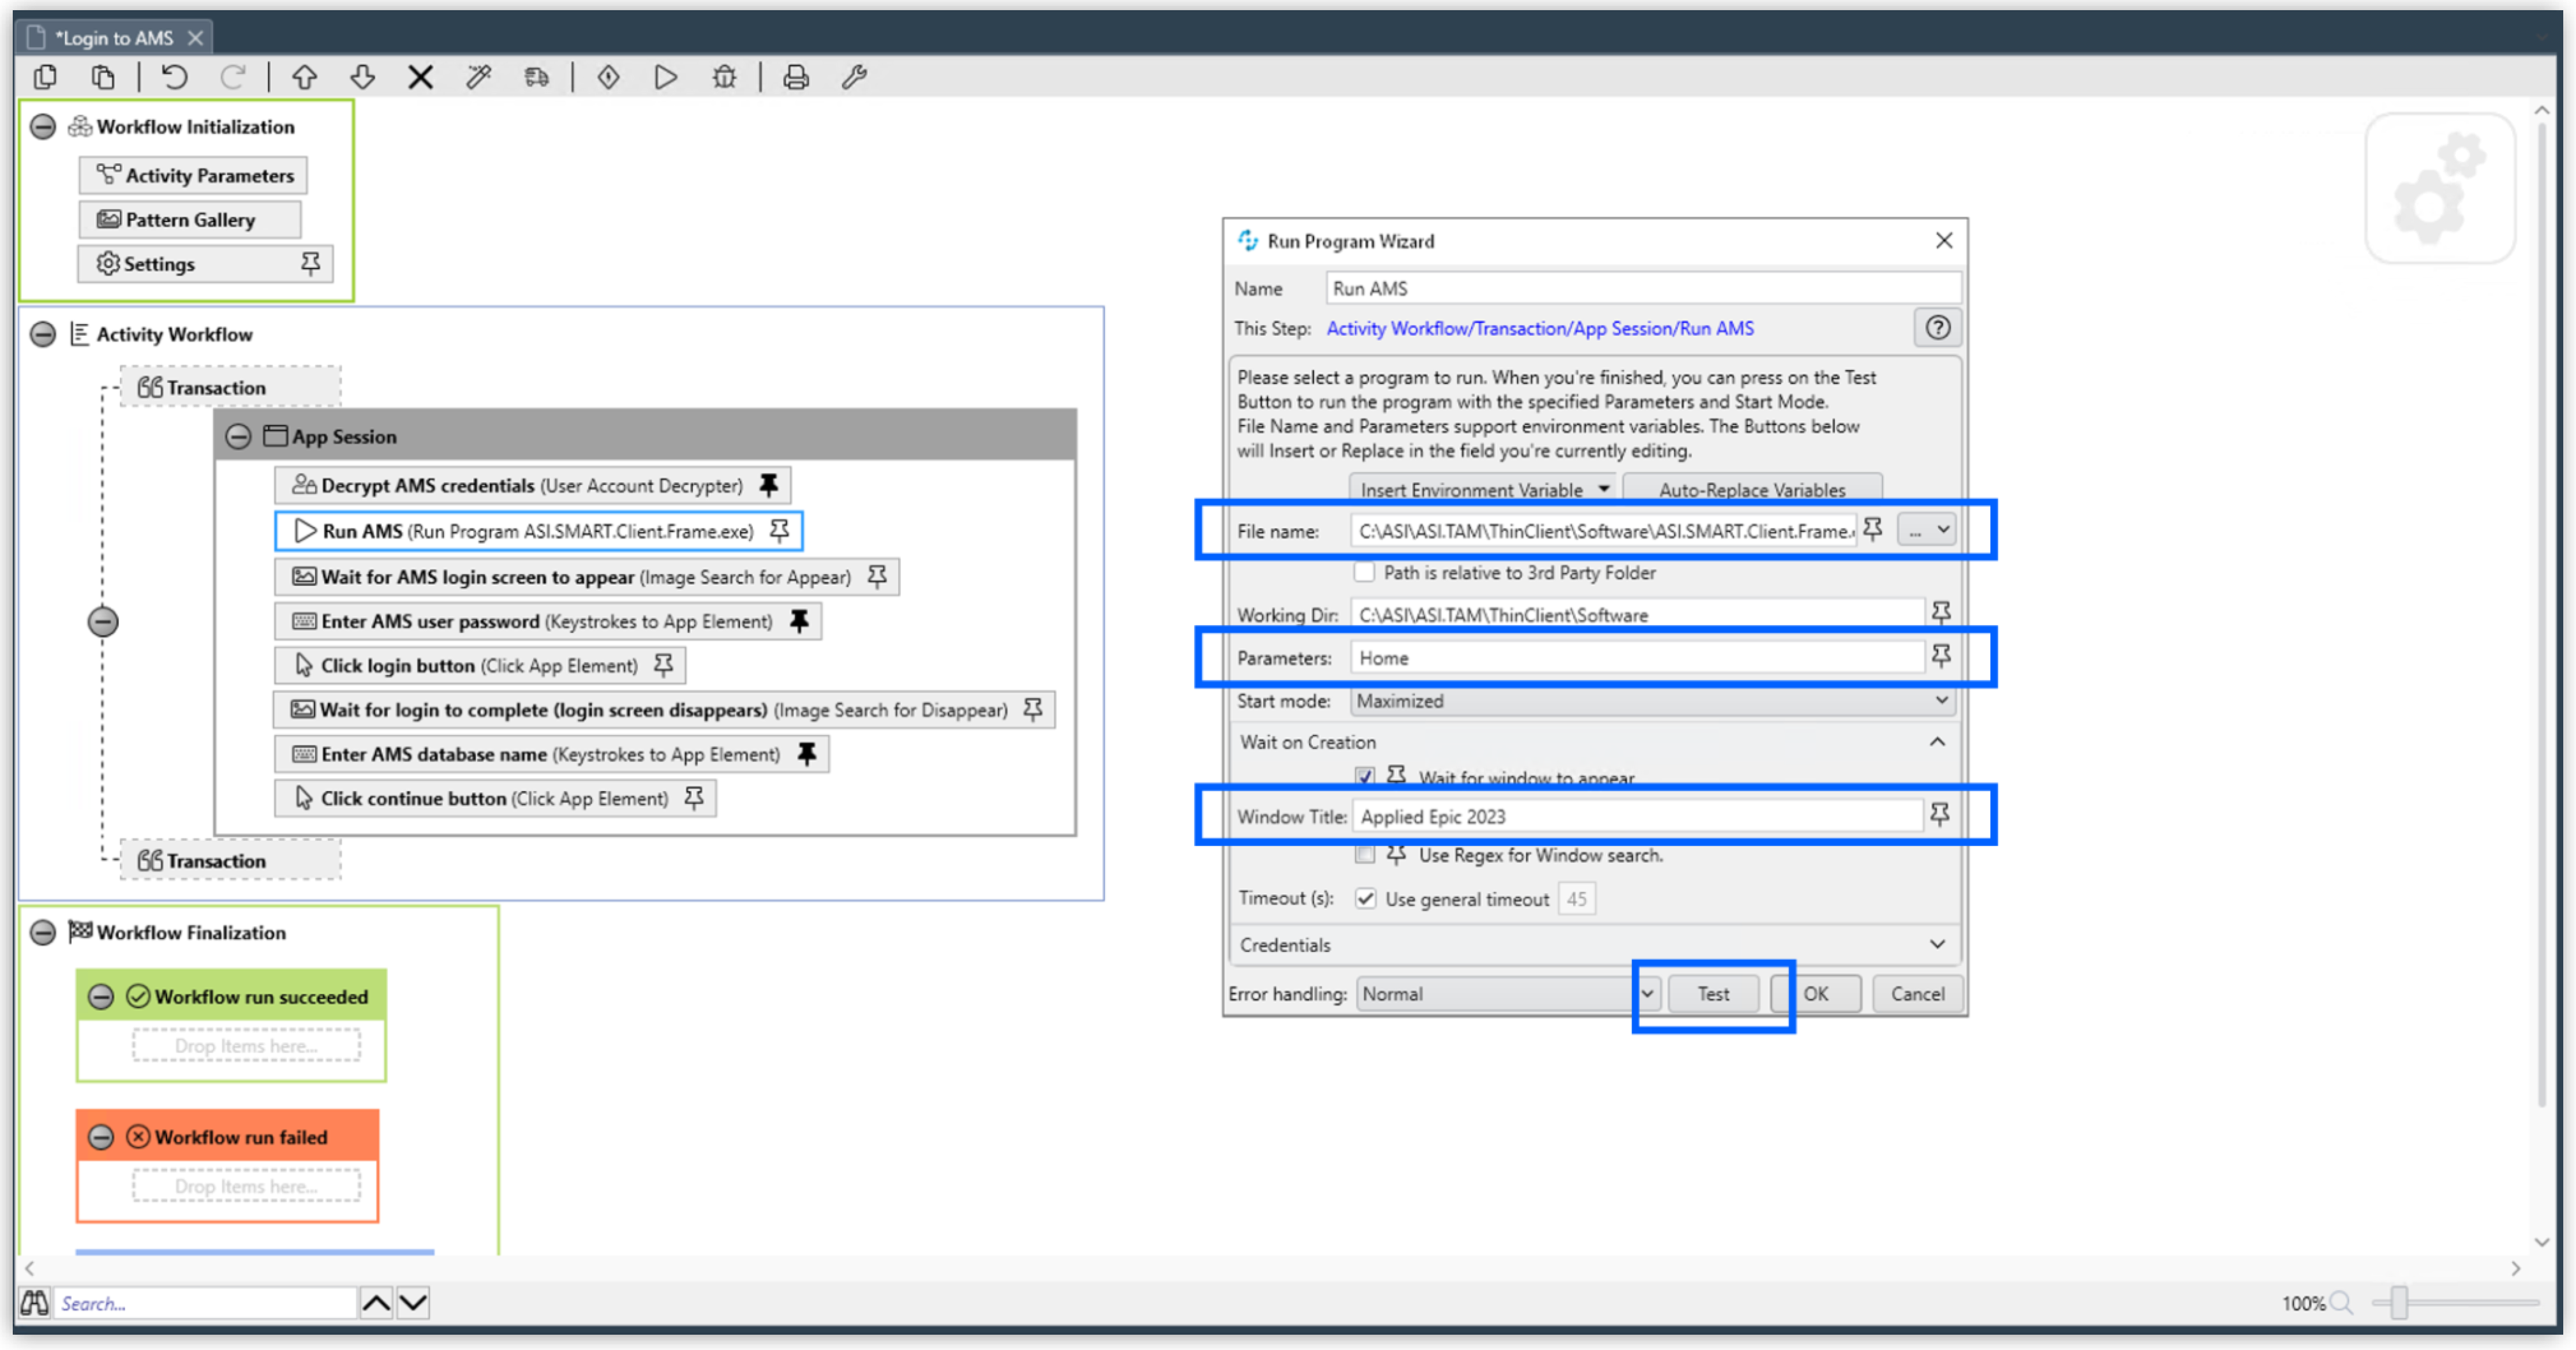
Minimum Steps to Adapt in This Workflow
-
Change the following in the Run Program Action Step:
-
Replace the values in the File name, Parameters, and Window Title fields with the values from your AMS.
-
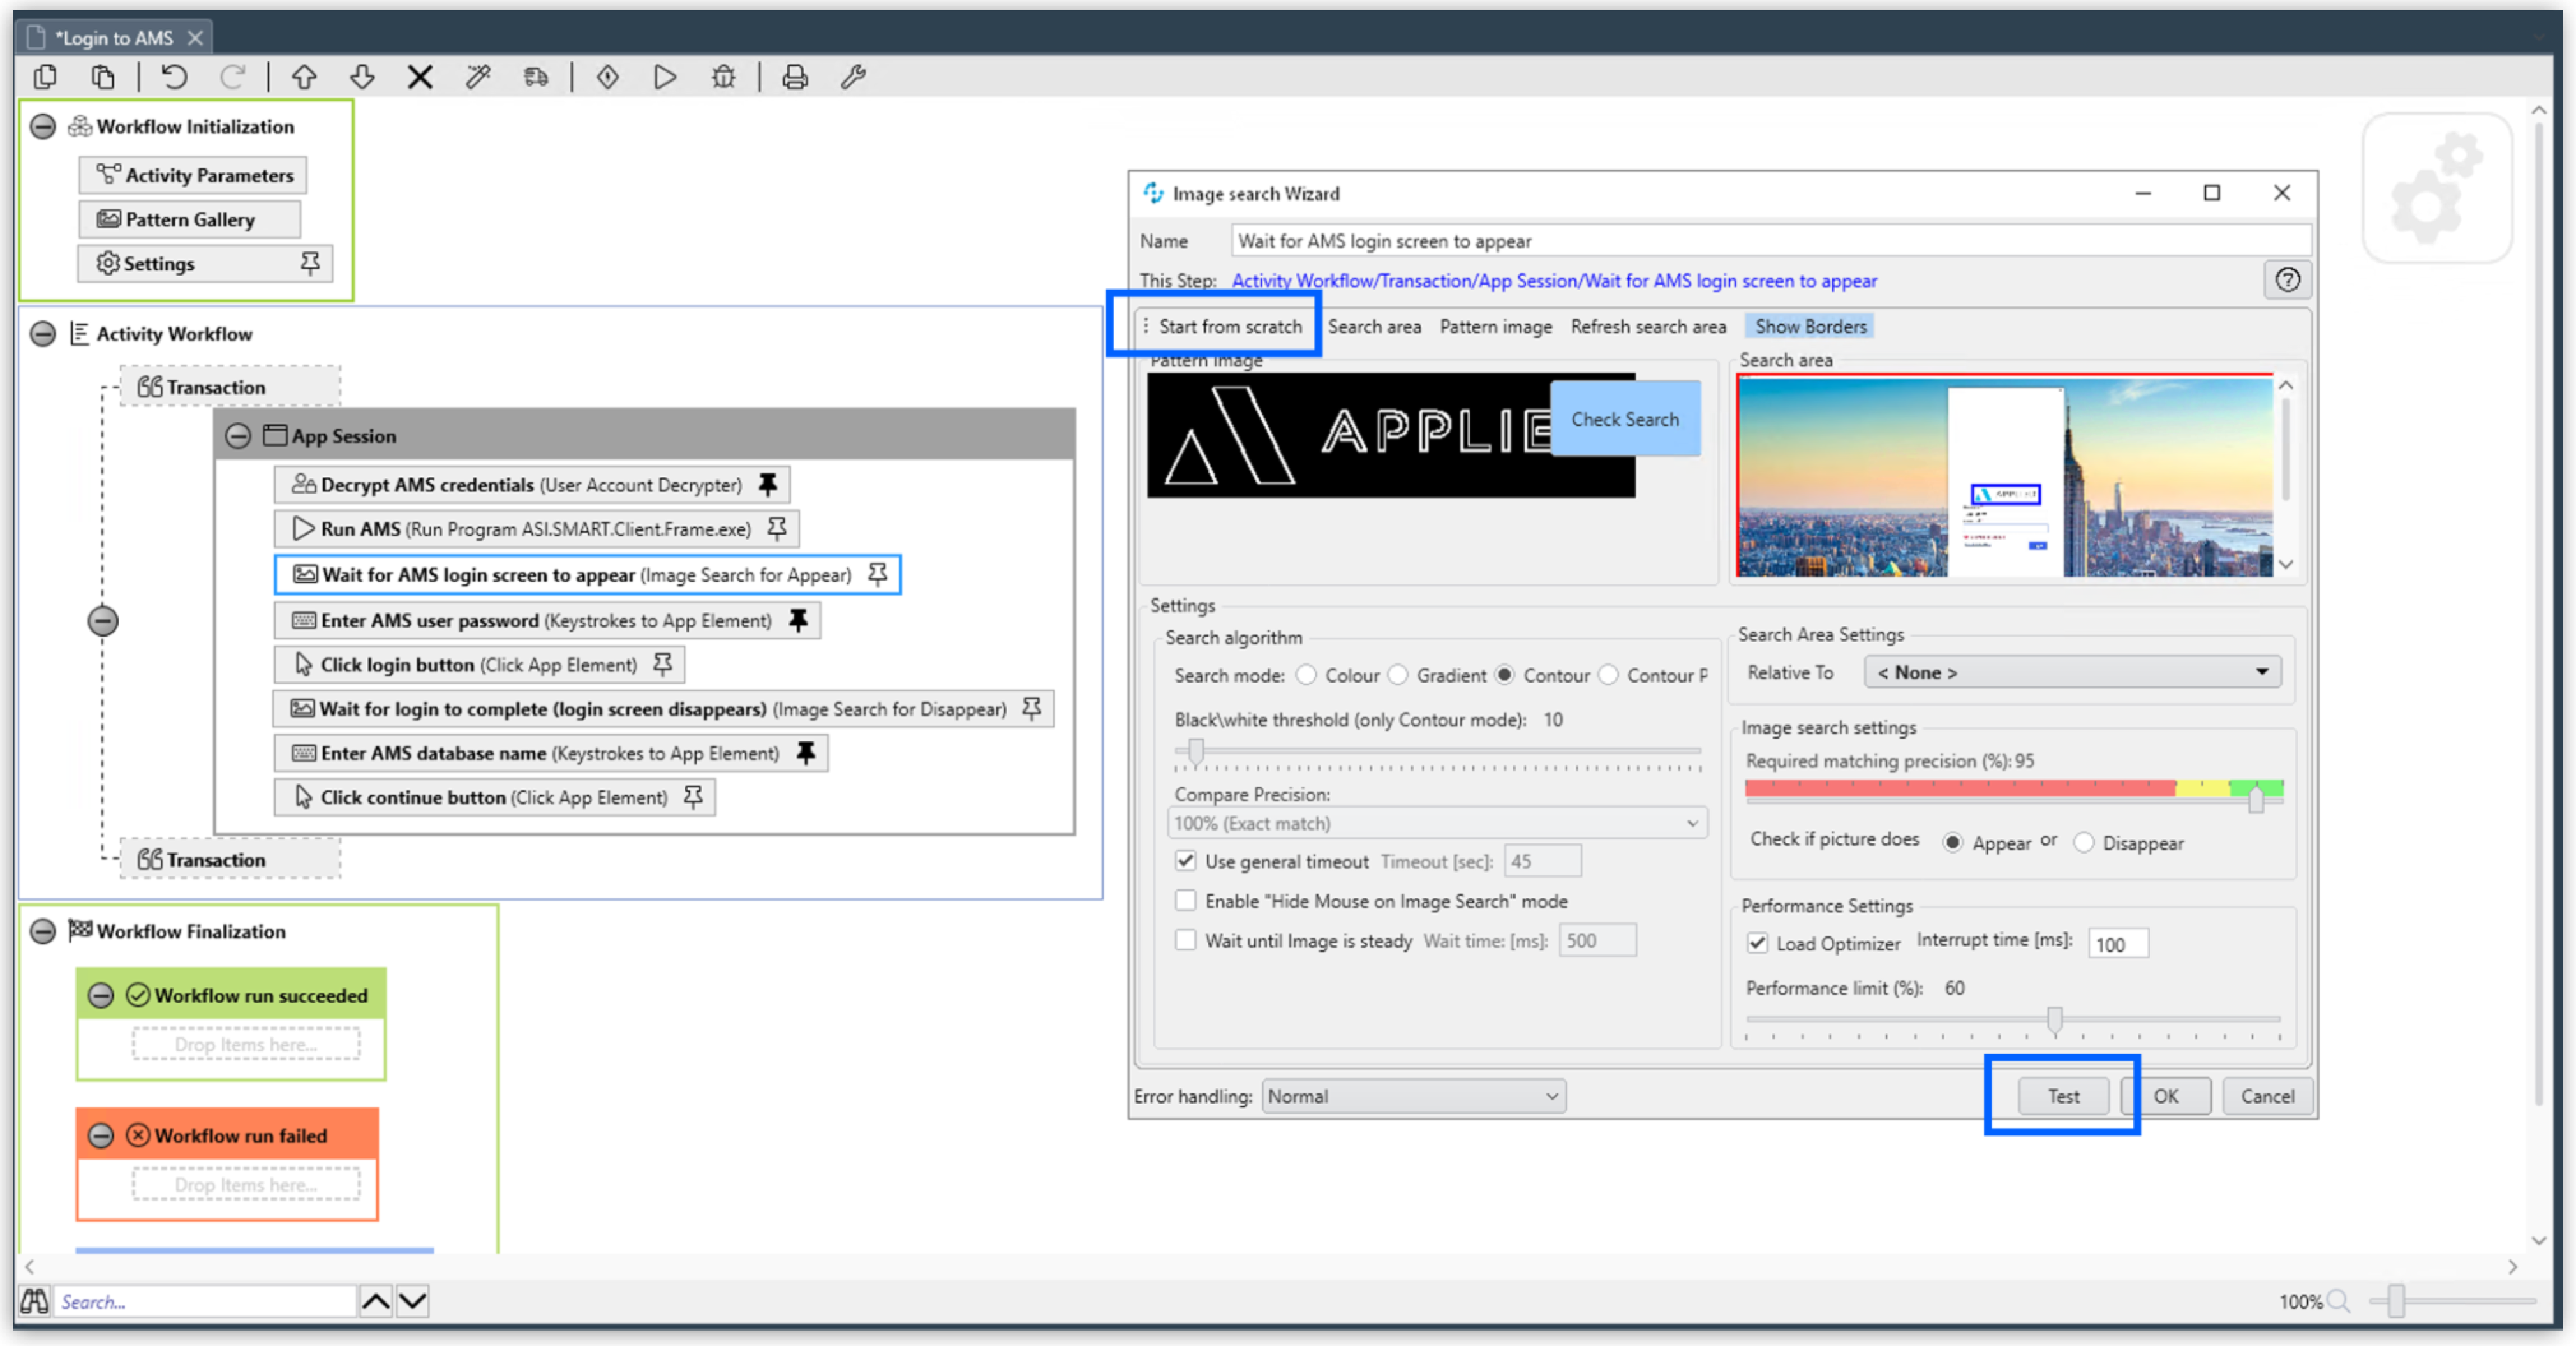
Click Test to run the application so that you can use it to adapt the following Action Steps:
-
-
Use the Start from scratch option to capture and test a new pattern that indicates that the login page of the AMS is visible onscreen:
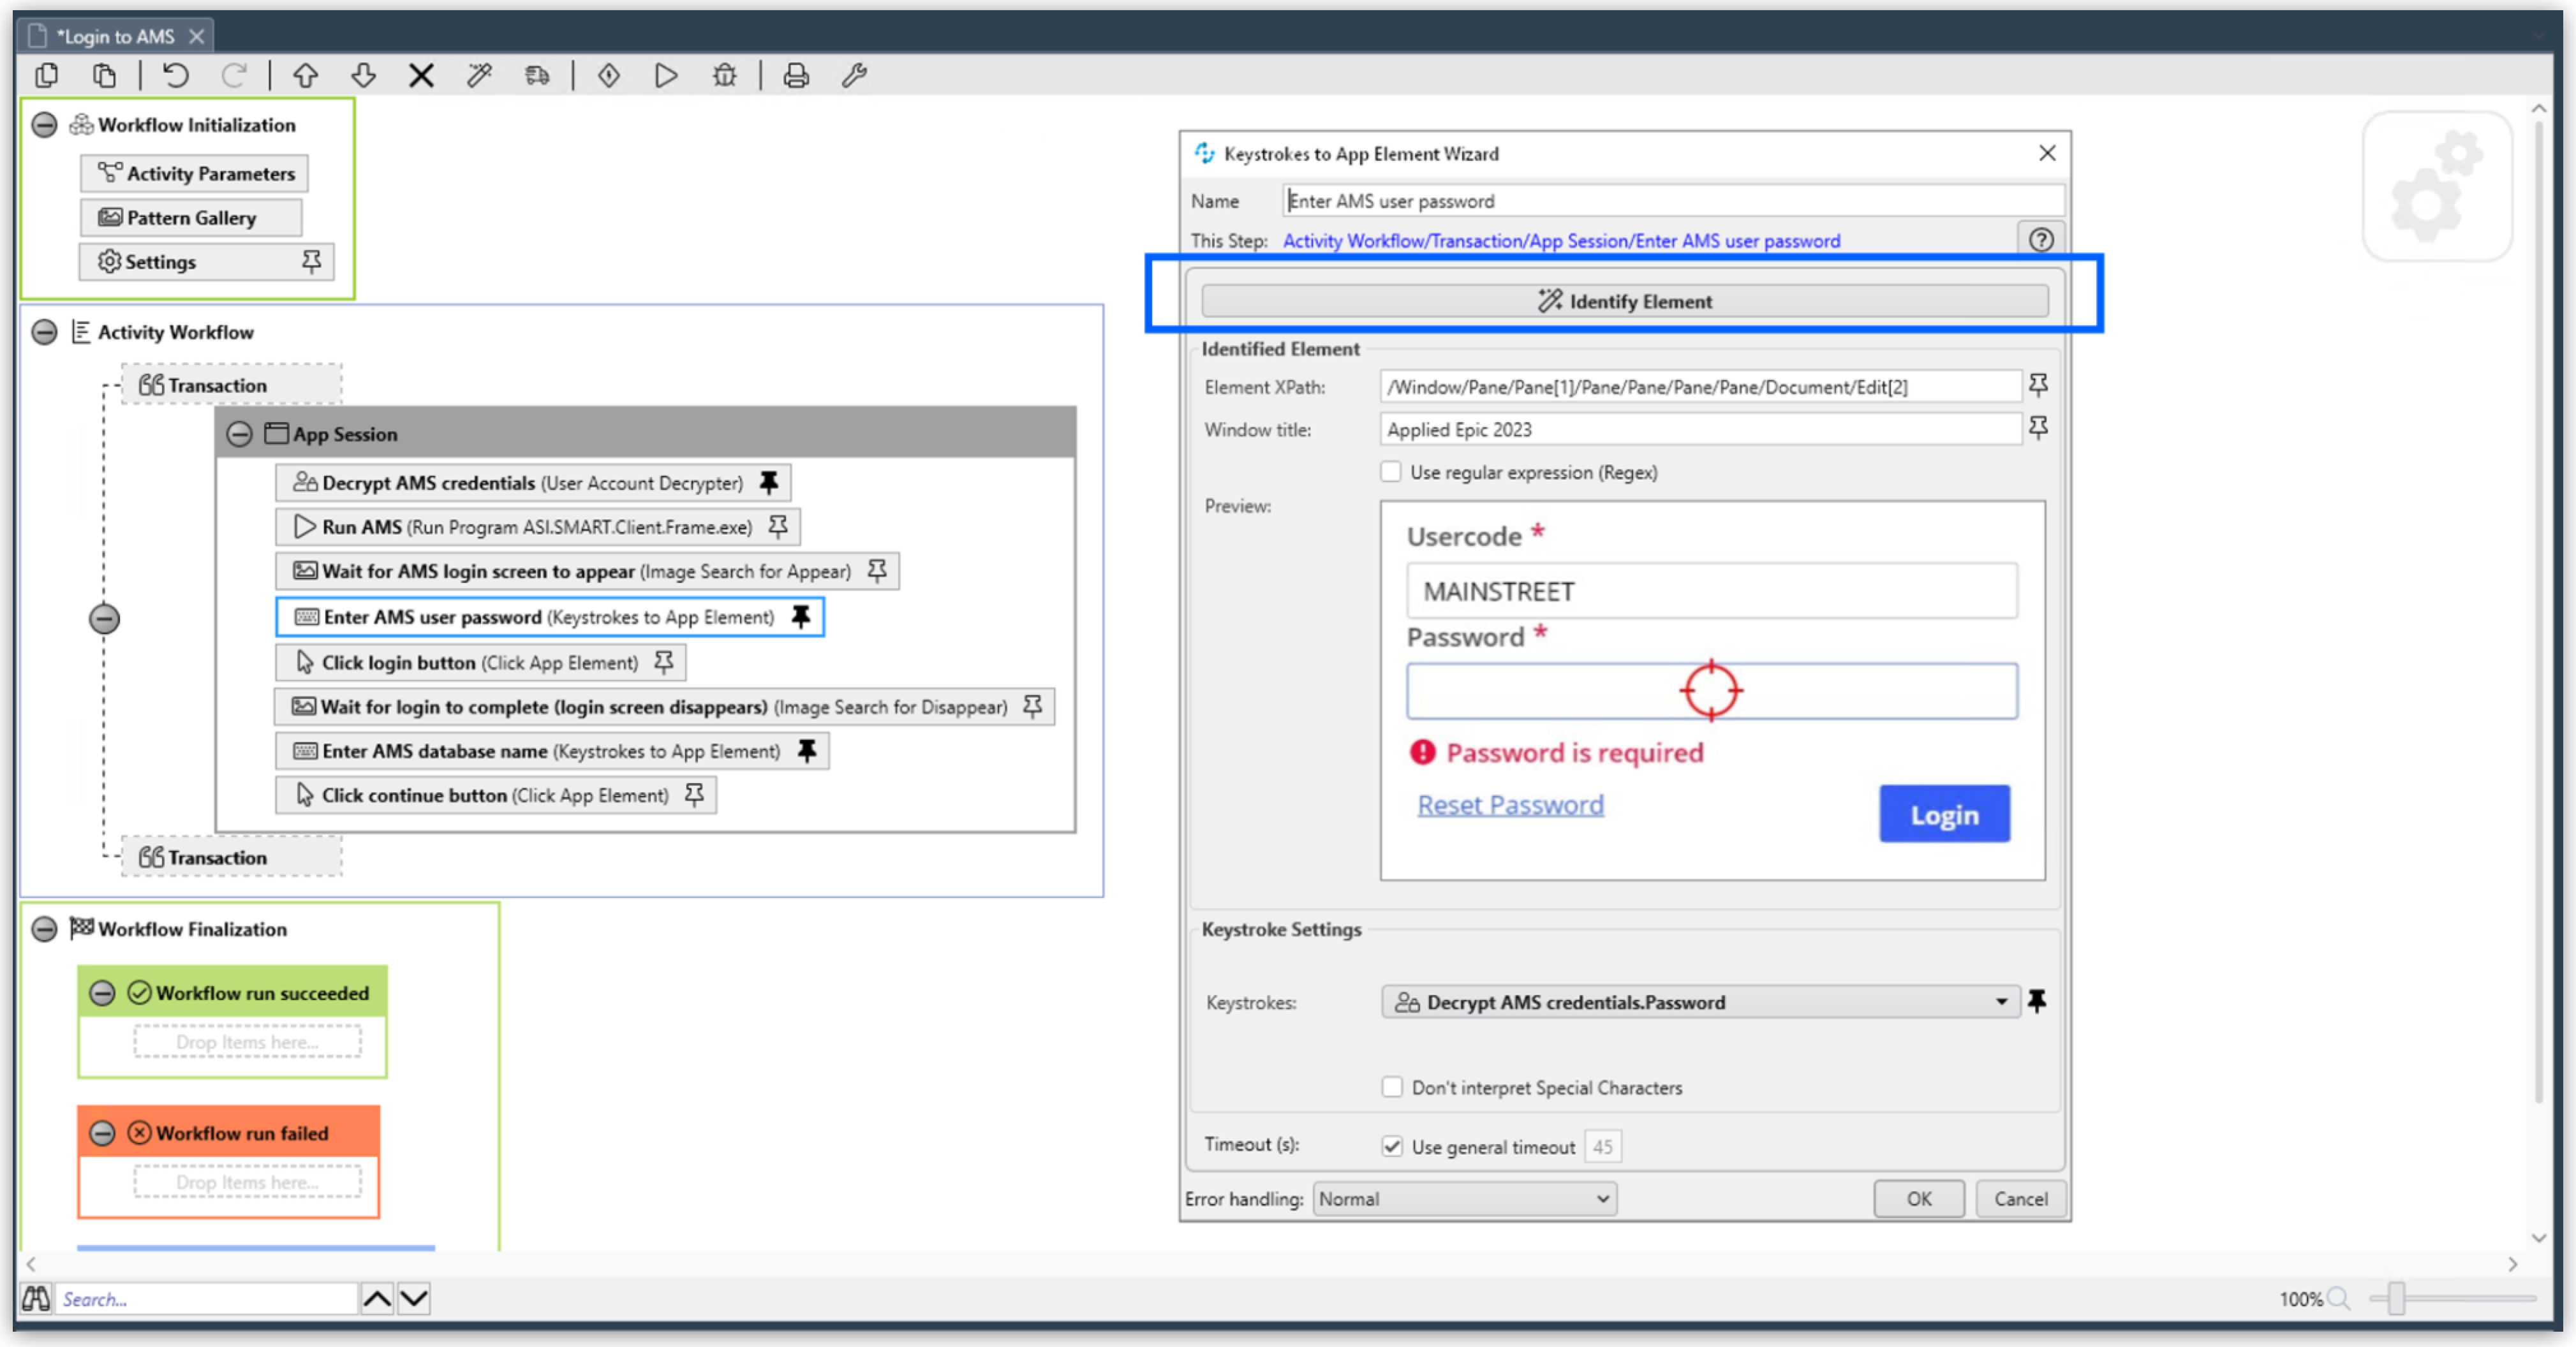
-
Reidentify the field to enter the password. You might have to add another Keystrokes to App Element Action Step for entering the user name, which would go before the password step.
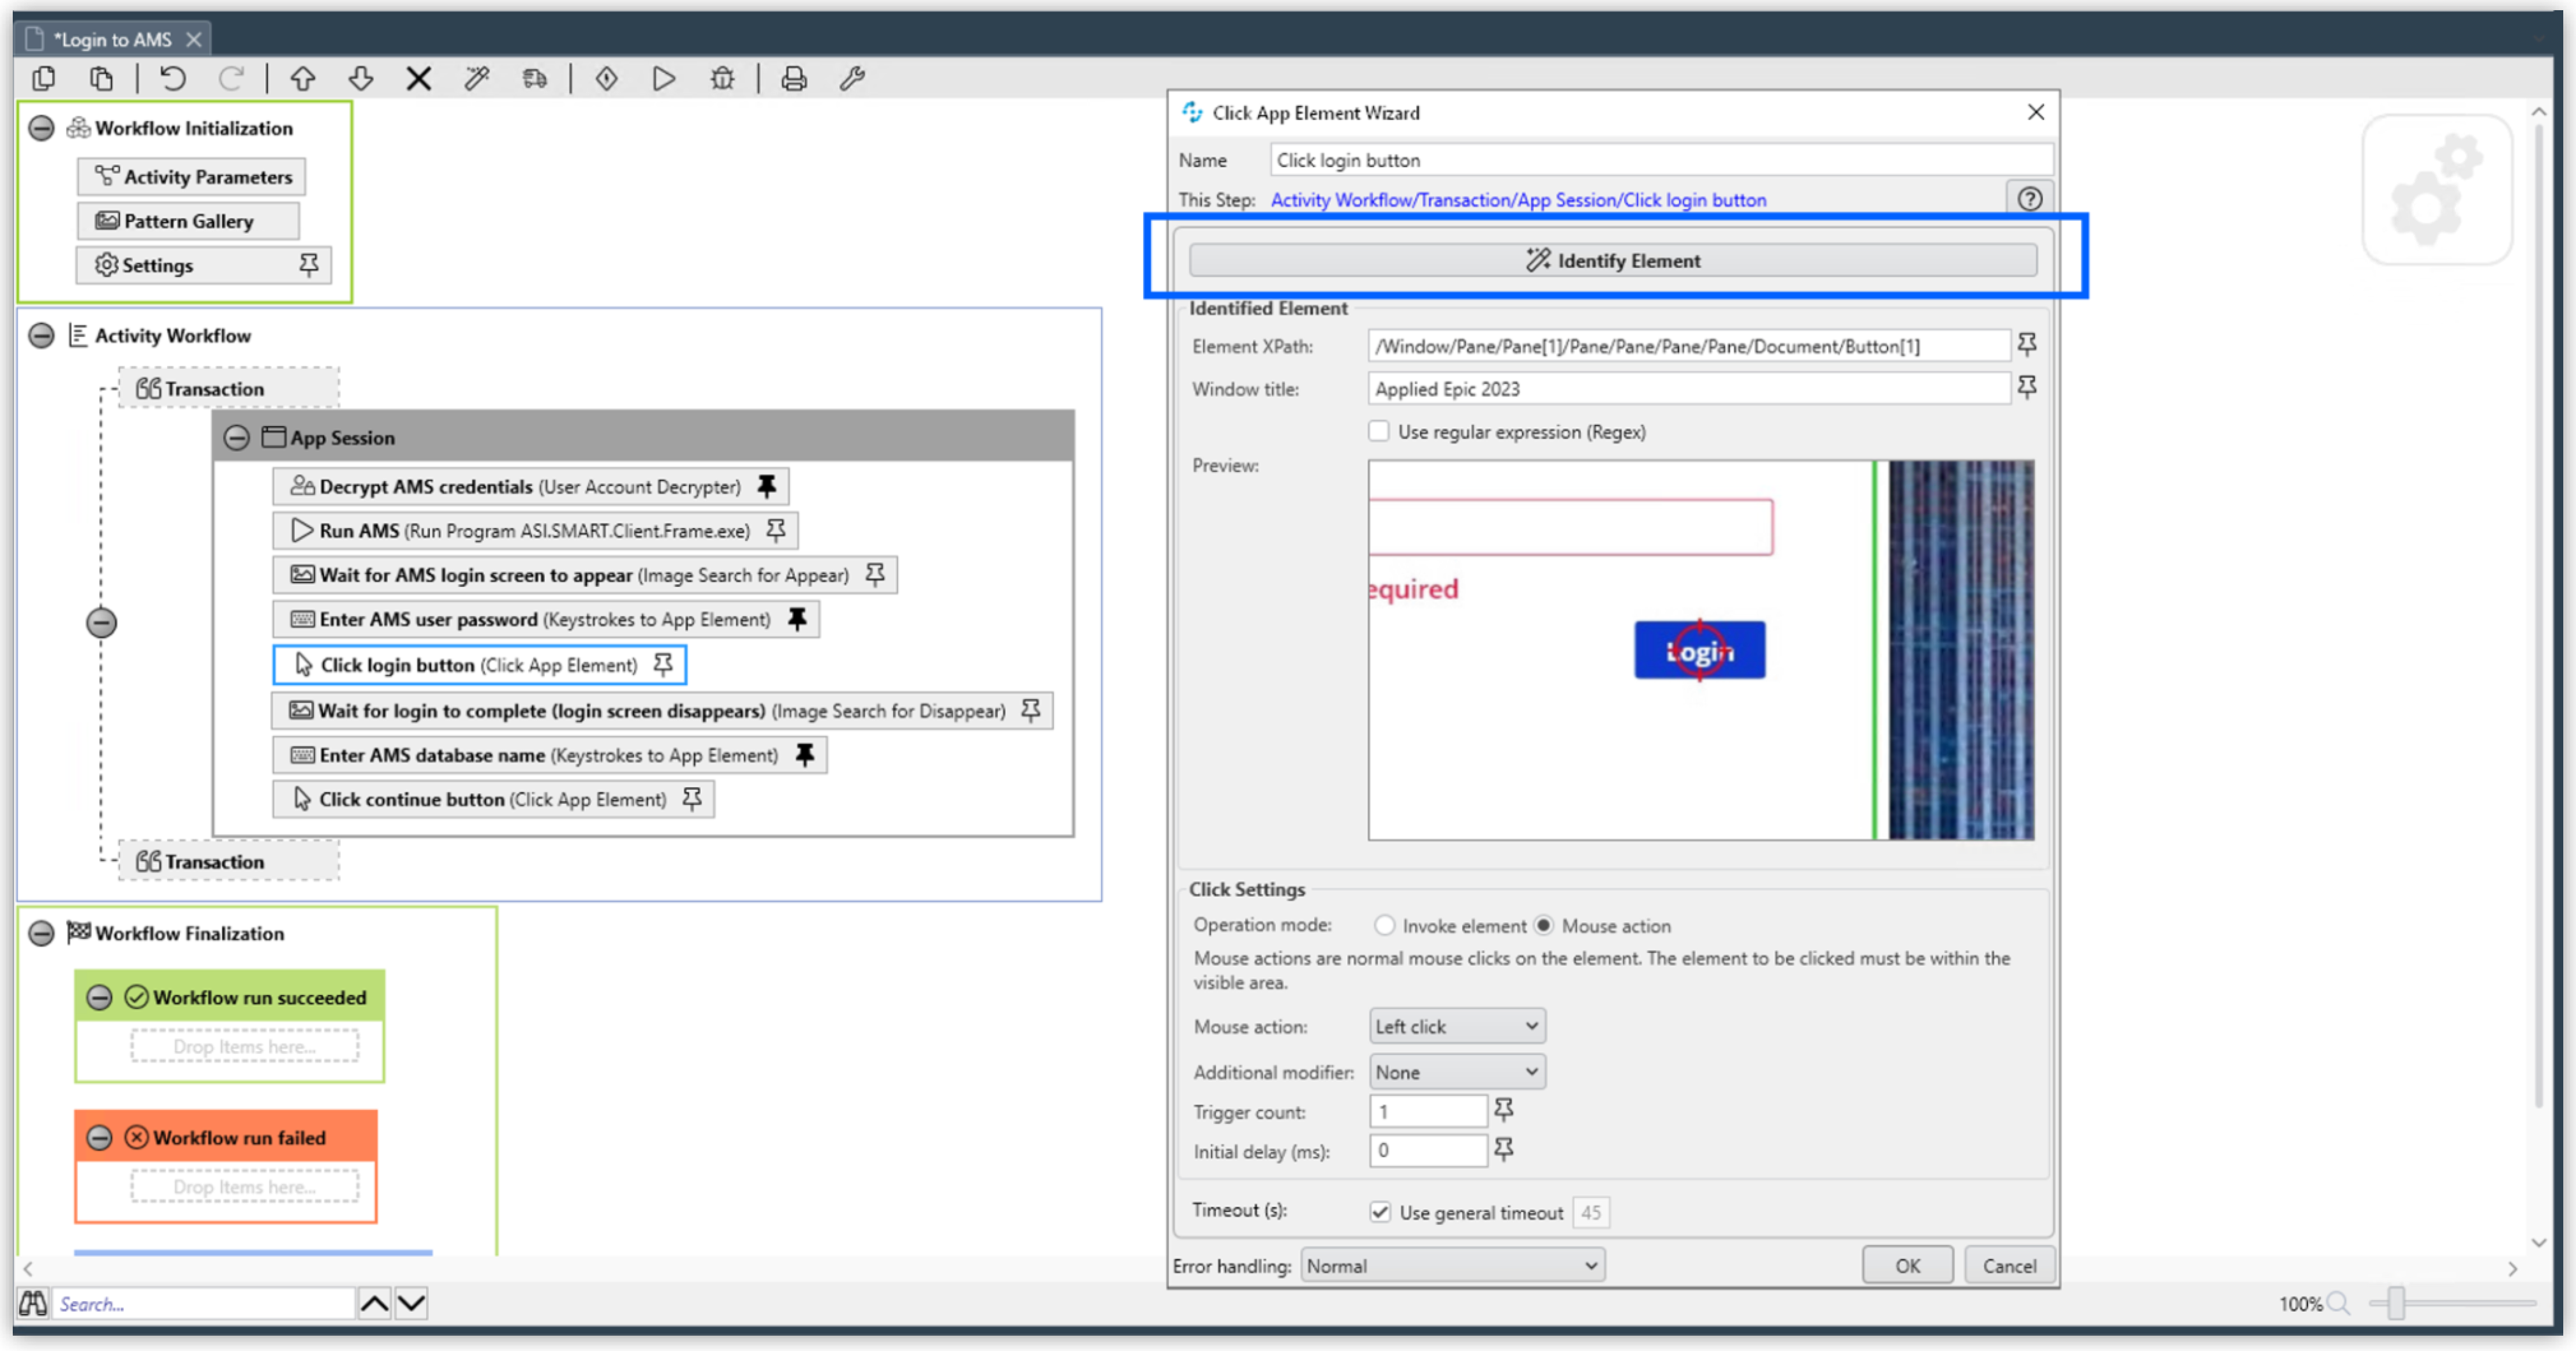
-
Reidentify the Login button, which is used in the Click App Element Action Step:
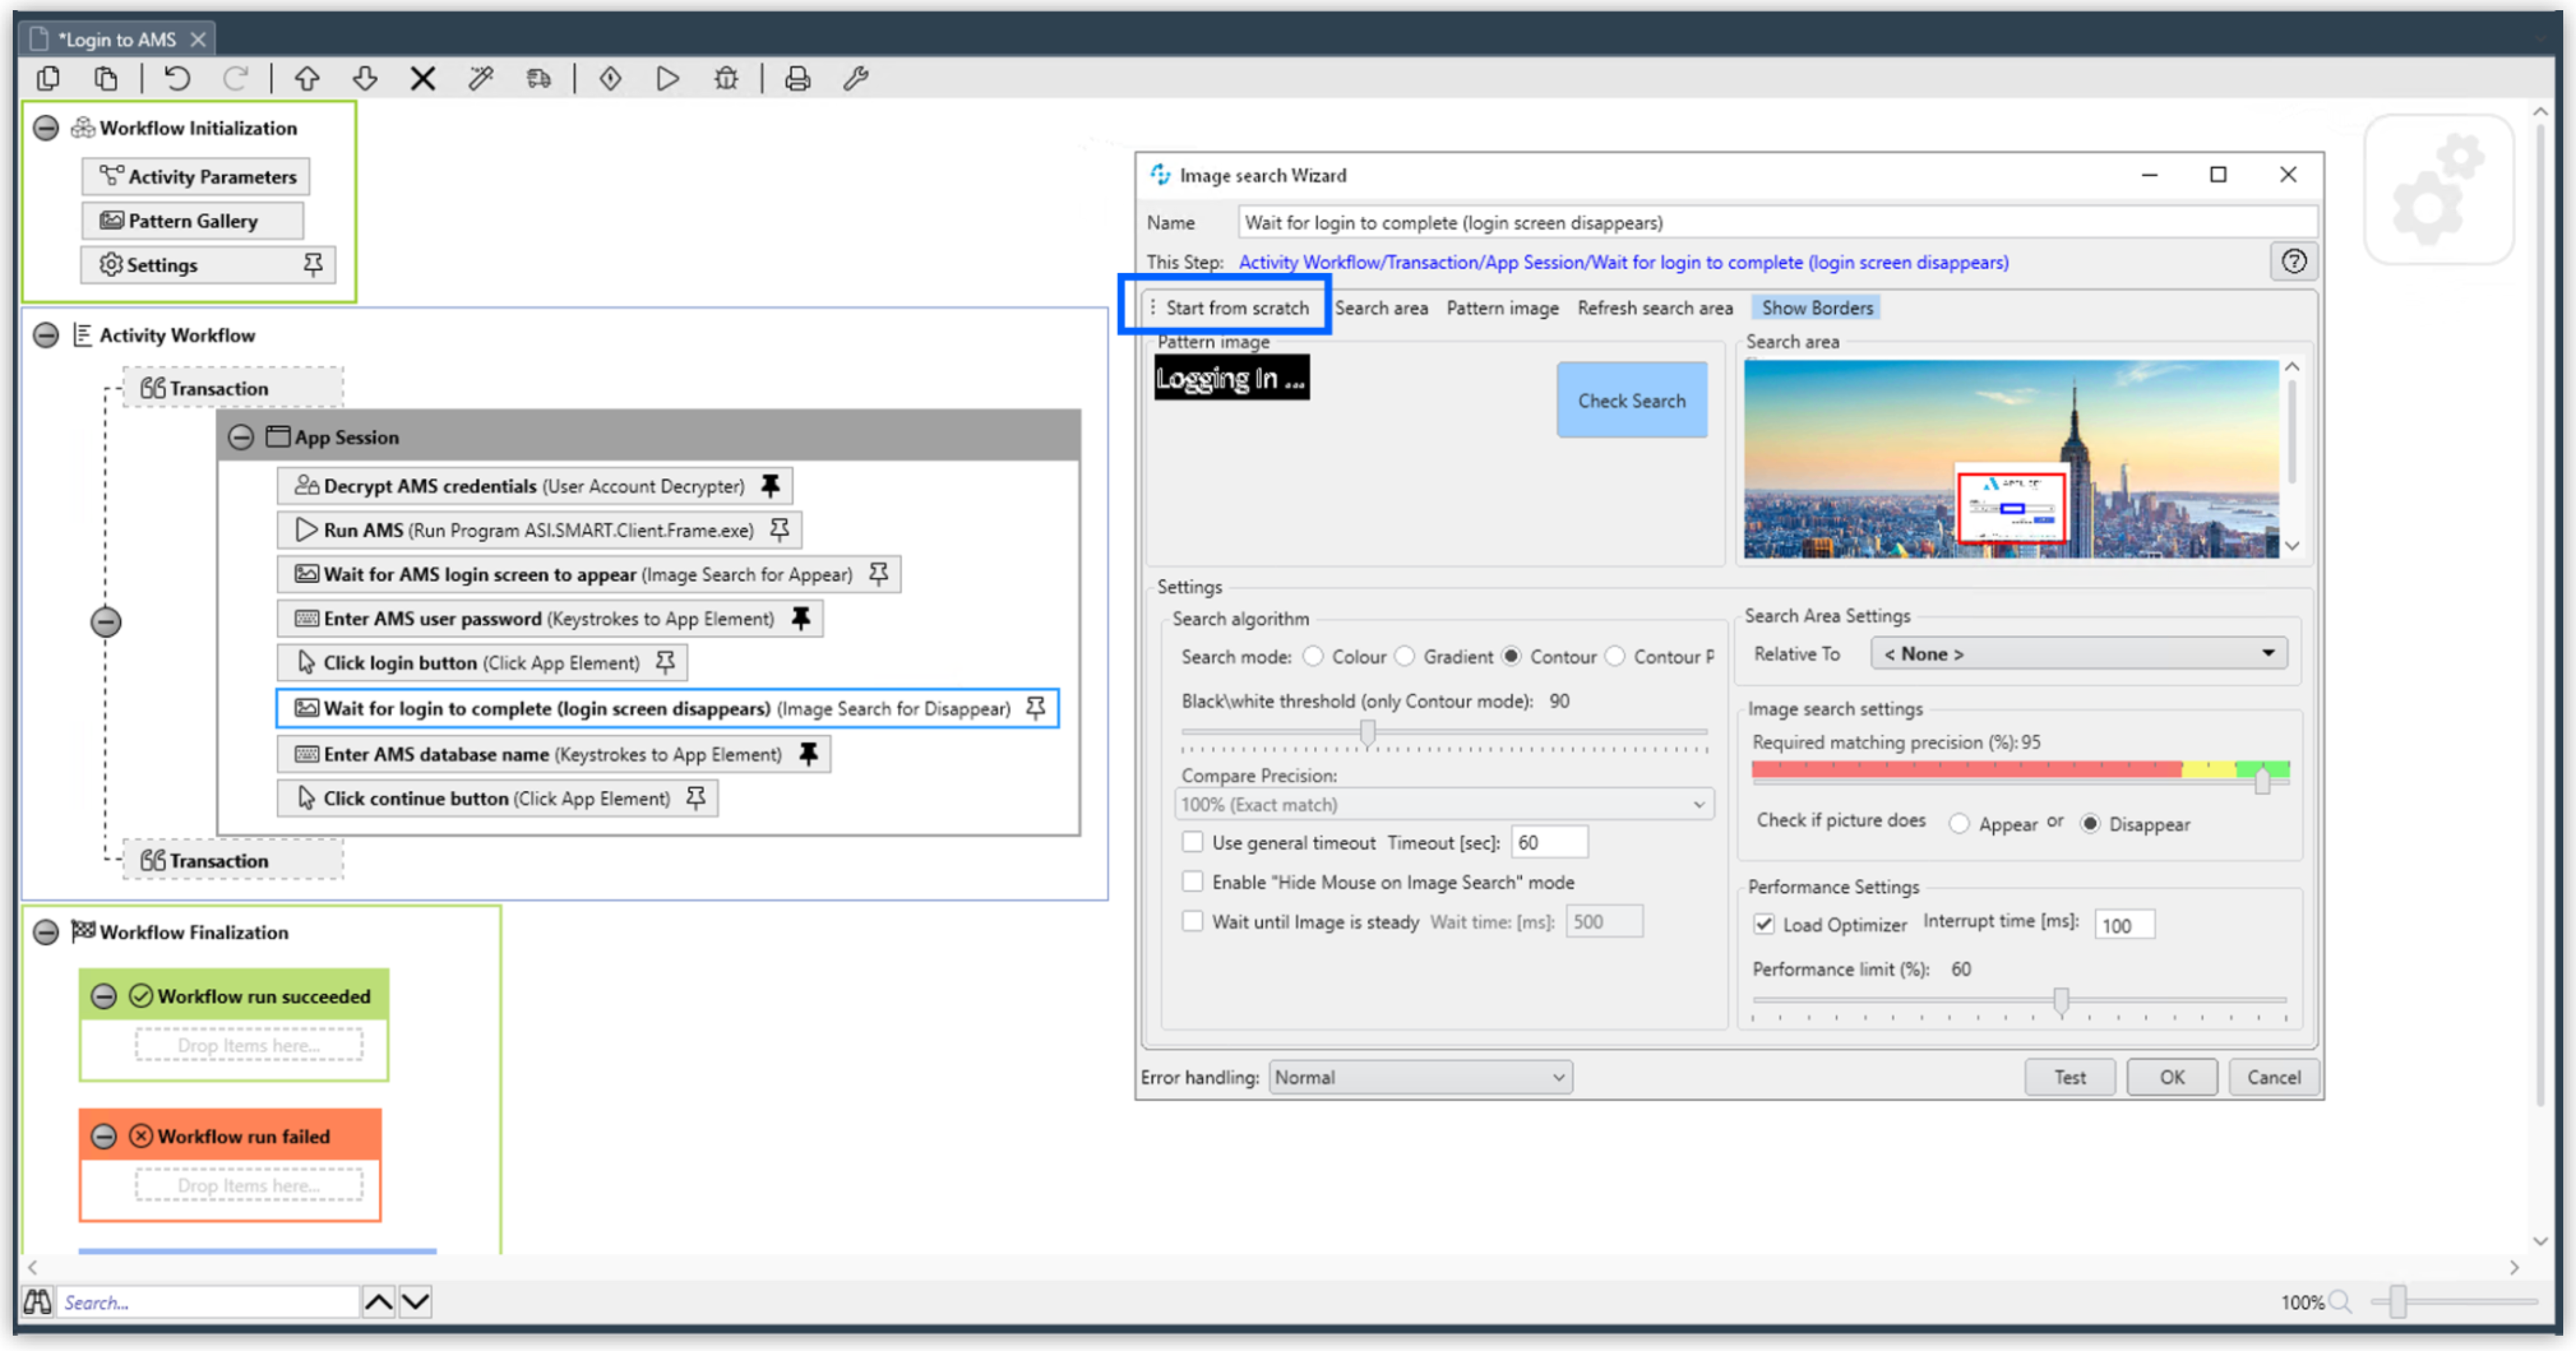
-
Wait for the login process to complete by choosing a pattern that disappears after completion:
-
Adapt the other Action Steps of the same types in a similar way. Or, add or delete Action Steps based on what is needed to log in to your AMS.
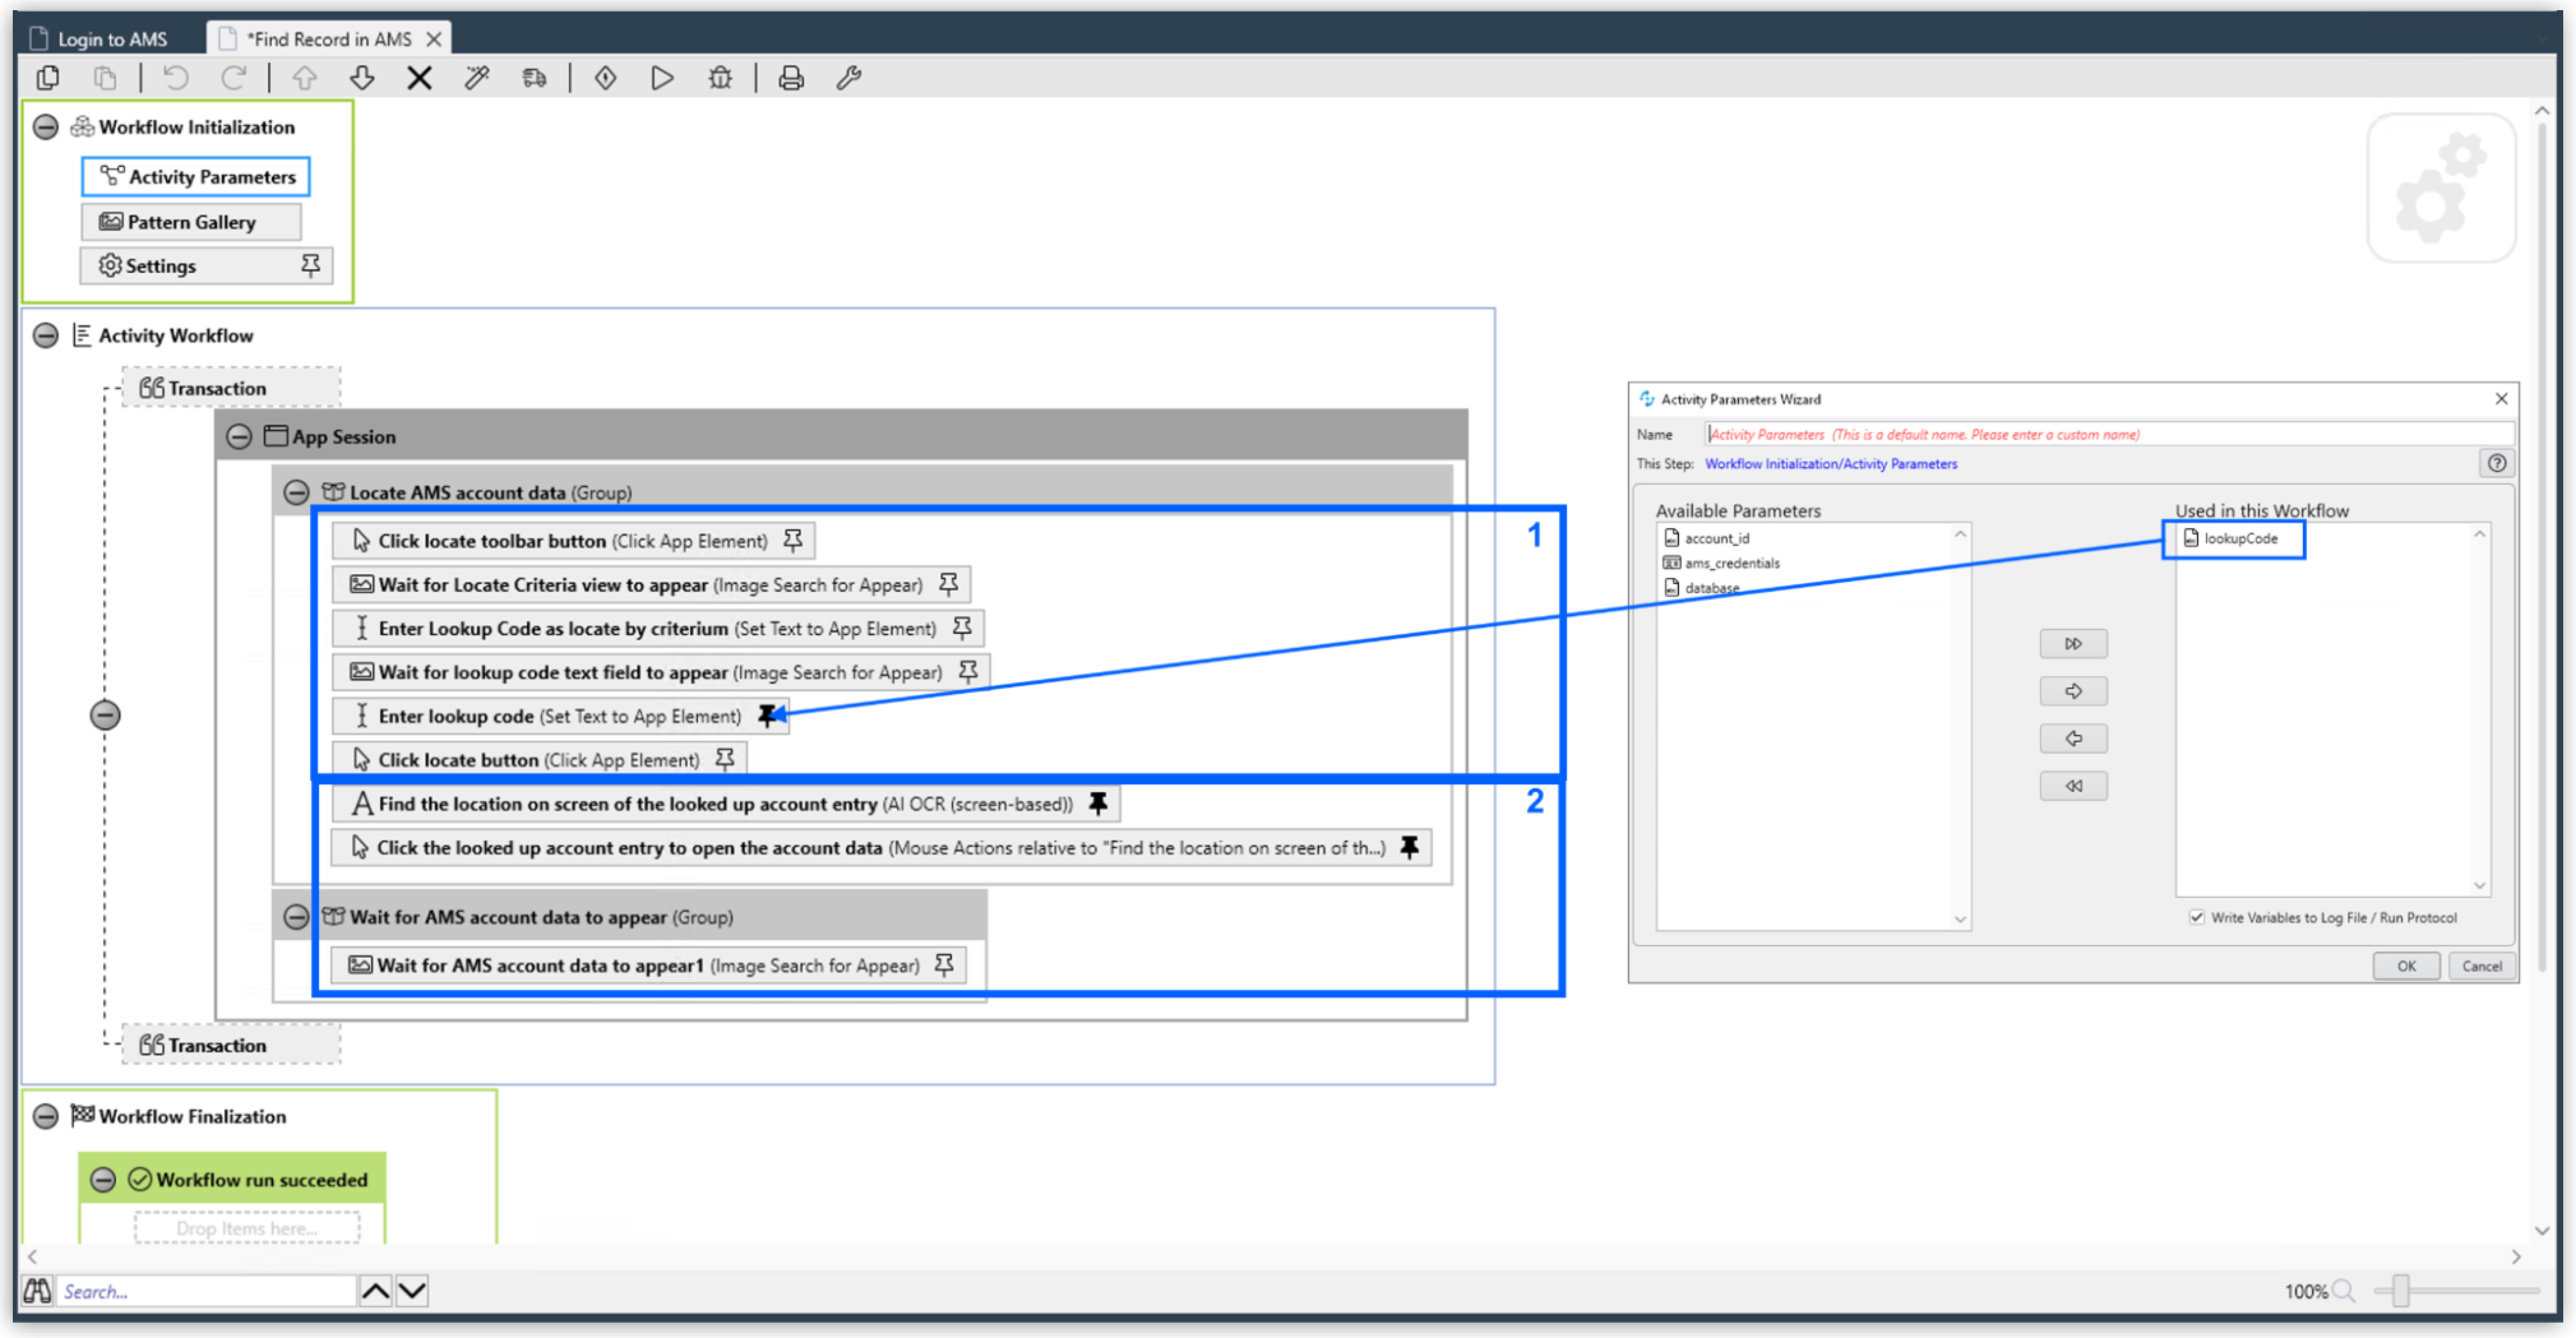
Activity 2: Find a Record in the AMS
The second activity finds a record in the AMS by using a lookup code.
-
Enter the lookup code, which was provided as an Activity Parameter, as locate criterion to search for the account data set.
-
Click on the result entry to open the account data, and then wait until it’s fully loaded.
Change the following Action Steps:
-
Adapt the first Action Steps as you did in the previous Activity.
-
Adapt the scan area in the AI OCR Action Step in which RPA Bot searches for the record entry with the lookup code:
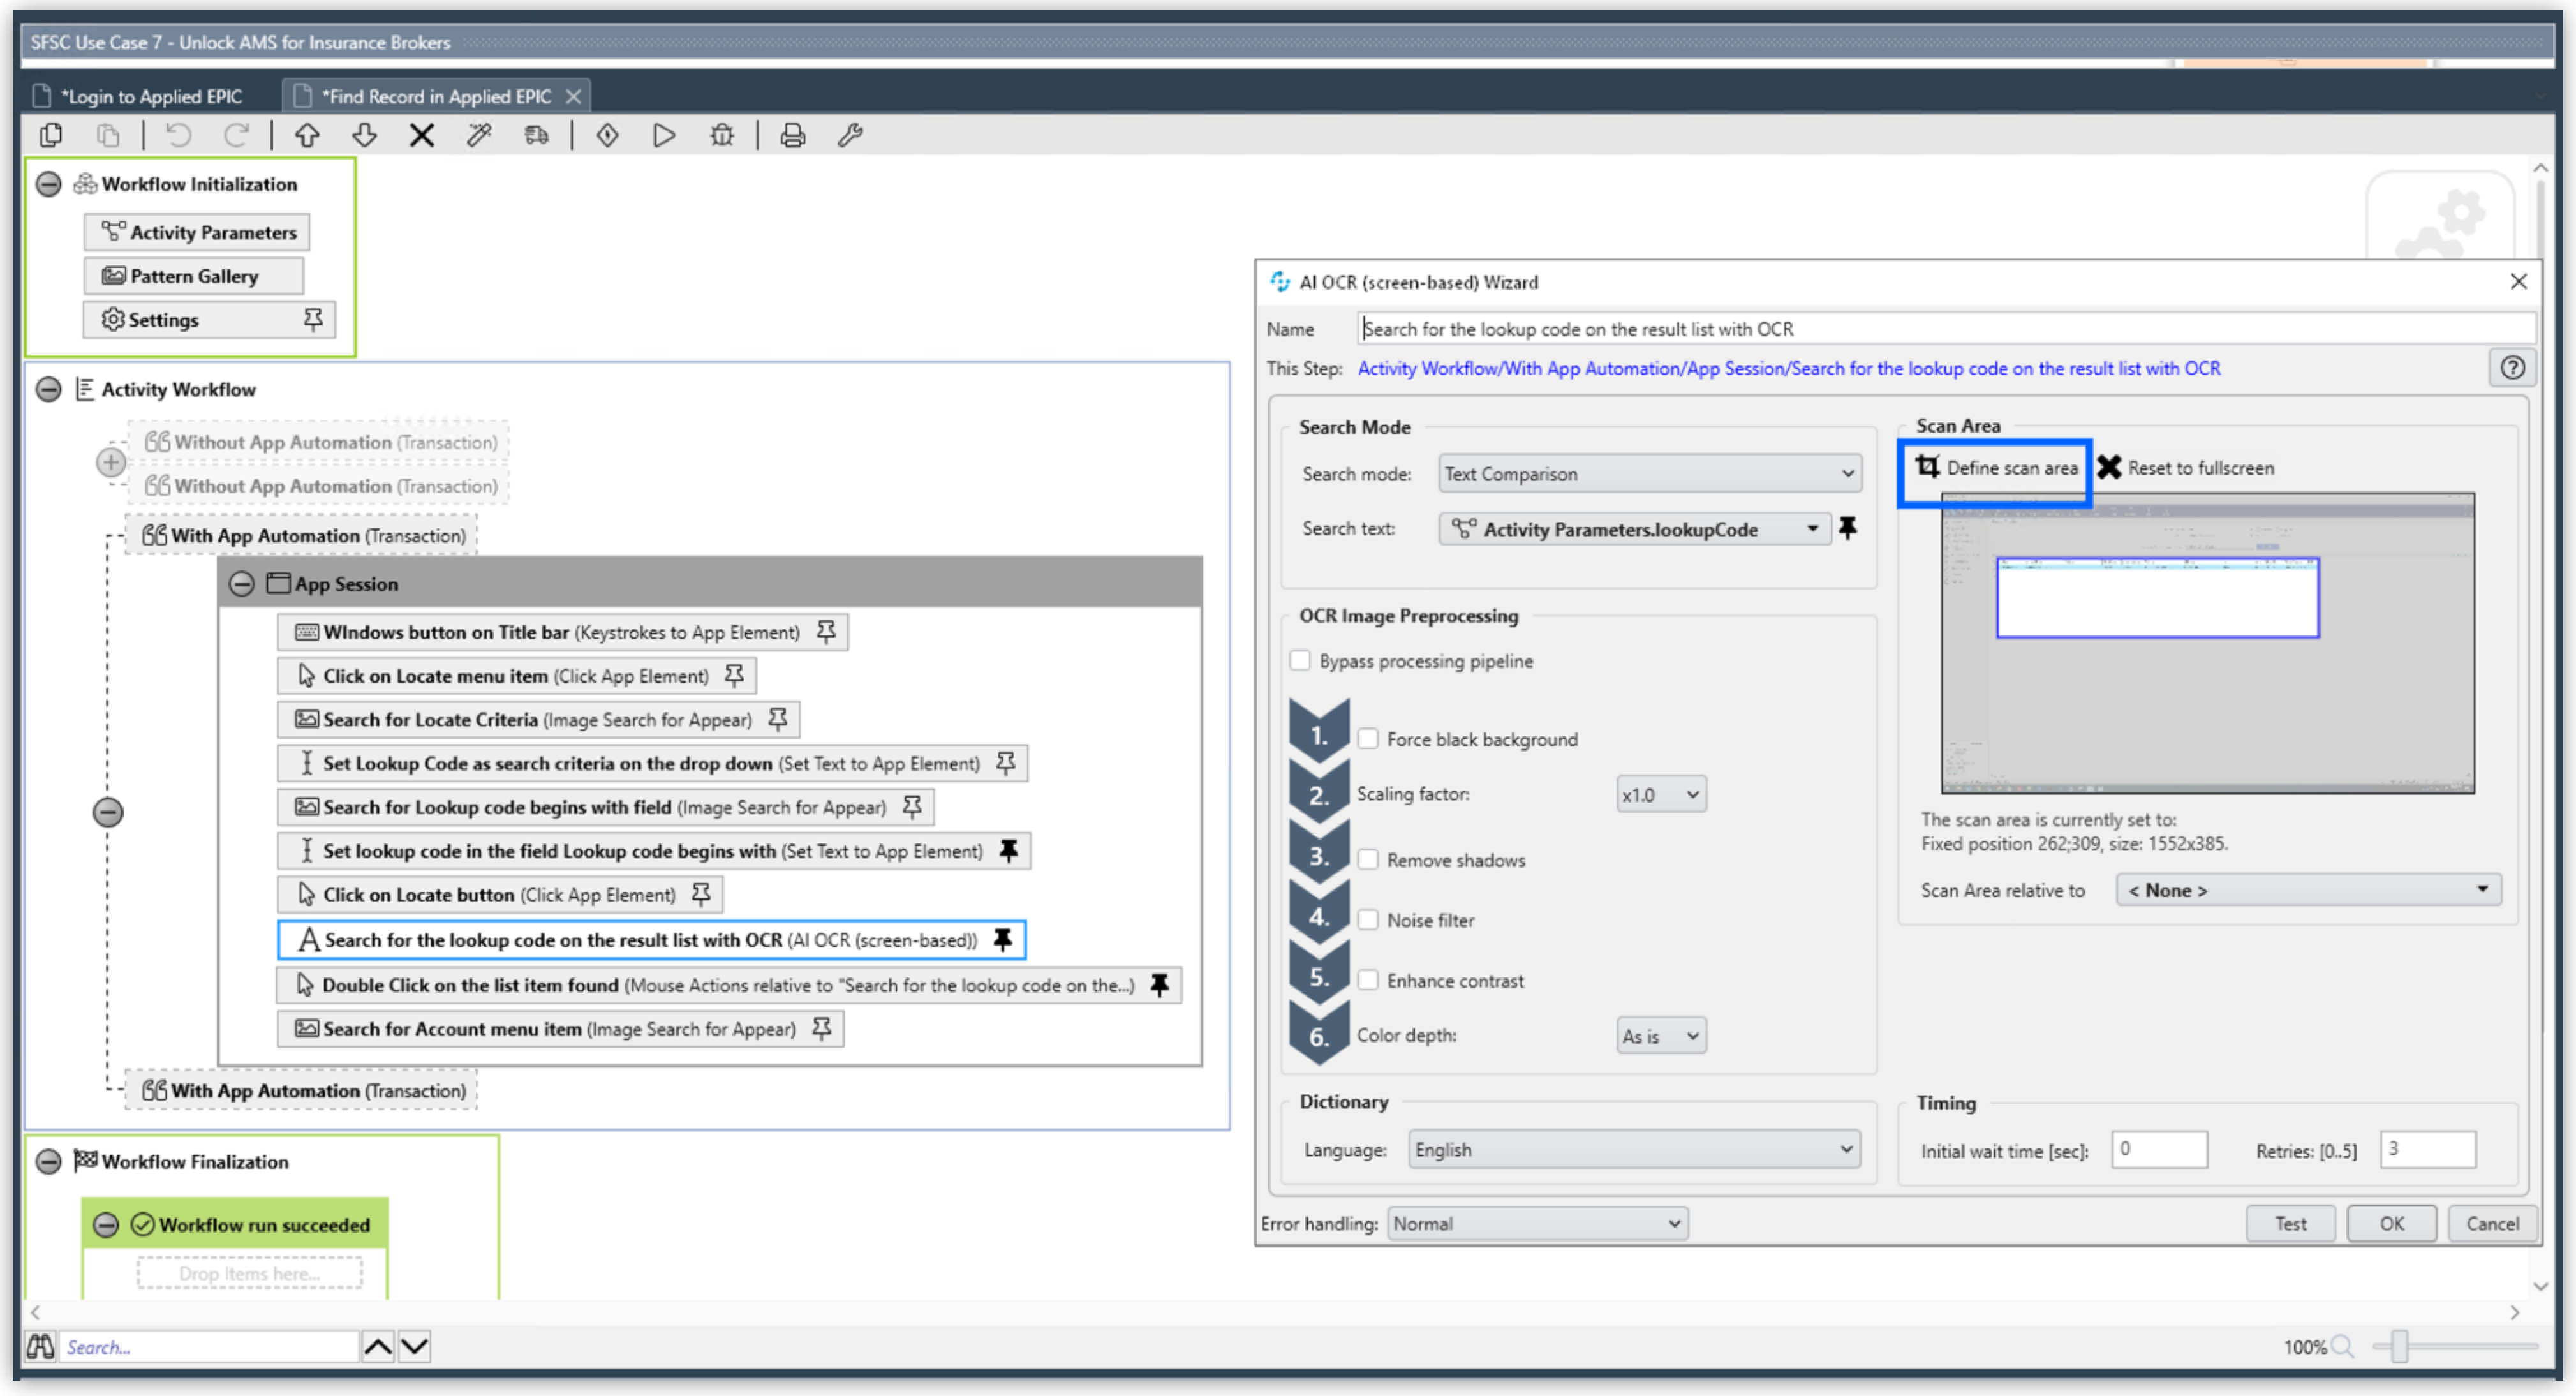
-
Adapt the rest of the Action Steps as you did in the previous Activity.
Activity 3: Retrieve and Export Data from the AMS
The third activity retrieves data and exports the data from the AMS so that it can be imported to Salesforce Financial Services Cloud.
-
Retrieve account data.
-
Retrieve the policy data of the account.
-
Export the data to a CSV file.
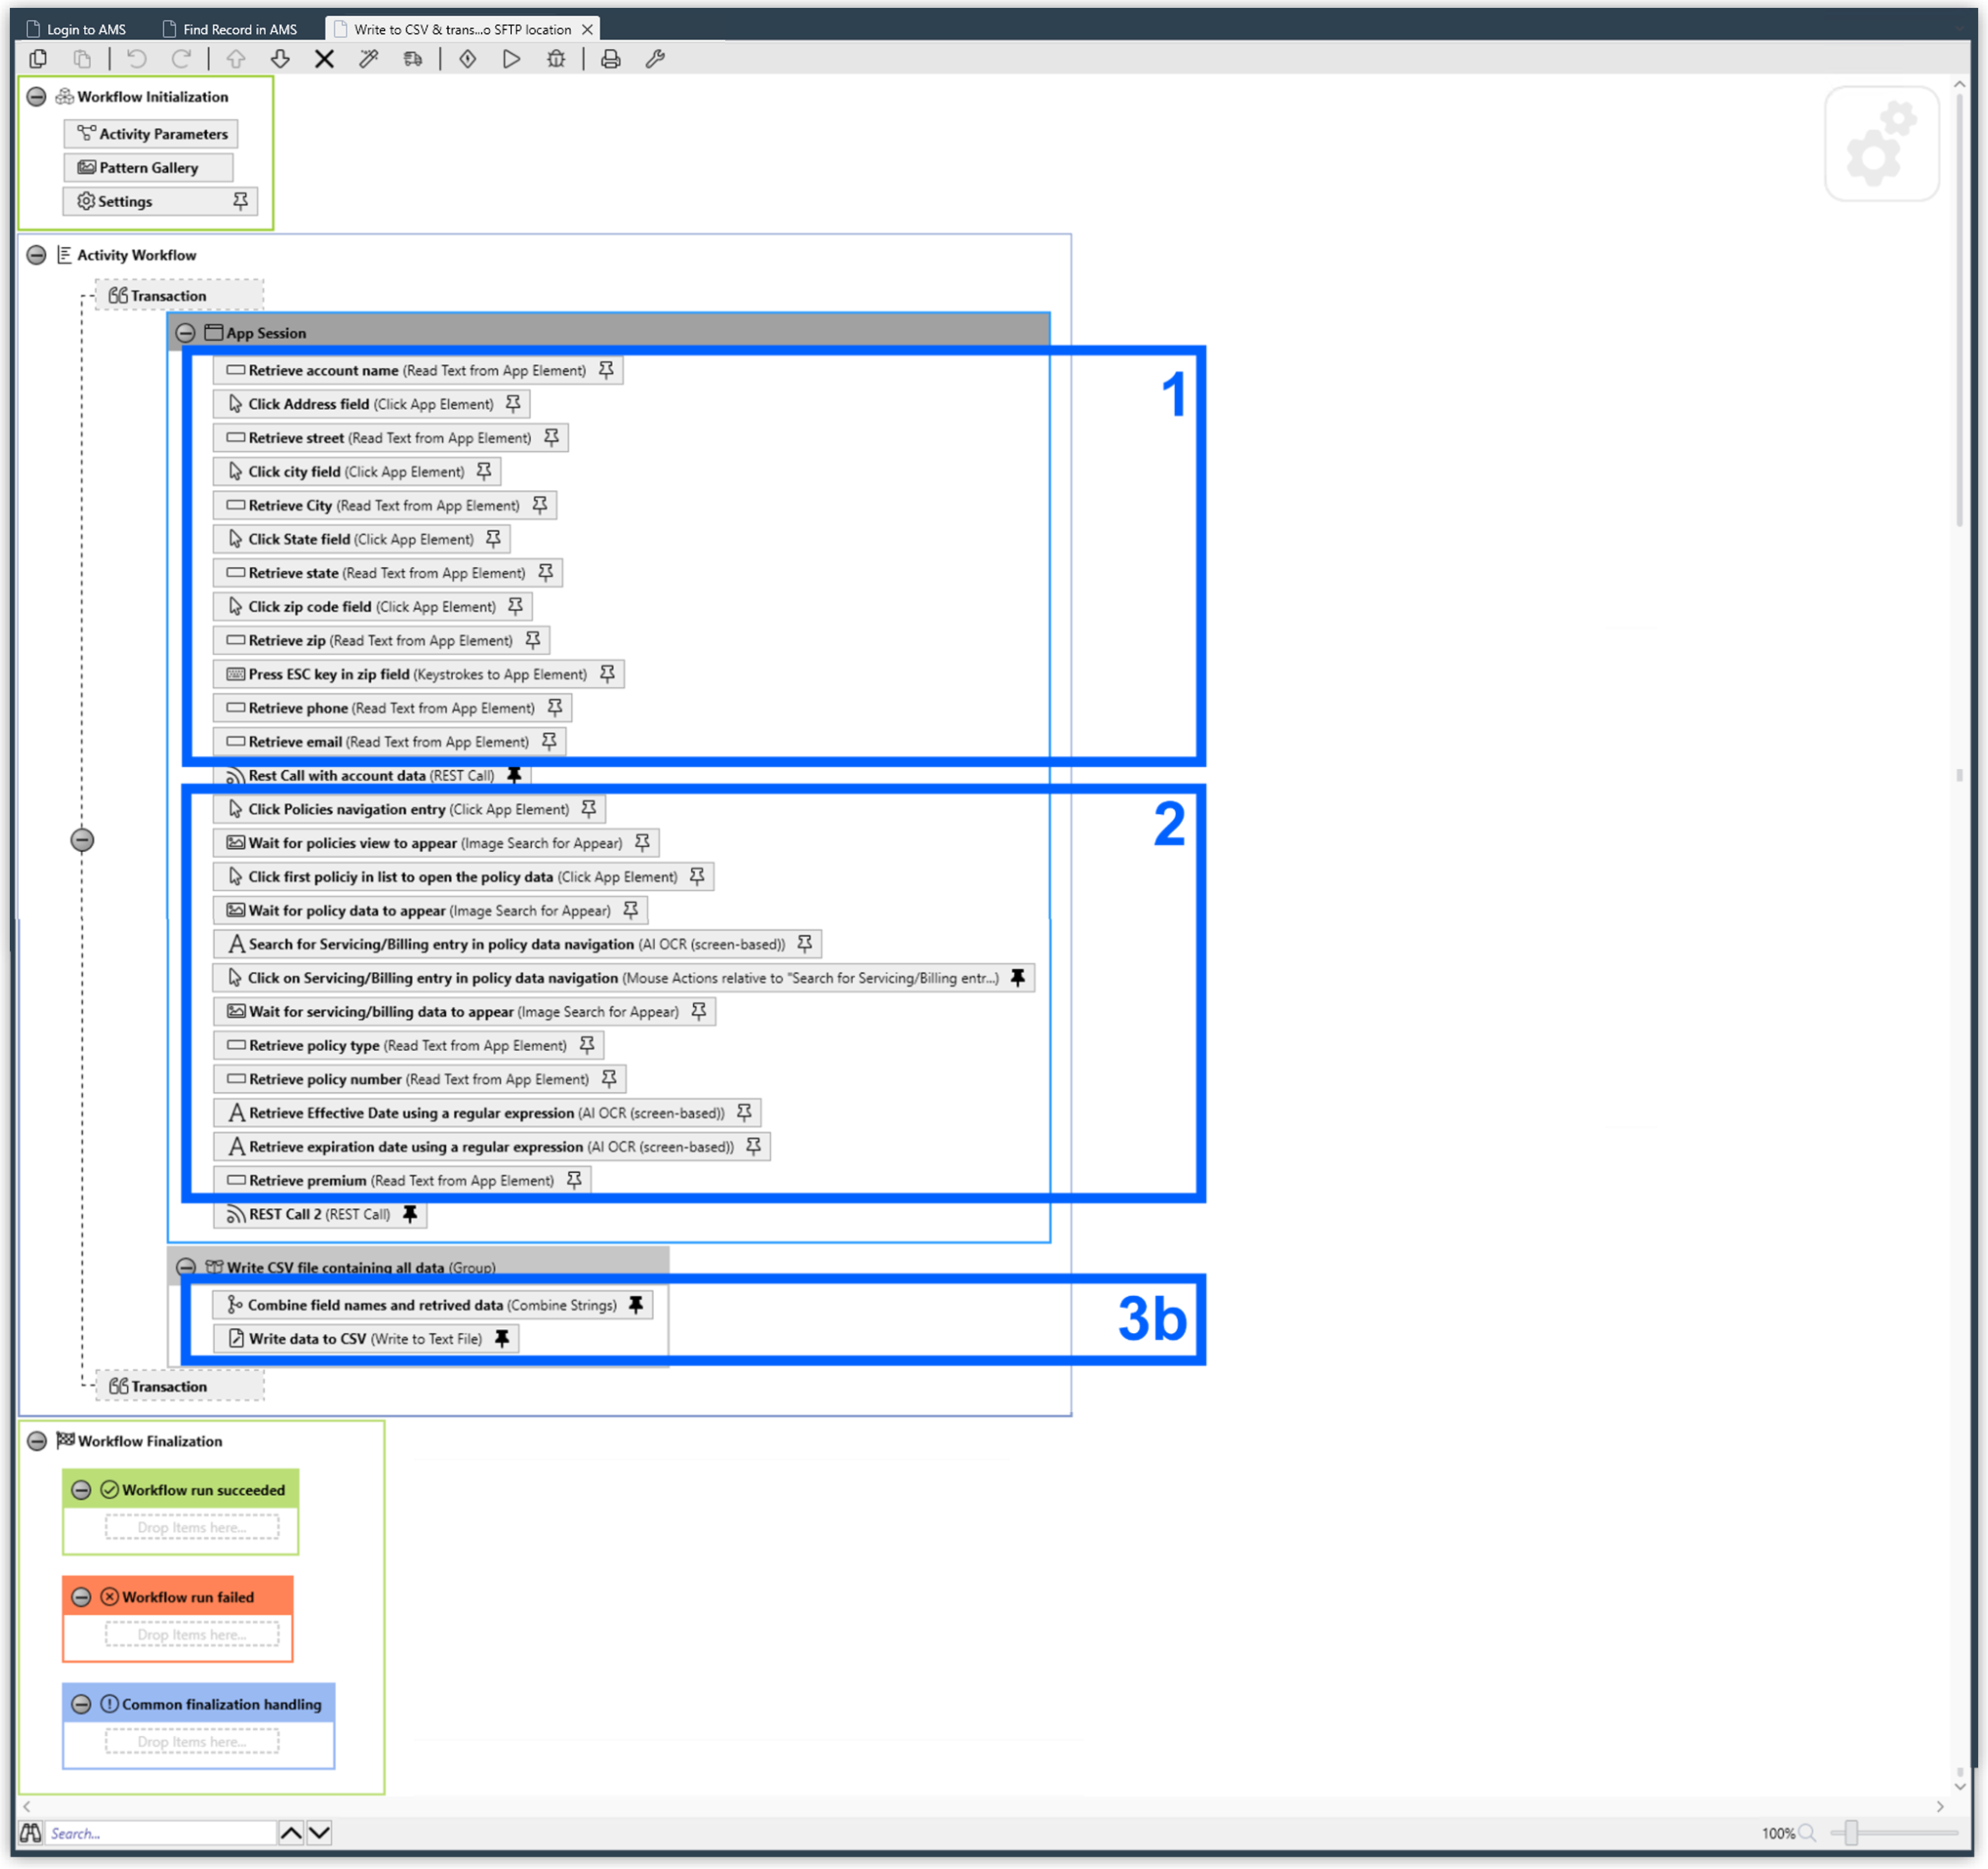
Change the following Action Steps:
-
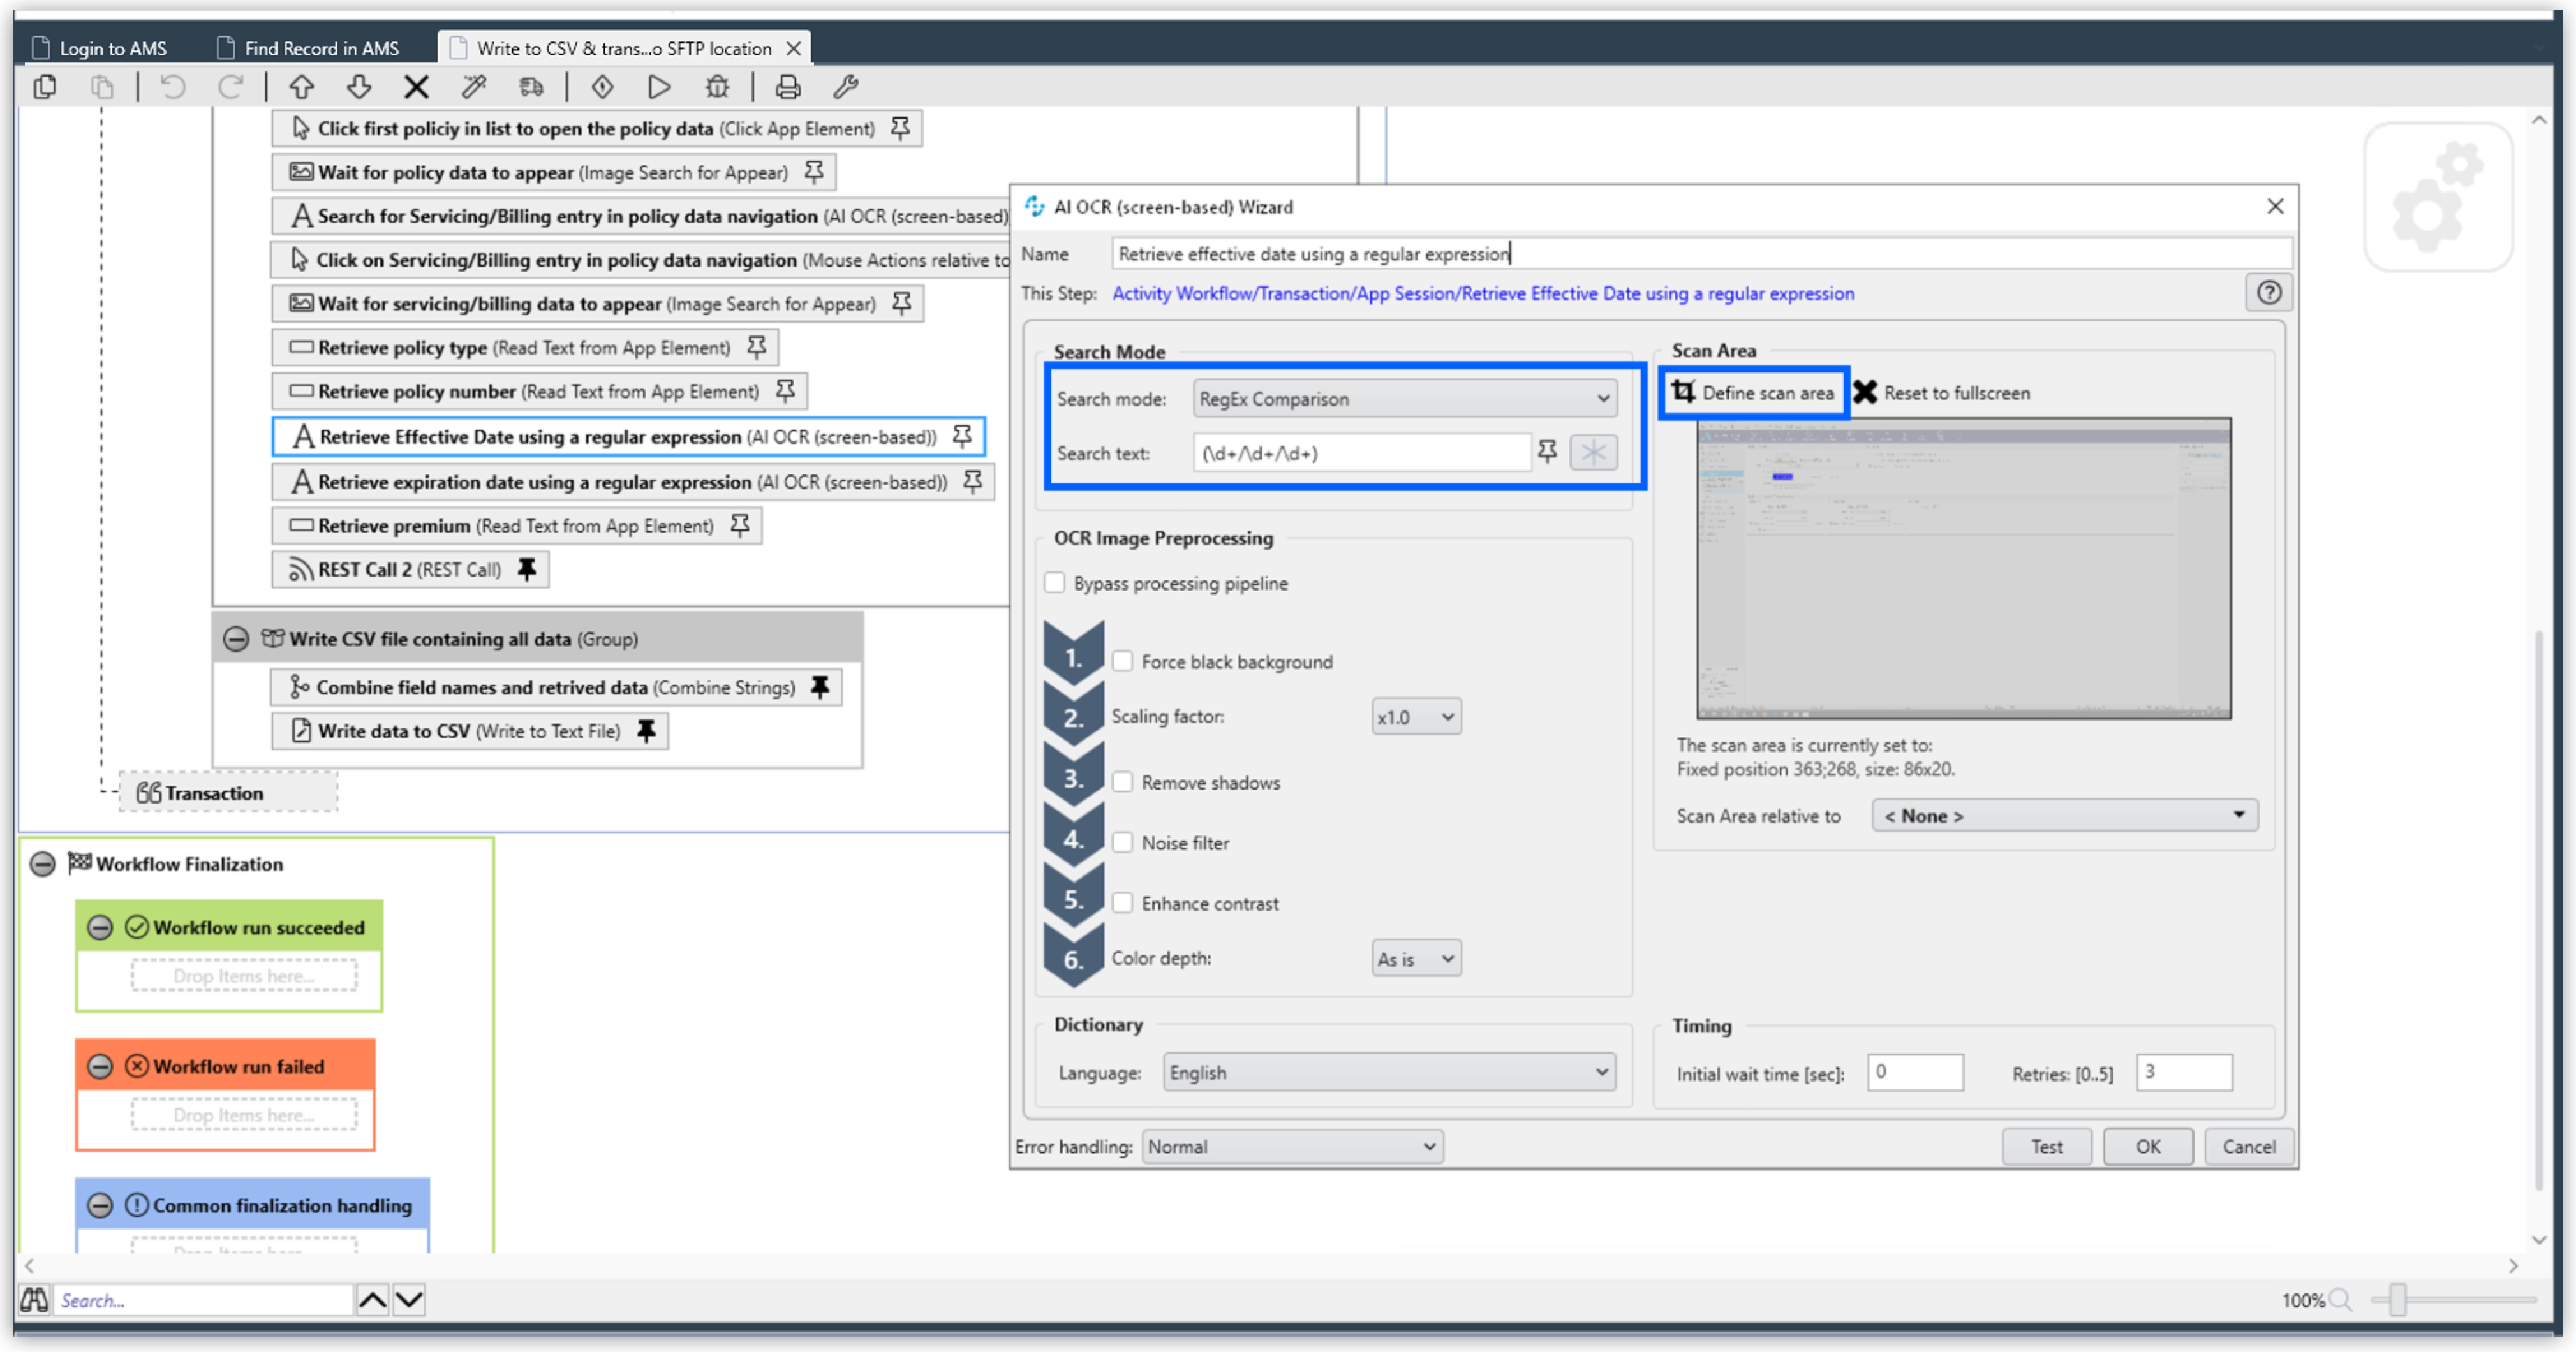
To retrieve the data, reidentify the fields from which to read in each of the Read Text from App Element Action Steps and add or delete them as needed.
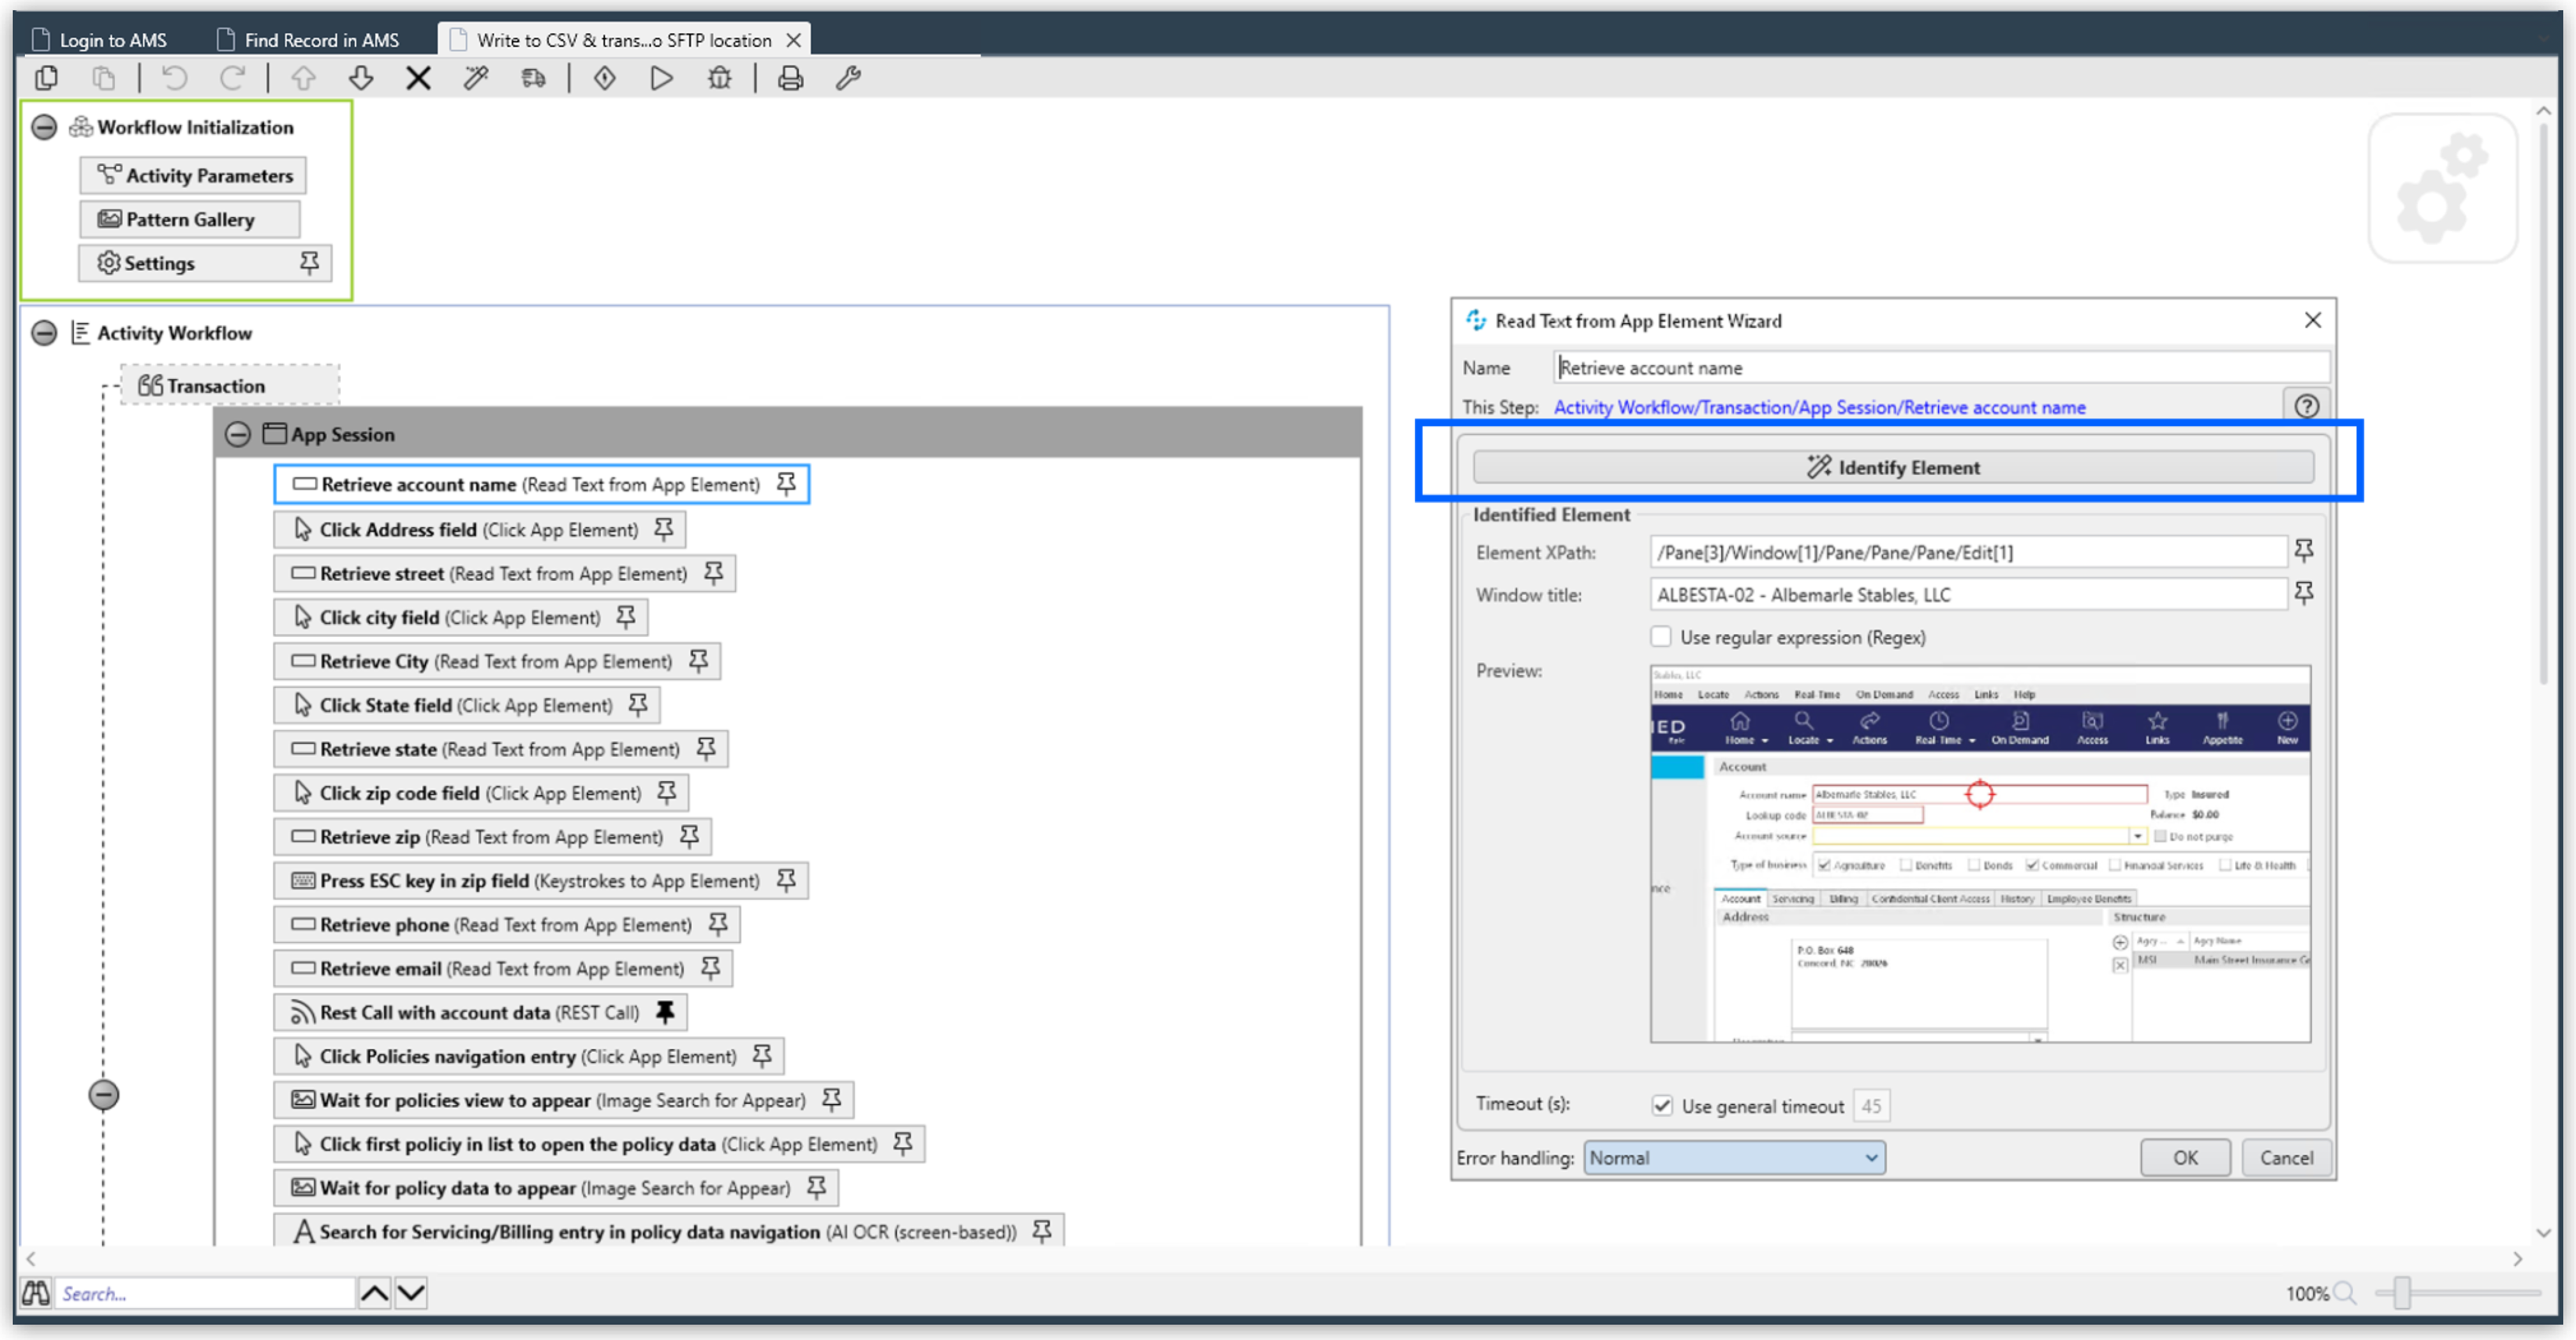
If necessary, click into a field before reading the text and then use a keystroke to get out of the field.
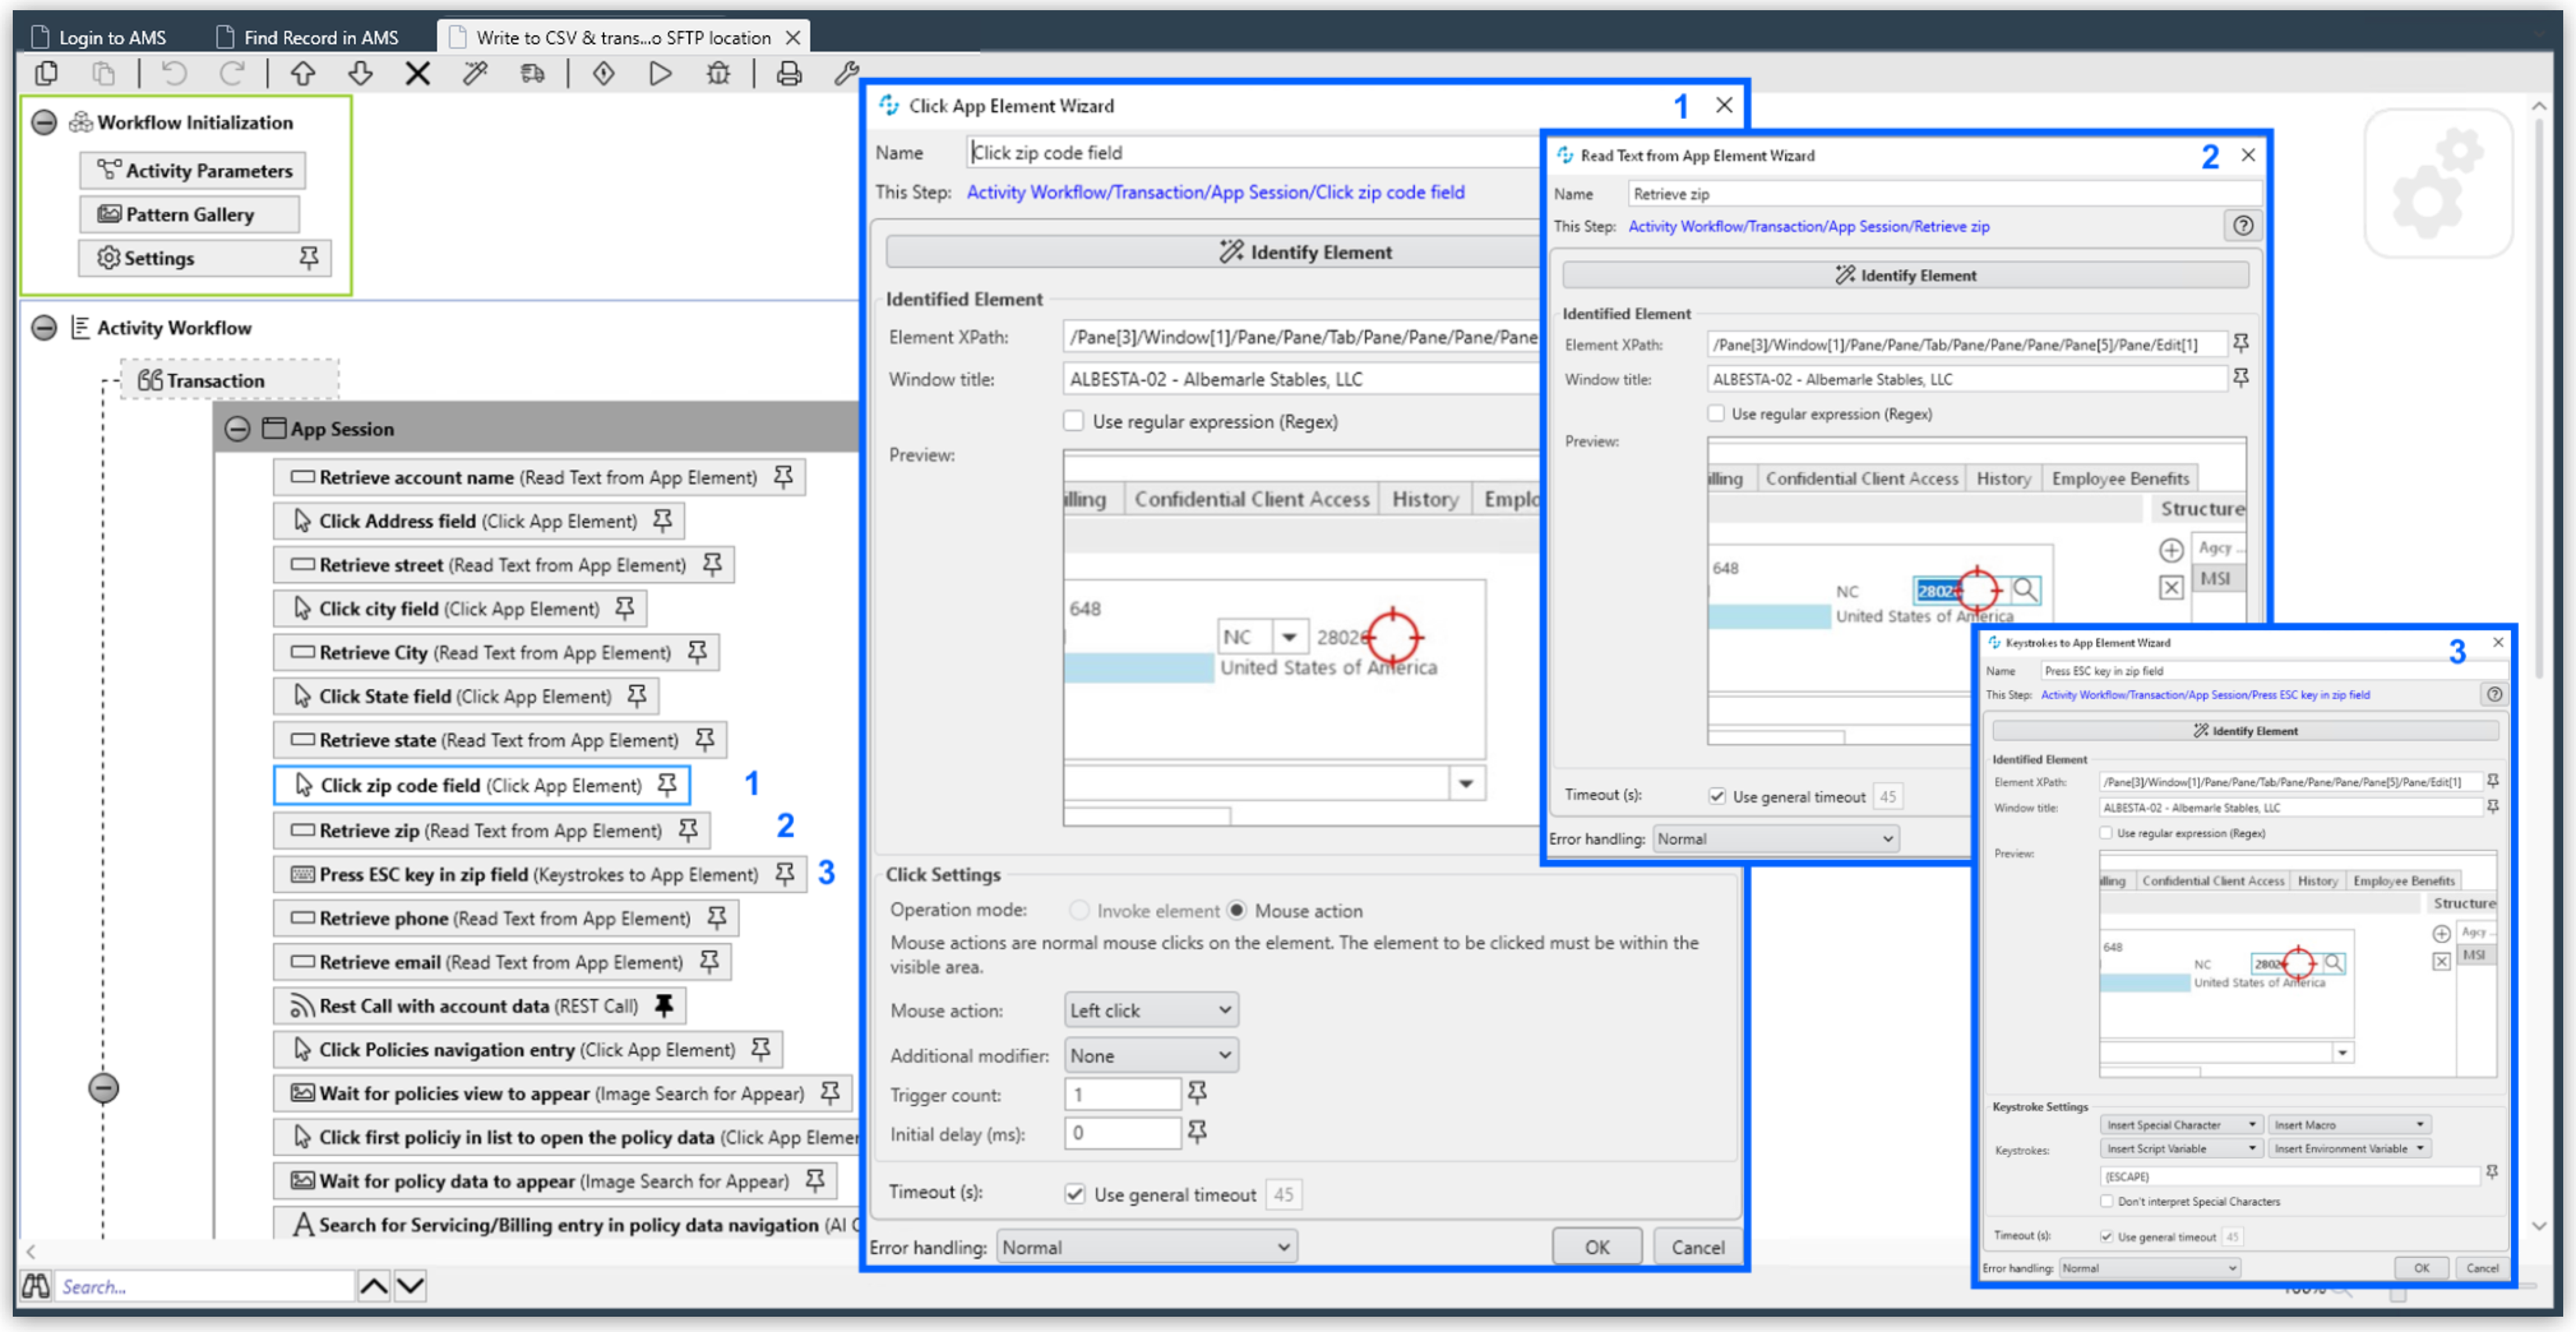
To search for text in a special format, you can use Optical Character Recognition in combination with regular expressions.
-
Ensure that all retrieved data is pinned to the Combine Strings Action Step and adjust if necessary. You can also link more Activity Parameters.
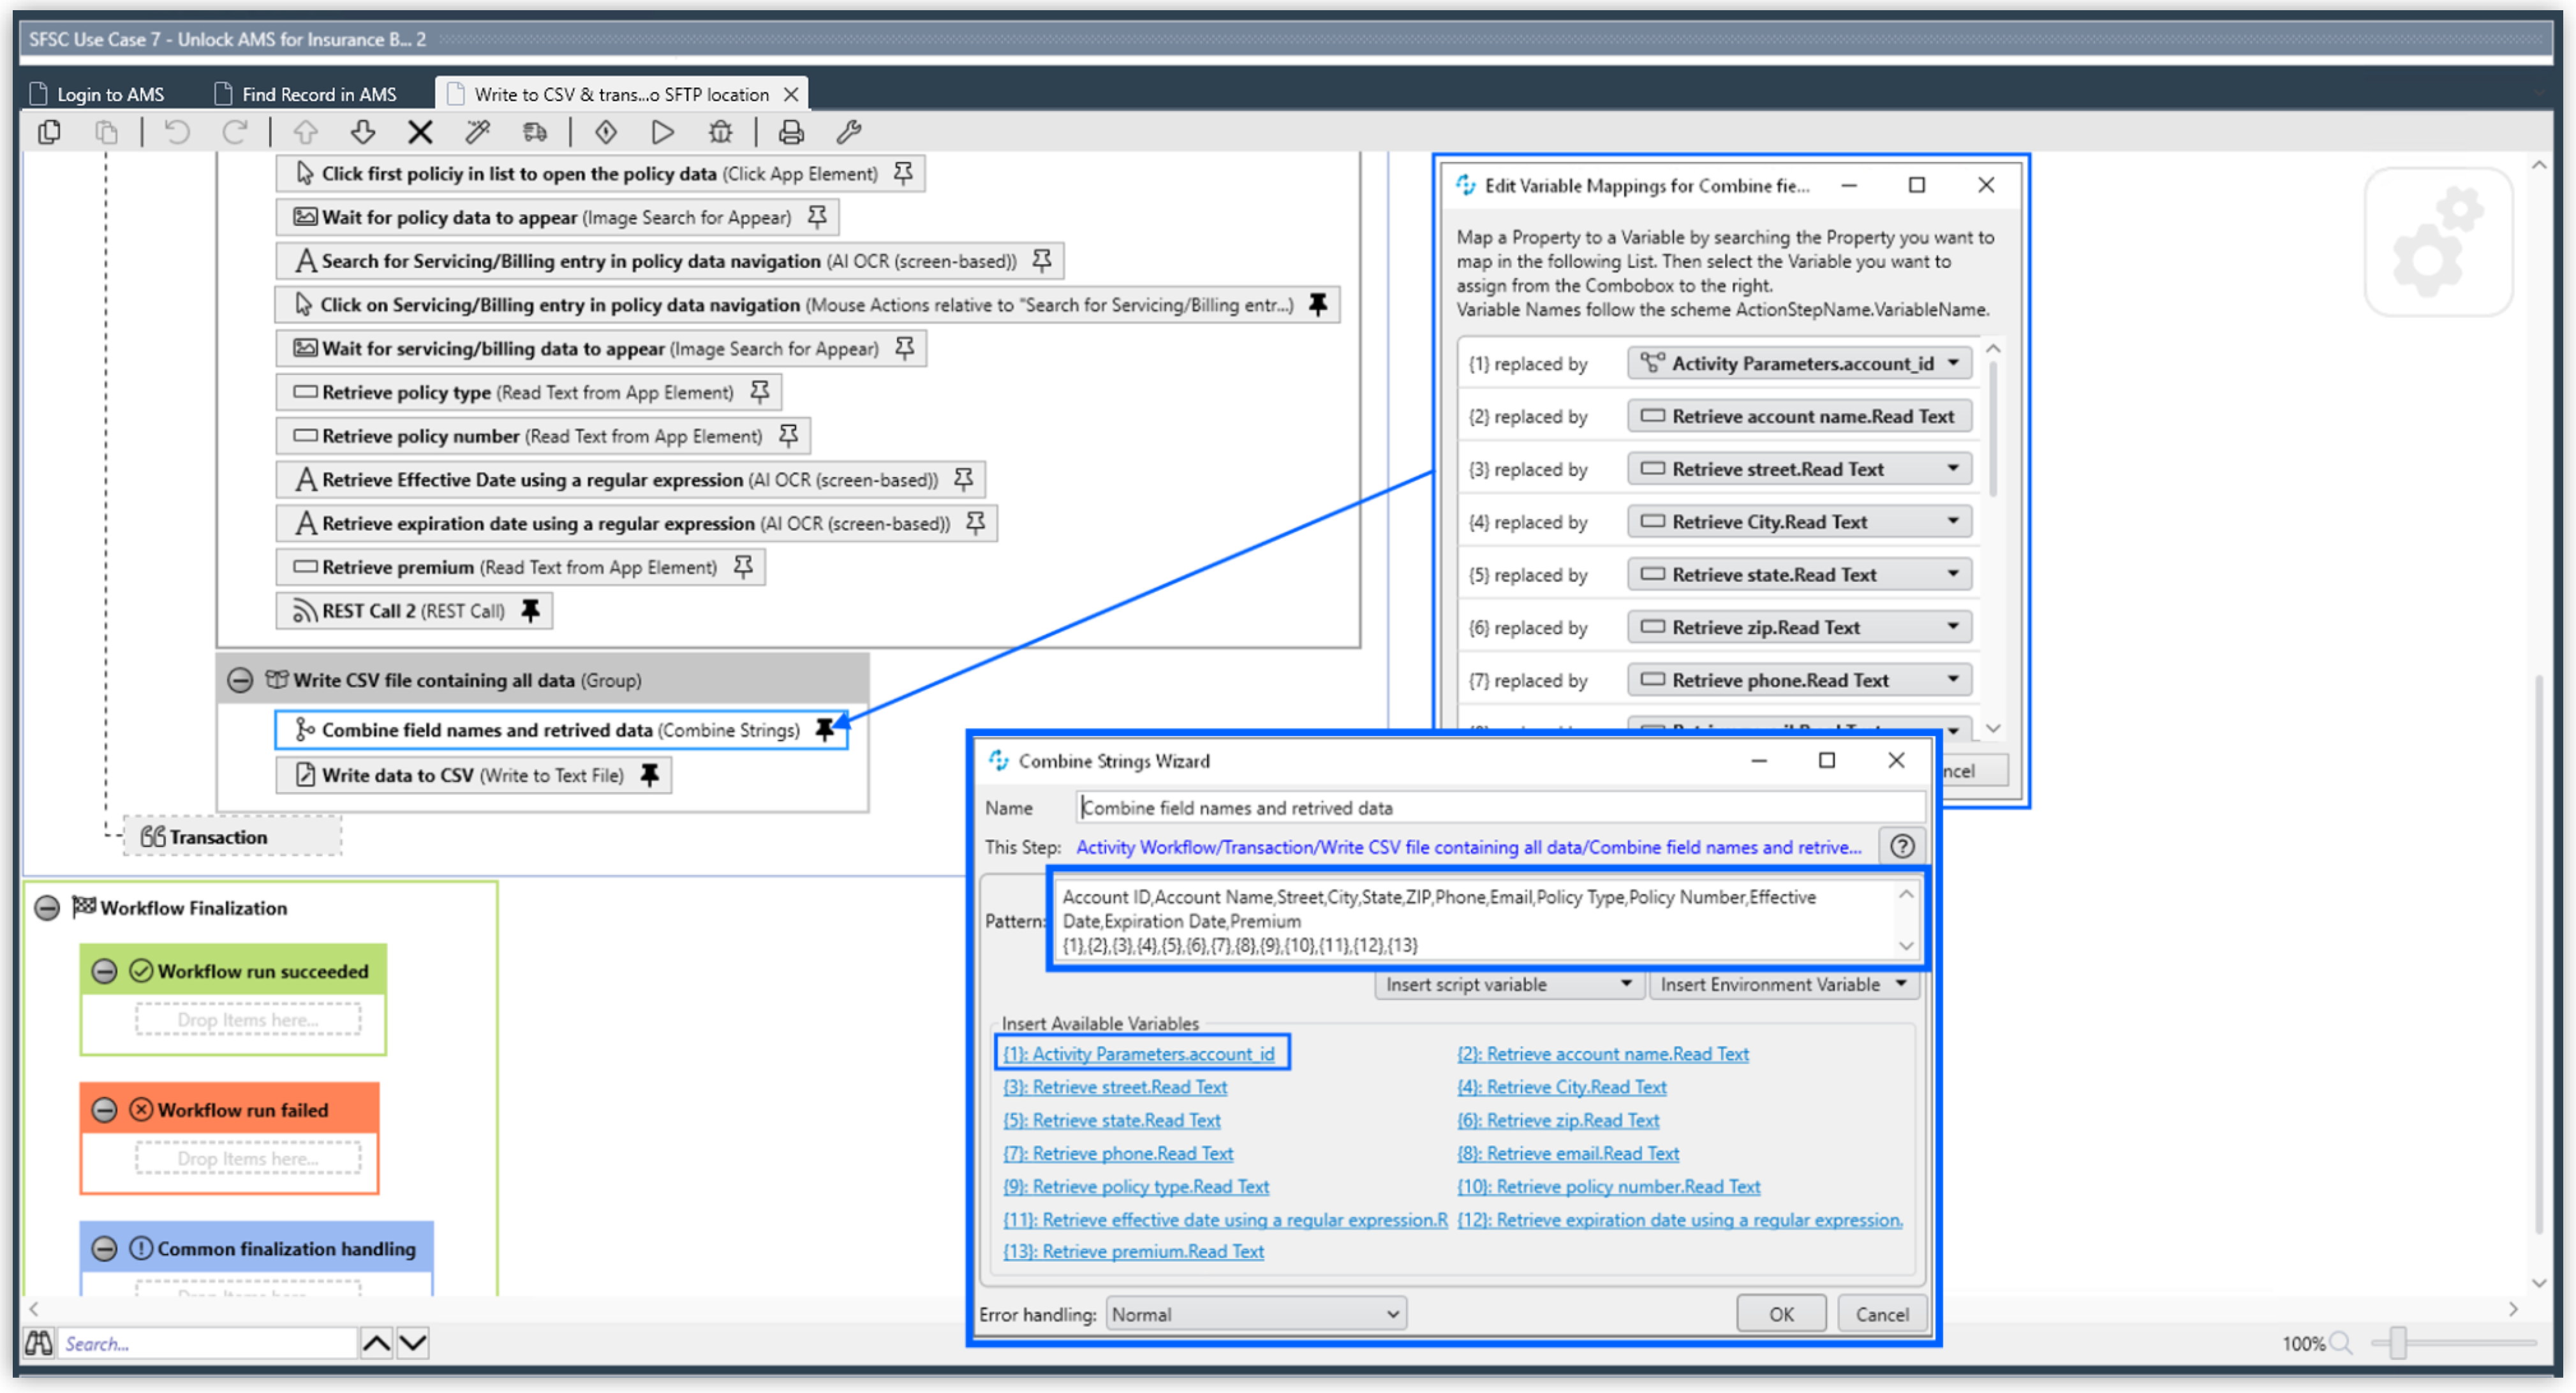
-
Add the string to a CSV file as
Pin Variableand adjust the properties as needed. The CSV file must be in the specified format.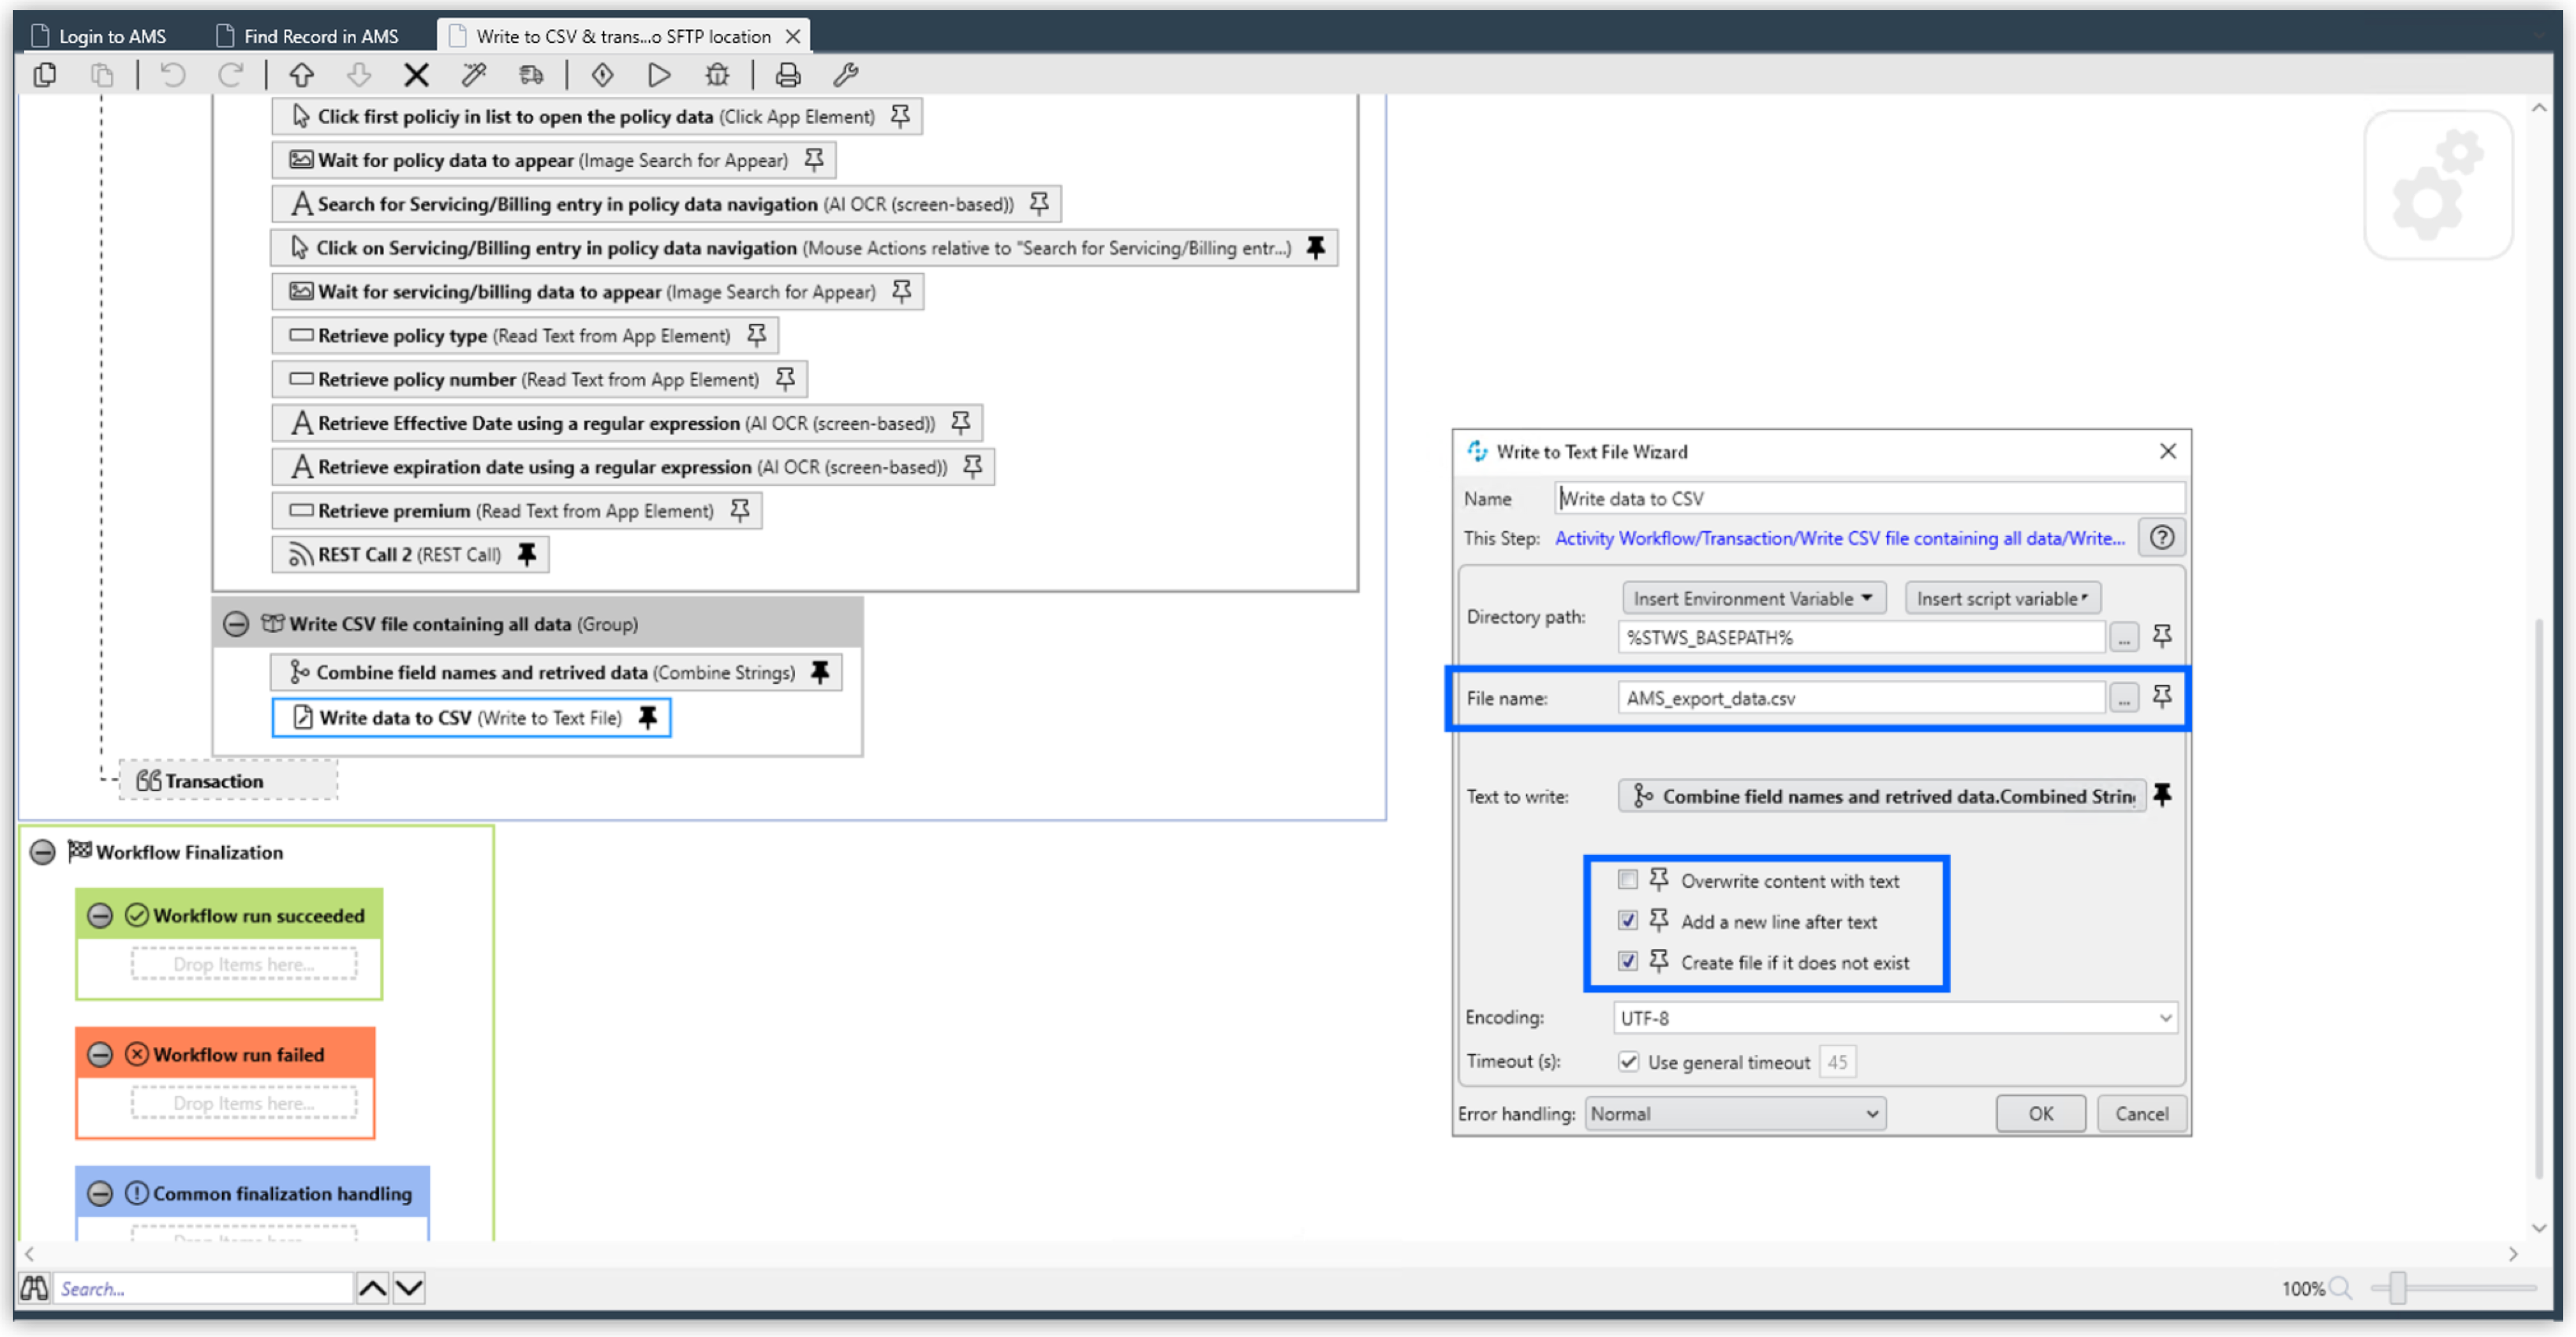
See Also
-
Salesforce Help: Account
-
Salesforce Help: Prepare a CSV File for an Import or Update in Salesforce
-
Salesforce Help: Standard Objects